The old fashioned feeders are quickly becoming a thing of the past. Although they may still work for some, people are finding themselves frustrated at the fact that their chickens are either pooping or kicking bedding into the feeder, which can quickly spread illness and disease.
A properly constructed gravity feeder is the solution to most feeder problems. It can contain as much or as little feed as the handler wishes to keep, it prevents any possible way for chickens to get waste into their food, and it will keep the contents dry and pest free. If you are looking for an alternative means of providing your girls crushed oyster shell other than in a bowl, this will accommodate that offering as well.
All of the materials needed to construct these feeders can be found at your local home improvement store. The tools required should be available in most everyones home or by borrowing from a neighbor.
Tools needed:
- Tape measure
- Power drill
- 1/4" Drill bit
- 7/16" socket and 7/16" wrench or adjustable wrench
- PVC primer (clear or purple)
- PVC cement
- A hand saw or PVC pipe cutter capable of cutting up to 4" PVC.
Materials needed:
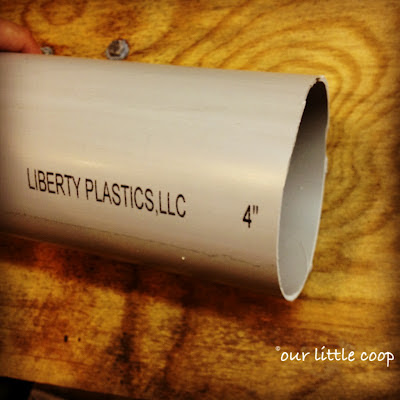
- 24" of Schedule 35 PVC. This is a grey pipe and is used as waste pipe.
*(Regular Schedule 40 PVC will not work properly as noted in my explanation)

Schedule 35 PVC waste pipe
- (2) 1/4"x 1" length bolts, washers, and nuts
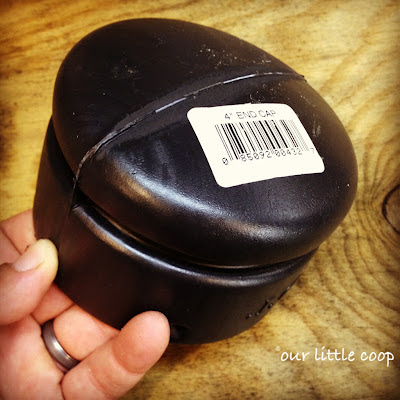
- 4"Black corrugated waste drain cap

Corrugated waste pipe end cap
- PVC fencing post cap
- 4"x 2"x3" waste pipe fitting. This is found near the corrugated waste pipe and can be used for tying in downspouts.

PVC fence post cap (left) Downspout adapter (right)
Start out by taking the fence post cap and slipping it over the square end of the waste pipe fitting. This will be a snug fit. On the lip of the post cap, measure 1" from the end and mark a dot on either side. "Carefully" with the 1/4" drill bit, drill a hole thru these marks and slightly ream out to remove any burrs.

Drill a 1/4" hole on either side 1" in from the corners
Push the 1/4" bolts into each one of these holes, and by reaching into the circular opening of the fitting, slide a washer and thread a nut on each of the two bolts. Tighten enough where these connected fittings can just barely hinge apart.

Poultry gravity feeder assembly
With the PVC primer, lightly coat one end of the pipe approximately 2" down and the opening side of the fitting you just constructed. Apply a light coat of PVC cement and firmly slide the fitting over the end of the pipe and hold in place for 10 seconds.
Slide the black cap over the top, and you are done!

The handy cap keeps out dirt and debris.
Mounting can be done in several different ways. In my very first picture, you will see I used a chimney pipe bracket, but a couple of heavy duty zip ties will work as well if mounting to a fence post or such. Be creative!

Build multiple feeders for larger flocks.
Waterer:

Chicken water nipples screwed into PVC cap
The gravity waterer is constructed in almost the exact same manner except with the use of a 4" slip cap and as many water nipples as you would like to use. I always recommend a minimum of at least two nipples just incase one fails. Check the operation of this waterer daily.
Fill and ENJOY!
Cheers ~ Kevin
*********Please subscribe, comment and share!************
Tools needed:
- Tape measure
- Power drill
- 1/4" Drill bit
- 7/16" socket and 7/16" wrench or adjustable wrench
- PVC primer (clear or purple)
- PVC cement
- A hand saw or PVC pipe cutter capable of cutting up to 4" PVC.
Materials needed:
- 24" of Schedule 35 PVC. This is a grey pipe and is used as waste pipe.*(Regular Schedule 40 PVC will not work properly as noted in my explanation)
 |
| Schedule 35 PVC waste pipe |
- 4"Black corrugated waste drain cap
 |
| Corrugated waste pipe end cap |
- 4"x 2"x3" waste pipe fitting. This is found near the corrugated waste pipe and can be used for tying in downspouts.
 |
| PVC fence post cap (left) Downspout adapter (right) |
 |
| Drill a 1/4" hole on either side 1" in from the corners |
 |
| Poultry gravity feeder assembly |
With the PVC primer, lightly coat one end of the pipe approximately 2" down and the opening side of the fitting you just constructed. Apply a light coat of PVC cement and firmly slide the fitting over the end of the pipe and hold in place for 10 seconds.
Slide the black cap over the top, and you are done!
 |
| The handy cap keeps out dirt and debris. |
Mounting can be done in several different ways. In my very first picture, you will see I used a chimney pipe bracket, but a couple of heavy duty zip ties will work as well if mounting to a fence post or such. Be creative!
 |
| Build multiple feeders for larger flocks. |
Waterer:
 |
| Chicken water nipples screwed into PVC cap |
Fill and ENJOY!
Cheers ~ Kevin
*********Please subscribe, comment and share!************


-2.jpg)
.jpg)


Where did you get the PVC fence post cap? I went to Home Depot and Loews, but they didn't have anything like what is pictured. Is the cap square or rectangular?
ReplyDeleteask for schedule 35 4"Black corrugated waste drain cap. I bought at Menards
DeleteFound The sked 35 not in the plumbing side of the house but the drainage side outdoors with the black flex pipe.
DeleteI have been to 4 stores looking for the post cap that is pictured. The only thing that i can find is a "pyramid" style post cap. Any suggestions would be helpful.
ReplyDeleteask for schedule 35 4"Black corrugated waste drain cap. I bought at Menards
DeleteWhere do you get the water nipples? would they have them at a feed store?
ReplyDeleteEbay
DeleteCan you suggest a good place to purchase new egg cartons?
ReplyDeletethanks,Becky
best prices are on ebay
DeleteWhy doesn't SDR 40 work? I can't seem to find your explanation anywhere..
ReplyDeleteask for schedule 35 4"Black corrugated waste drain
Deletethe parts needed won't fit on schedule 40 pvc
you can build this feeder with sched. 40 pvc.
Deletehttp://www.ourlittlecoop.com/2012/06/diy-pvc-gravity-feeder.html
How many chickens would a PVC feeder be able to accommodate?
ReplyDelete8-10 chickens
DeleteI like the idea here. In reference to the people looking for a cap - If you go to an electrical store, they make an end cap that is made to cover the end of the PVC.
ReplyDeletethank you
DeleteThis comment has been removed by the author.
ReplyDeleteLove this idea, and this will work with my mini potbelly pig with a pig nipple. Thanks!
ReplyDeleteyou are quite welcome!
DeleteThis comment has been removed by a blog administrator.
ReplyDeleteI love the style of this feeder. Approximately how many pounds of feed will it hold?
ReplyDelete10 + #'s
DeleteI believe this will be my choice...I have searched for homemade feeders. This looks to be the best design. How much feed will this one hold? Thanks so much for a great site! JoHanna
ReplyDeleteIt holds approxiamately 10 lbs of feed. you can make it larger to hold more,
DeleteWhere did you get that cap? Or do you know the maker? I use that style for a puppet I make. Can I buy yours from you?
ReplyDeleteI love your idea for this feeder but I ran into a small snag. Where did you buy the white FENCE POST CAP? I was able to find the black pvc schedule 35 cap that goes on the top but cannot find the cap where the food feeds out. Everything online doesn't have a lip on it for the bolt. We live pretty far out in the country and there are no electrical stores. Any help would be awesome!
ReplyDeleteYou said you bought it at Menards? On their website they call it a 4" New England Cap, sku#1128922. And it says they can't ship it, awesome! Maybe you should sell and ship? ;)
ReplyDeleteHello! I saw your design for the poultry feeder and ended up using a modified version for my own flock. I have linked to your site on my blog. Thank you for the inspiration! Renee
ReplyDeletehttp://crossedsabersranch.blogspot.com/2013/08/gravity-fed-poultry-feeder.html
Thank you! We appreciate you doing that.
DeleteHi, Fab feeder. Have you had any problems in the rain? any ideas on how you could add a rain sheild?
ReplyDeleteNo problems in the rain because my feeders are kind of under a roof. I would imagine you would have an issue with clumping in this feeder if left uncovered.
DeleteJust an update for those who may be considering using this pvc poultry feeder: After several years of continuous use, They still work as good as the day I made them!! I do however keep these feeders somewhat shielded from the rain and do not have any problems what so ever.
ReplyDeleteWith e overall materials listed does this make one waterer amd one feeder or will it make more than two ? Just asking as I only have 3chooks :)
ReplyDeleteThanks for sharing nice information with us. I like your post and all you share with us is upto date and quite informative, i would like to bookmark the page so i can come here again to read you, as you have done a wonderful job Poultry Solutions
ReplyDeleteI read your post and i really like your post. Thank you for sharing this post.
ReplyDeletePlumbing Pipes
pvc fittings
Thanks for the sharing of such information. we will pass it on to our readers. This is a great reading. Thanking you
ReplyDeletePVC Pipes and Fittings in Pakistan