Showing posts with label Water. Show all posts

Tuesday, June 11, 2013

The Pocket Hose. Kevin's Review

As the Pocket Hose promises: 

"The Hose That Fits In A Pocket But Grows To A Full Size Hose".


Now let me start by saying this,  "Time will tell".  The reason Im going to start at this point is because I have been scouring the internet reading other peoples reviews and they are less than promising.  I have only owned this hose for a couple of days, and have not had any of the problems listed but I do in fact have my doubts:

"Plastic end pieces crack or leak"
"Hose develops pin holes and drips"
"Hose, if left full of water under pressure, will burst"

The Pocket Hose expanding garden hose, shut off, material
The Pocket Hose expanding garden hose

What I do love about the Pocket  Hose, and the reason for my write up , is the fact it is super light and very easy to manage around the yard.  The Pocket Hose has yet to tangle or kink, and stores super easy in a flower pot sitting right by your hose bib.  If this thing lasts, I plan on purchasing a couple more....

Cheers ~ Kevin


⬇   Please +1 our posts  ⬇

Tuesday, January 15, 2013

Basic Family Supply list


FEMA has put together a list of items you "should" have together in your home incase of a disaster.  I wanted to share this here as we will be building off of this.  This information has been taken directly from their site. 

Emergency Supplies
Water, food, and clean air are important things to have if an emergency happens. Each family or individual’s kit should be customized to meet specific needs, such as medications and infantformula. It should also be customized to include important family documents.
Recommended Supplies to Include in a Basic Kit:
  •   Water one gallon per person per day, for drinking and sanitation (don't forget your pets)
  •   Non-perishable Food at least a three-day supply
  •   Battery-powered or hand crank radio and a NOAA
    Weather Radio with tone alert and extra batteries for both
  •   Flashlight and extra batteries
  •   First Aid kit
  •   Whistle to signal for help
  •   Filter mask or cotton t-shirt, to help filter the air
  •   Moist towelettes, garbage bags and plastic ties for
    personal sanitation
  •   Wrench or pliers to turn off utilities
  •   Manual can opener if kit contains canned food
  •   Plastic sheeting and duct tape to shelter-in-place
  •   Important Family Documents
  •   Items for unique family needs, such as daily prescription medications, infant formula or diapers
  •   Cell phone and chargers
    If you live in a cold weather climate, you must think about warmth. It is possible that the power will be out and you will not have heat. Rethink your clothing and bedding supplies to account for growing children and other family changes. One complete change of warm clothing and shoes per person, including:important family documents.
    Clothing and Bedding:
    A jacket or coat
    Long pants
    A long sleeve shirt Sturdy shoes
    A hat and gloves
    A sleeping bag or warm blanket for each person 


    Feel free to add to this in the comment section below.
    Cheers ~ Kevin


Friday, August 24, 2012

Meal worm farming


meal worm in palm of hand, farm, how to
As we all know, meal worms are a great feed supplement for all poultry flocks, and they LOVE them.  Thanks to companies like Happy Hen Treats they are easy to purchase and simple to feed to our chickens, ducks and quail.  Over time, depending on how often you like to give your birds meal worms, it can indeed get quite pricey.  In a time where the "name of the game" is to spend as little as possible and be more self sufficient, one finds themselves looking for alternatives to buying certain things.  Although there is an initial investment to meal worm farming, the pay off is quite nice and in some cases you can even make money by selling your worms.
Meal worm farm field.  Substrate used is wheat bran.
Meal worm farm field.  Substrate used is wheat bran.


I recently started up my own meal worm farm about 2 weeks ago after much research and consulting with several "professionals".  Like anything else, the more people you ask the more different answers you will receive.  What I did was to start simple and combined bits and pieces from each persons point of view.

The meal worm farm is the cheapest farm you can possibly buy.

The first thing you will need to start farming your own meal worms is obviously the farm itself.  I am using a plastic 3 drawer organizer I had left over from our office which had been used to store paper products in.  Since we no longer use paper, it was the perfect item to repurpose. The reason for 3 drawers is because you should separate the worms as they go through their life cycles from worm to pupa to beetle and back again.  All of the drawers will need a layer approximately 2 inches deep and also some sort of  moisture for the worms to drink from usually just in the form of a cut potato or carrot.  Since these worms are going to be a food source for our hens and our family eats their eggs, I didn't skimp on the substrate which the worms feed from.  In my farm I used an all natural wheat bran at about $2 per box with each drawer using about 2 boxes.  You can also use non - instant oat meal if you prefer.

Feed meal worms wheat bran by using as substrate or bedding
Feed them right by using a good substrate.

The first drawer of my meal worm farm contains the worms themselves.  This initial purchase of worms can either be bought in bulk from an online distributor or through your local pet store. You will want to start with about 500-2000 worms if you will be feeding your birds right from your farm. Stay away from the "super worms" and "giant meal worms" as these are somehow treated to prevent them from further developing.

The second drawer of my meal worm farm will contain the pupa I gather from my first drawer.  These are easy to distinguish because you will most likely find them on the top of the substrate, motionless, and will be a creamy white color.  Their color will slowly turn to brown during its pupation which may take anywhere from three days up to one month.

The third drawer of my meal worm farm will contain the beetles which "hatch" from the pupa.  The Tenebrio molter, or flour beetles, are then left in this drawer on the same substrate as in the other two, where they will eventually lay up to three hundred eggs each!  As these eggs hatch into worms and the worms get large enough for me to strain out, they will be placed into the first drawer and the cycle will begin all over again.  

Mealworm Nutritional Information:

Fat 27.2%, Protein 49.6%, Carbohydrates 6.9 grams/100, Calories 471 calories/100 grams


Happy Farming! 
Cheers ~ Kevin


(Purchase your supplies below with these great deals!)


Friday, August 17, 2012

Last minute - DIY FREE chick waterer


1 week old Coturnix quail chicks in brooder
1 week old Coturnix quail chicks

Poultry chicks, regardless of species or breed, are extremely cute and very hard to pass up to a family just getting started in backyard poultry keeping, especially if on a whim.

Sometimes poor planning gets the best of us and we start this great and wonderful hobby not by planning first, but with the chicks! Either the kids bring a few home from school, a friend had a better hatch than expected and decides to pawn a few cute little babies off on you, or maybe Tractor Supply is conveniently having their annual "Chick Days" while you just so happen to be there picking up dog food, you will suddenly find yourself scrambling to gather the necessary supplies and equipment needed.

After the first 24 hours of life, it is critical that a chick is eating food and drinking water. Although offering food is a simple thing to figure out, or can even be sprinkled on the floor, providing water in a safe manner can get a little hairy. I have read horror stories from folks who thought they had no other alternative than to leave a bowl of water with the chicks, later to find one had drown.

*While providing water for your newly hatched babies, it is always best to use some kind of recommended waterer. If you find yourself in a jam, you can quickly improvise with a soup can, plastic lid and a piece of heavy string.

Materials you will need to make this waterer for chick brooder
Materials you will need to make this waterer

Materials/Tools needed:


- 1 Soup can 

- 1 Plastic lid (slightly larger in diameter than the soup can)

- 1 piece of string

- Scratch awl or power drill with small sized drill bit

Location of holes to be made for chick waterer in brooder
Location of holes to be made

Mark the approximate height on can, with open side facing down, equal to half the height of the sides on lid.  This mark will be the height in which you want your water level at.

Location of holes to be made in chick waterer for brooder
Keep your holes slightly below the sides on the lid

Carefully punch or drill 2 holes across from each other at the height you previously marked making sure you do not have your hand on the opposite side you will be making your holes, as you can cause injury to yourself. 

diy chick waterer, quail, chickens, poultry
Fill with fresh water


Fill the can with water just below the holes you have just made, and firmly hold the lid over the top on the can.  Quickly while holding the lid in place, flip the can over, tightly tie a string around both and you are done!

Finished chick water ready for the brooder!


Cheers! ~ Kevin

*****Please Subscribe, comment and share!*****


DIY PVC Chicken Gravity Feeder and Waterer

The old fashioned feeders are quickly becoming a thing of the past.  Although they may still work for some, people are finding themselves frustrated at the fact that their chickens are either pooping or kicking bedding into the feeder, which can quickly spread illness and disease. 


"A properly constructed gravity feeder will be the solution to most feeder problems.  It can contain as much or as little feed as the handler wishes to keep, it prevents any possible ways for your chickens to get waste into their feed, and it will keep the inside contents dry and pest free."
"A properly constructed gravity feeder will be the solution to most feeder problems.  It can contain as much or as little feed as the handler wishes to keep, it prevents any possible ways for your chickens to get waste into their feed, and it will keep the inside contents dry and pest free."

A properly constructed gravity feeder is the solution to most feeder problems.  It can contain as much or as little feed as the handler wishes to keep, it prevents any possible way for chickens to get waste into their food, and it will keep the contents dry and pest free.  If you are looking for an alternative means of providing your girls crushed oyster shell other than in a bowl, this will accommodate that offering as well.


duck, chicken, diy, gravity feeder, make, easy, good, best
Got ducks? They quickly adapt to this style of feeder too.
All of the materials needed to construct these feeders can be found at your local home improvement store.  The tools required should be available in most everyones home or by borrowing from a neighbor.


Tools needed:


- Tape measure
- Power drill
- 1/4" Drill bit
- 7/16" socket and 7/16" wrench or adjustable wrench
- PVC primer (clear or purple)
- PVC cement
- A hand saw or PVC pipe cutter capable of cutting up to 4" PVC.  


Materials needed:

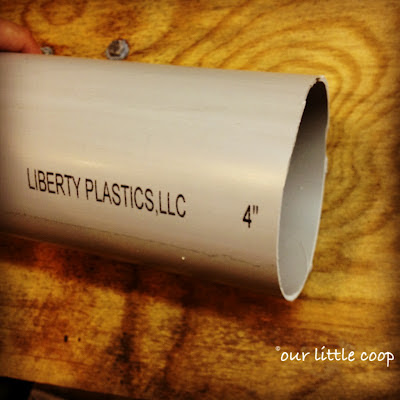
- 24" of Schedule 35 PVC.  This is a grey pipe and is used as waste pipe. 
  *(Regular Schedule 40 PVC will not work properly as noted in my explanation)


pvc pipe for gravity feeder, best
Schedule 35 PVC waste pipe
- (2) 1/4"x 1" length bolts, washers, and nuts

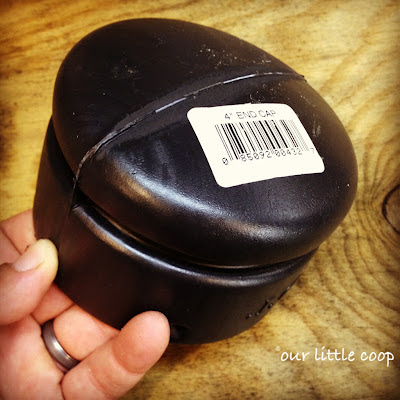
- 4"Black corrugated waste drain cap


best diy gravity feeder cap
Corrugated waste pipe end cap
- PVC fencing post cap

- 4"x 2"x3" waste pipe fitting.  This is found near the corrugated waste pipe and can be used for tying in downspouts. 


pvc gravity feeder parts, best, pvc, free, cap, trough
PVC fence post cap (left) Downspout adapter (right)
Start out by taking the fence post cap and slipping it over the square end of the waste pipe fitting.  This will be a snug fit.  On the lip of the post cap, measure 1" from the end and mark a dot on either side.  "Carefully" with the 1/4" drill bit, drill a hole thru these marks and slightly ream out to remove any burrs. 


Drill a 1/4" hole on either side 1" in from the corners
Push the 1/4" bolts into each one of these holes, and by reaching into the circular opening of the fitting, slide a washer and thread a nut on each of the two bolts.  Tighten enough where these connected fittings can just barely hinge apart.
pvc gravity feeder parts, best, pvc, free, cap, trough, poultry, urban, pest
Poultry gravity feeder assembly

With the PVC primer, lightly coat one end of the pipe approximately 2" down and the opening side of the fitting you just constructed.  Apply a light coat of PVC cement and firmly slide the fitting over the end of the pipe and hold in place for 10 seconds.  

Slide the black cap over the top, and you are done!


fill gravity feeder with chick starter
The handy cap keeps out dirt and debris.


Mounting can be done in several different ways.  In my very first picture, you will see I used a chimney pipe bracket, but a couple of heavy duty zip ties will work as well if mounting to a fence post or such.  Be creative!

pvc gravity feeder parts, best, pvc, free, cap, trough, poultry, urban, pest, chicken
Build multiple feeders for larger flocks.

Waterer:


Chicken water nipples screwed into PVC cap
The gravity waterer is constructed in almost the exact same manner except with the use of a 4" slip cap and as many water nipples as you would like to use.  I always recommend a minimum of at least two nipples just incase one fails.  Check the operation of this waterer daily.

Fill and ENJOY! 
Cheers ~ Kevin
*********Please subscribe, comment and share!************

Monday, July 30, 2012

Keep your chickens healthy on the inside.

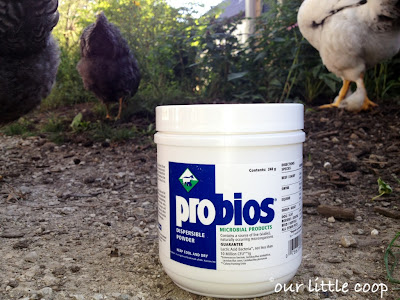
Provide your chickens probiotics for better health.


It wasn't until the recent battle with the upper respiratory issues our girls have been suffering with, that I had thought about giving them some sort of probiotic.  Typically when "we" get sick enough to be on antibiotics, we will supplement our diets with extra probiotics to help restore the good bacterias in our bodies.  Probiotics are good bacteria that help aid in digestion, and strengthen our immune systems.  Absence of those good bacterias leaves vulnerability to an over abundance of the bad which later leads to illness and poor health.  

*Providing your birds with probiotics from the day they hatch, can prevent them from developing dangerous diseases such as Salmonella. These probiotics also help chicks become healthier adult birds, digest their feed more efficiently for gaining weight and less waste and will also produce healthier eggs for you and your family. 
Probiotics in powdered form, can easily be added to your birds water.


Some people provide their birds with yogurt on a daily basis which is fine.  Like most other folks, I need an easier way to do so.  I find this to be in a powdered form I can easily add to their water. With the current brand I am using, a teaspoon mixed with a gallon of water does the trick. 
Cheers! ~ Kevin  

Thursday, July 5, 2012

Confusion about using misters on chickens

Hi all. With the recent bouts of extreme temperatures, the concept of using a mister to keep your chickens cool has been a hot topic.

**Just so you don't think this is coming from someone who has chickens, has a blog and a Facebook page and knows nothing about "evaporative cooling", I own and operate a heating and air conditioning company and have also graduated with a degree in thermodynamics.

CHICKENS DON'T LIKE TO BE WET. This is obvious by reading everyone's comments about how their chickens have reacted to their misters.

The most simplest form and example of evaporative cooling is perspiration, or the sweat secreted by our bodies. The constant evaporation occurring on the skin helps to cool the bodies temperature down. The amount of heat transfer depends on how quickly the evaporation occurs but on a typical 95 deg day is about 890 BTU per pound of water. The rate of evaporation depends on the temperature and humidity of the air (wet bulb temperature), which is why on those super hot, humid days our bodies are soaking wet because that perspiration does not evaporate fast enough.

What is a real mister? Well a real mister is not one you purchase for 7$ from an amazon link or big box store. Also those are not true evaporative coolers, and are not designed to be used in such a manner. Those are intended to be used on delicate plantings that benefit from light droplets of water. A mister or evaporative cooler, in the professional world, consists of a pure water supply, properly sized tubing, a compressor, filters and multiple appropriate sized nozzles. They are designed to cool the air without the targeted area or subjects ever getting wet. If you would rather invest in this type, get ready to spend some money because the entry level systems begin at around $1500.00-2000.00.

My bottom line to this discussion is use common sense. Do not try to force something on anything that clearly doesn't like it. If it is hot out, make sure to provide your birds with cold fresh water, plenty of shade, a fan and leave them alone. If you say your chickens dig your mister setup, please show me pictures of them in action. I love to be proven wrong. Peace out. ~ Kevin

Photo credits: Advancedmistingsystems.com

Friday, May 18, 2012

If you can't take the heat... neither can your peeps!

As summer begins to settle in,  Our Little Coop is typically missing its man of the house.  As many of you know, I work for myself as an HVAC service provider.  For those of you that are new here, the name of my company is Thermo Green, Inc. HVAC. I usually find myself away from home on average of anywhere between 8-16 hours a day, leaving our free-range chickens and dogs to fend for themselves.

The few precautions I usually take to make sure everyone will be ok during the day always pay off.  The most critical of all, is to ensure everyone has access to plenty of fresh water and shade from the sun.  Every morning I rinse/ refill 3 drinking containers and a large dog bowl with a combo of water and Kent VITA-PAK.  The VITA-PAK can be found at most feed stores or online.  I do not worry about the dogs drinking the chicken water or visa versa because they all get this combination.  The Kent is nothing more than extra vitamins and electrolytes which are critical as the mercury climbs.


To provide shade,  we have 2 large silver maples on our property as well as many ornamental grasses that are alone our property line.  At least half of our yard at any given time is shaded.  Additional shade can be provided with the use of anything that would totally block out the sun, like a piece of plywood or even a bed sheet draped over a clothes line. STAY COOL! ~ Kevin

Update ***** How to make the waterer pictured:

Kevin has fallen behind but is going to post a more detailed version. Basically what you do is take a clean 5 gallon bucket and drill a few 1/4" holes around the top (opening) of the bucket about 2 inches down. Find a pan that has sides that are at least 3-4 inches high. Fill up the bucket, place the pan over the top, and carefully flip the whole thing upside down. The water will fill the pan up to the holes that you drilled, and will maintain a constant height there. Hope this helps!? Stay tuned for the more detailed version. :-)

Friday, April 27, 2012

Are your Free Range Chickens Thirsty?

I feel like I am constantly refilling water for our backyard chickens, the dog, wild birds, and the kids. After visiting with our friend Travis, he showed me a cheap way to keep water out and me away from the hose for a longer period of time.

Farm and Fleet and TSC both sell big watering units for your flock that cost $18.00 - 30.00. For Under $10.00 you can easily make your own that will even hold more water and the dog can use.

Purchase a feed pan (basically an over-sized pie pan). Gather up a clean 5 or 7 gallon bucket, 1/4" drill, and 2 bungee cords. Drill a hole 1/2" to 3/4" down from the lip of the bucket. Fill it up with fresh water, place the pan over it and quickly but carefully flip it over and place on the ground. Secure the bucket to the pan with the bungee cords, and you are all set.

If the water over fills the pan, you know you drilled the hole(s) down too far on the bucket and will need to try again using another one. Measure first!

Cheers~ Kevin
best urban backyard chicken waterer
Best backyard chicken waterer

Other Posts You May Like