Saturday, April 27, 2013

Mexican Seitan Pizza

Tonight was one of those "What do you want for dinner?" "I don't care" "We have nothing to eat" kind of nights.  So I looked to see what we had and found a pizza crust, an almost empty jar of salsa, and some seitan that I keep forgetting to cook.  So I threw this little number together.  It was delicious.  

Mexican Seitan Pizza


Mexican Seitan Pizza
Ground Seitan 


Ingredients:

  • 1 store bought pizza crust
  • 1/4 cup of salsa
  • 1/4 cup of ranch dressing 
  • 1/2 onion chopped 
  • 1 small tomato chopped 
  • 1/2 can of black beans 
  • 6 oz ground seitan 
  • 1/2 can of corn kernels 
  • 8oz shredded mexican cheese 
Directions:
  1. Preheat oven to 450 degrees. 
  2. Pour salsa and ranch dressing onto your pizza crust and smooth/mix with the back of a spoon.
  3. Sprinkle onions, tomatoes, black beans, seitan and corn over the top of your sauce. 
  4. Top with shredded cheese. 
  5. Bake at 450 degrees for 25 minutes.
  6. Enjoy!  

Friday, April 26, 2013

Composting With The Worm Factory 360 (overview and setup)


When I hear the term "worm compost" it brings back memories of a friend who used to use the term "worm dirt" as a way to describe someone less than desirable. Whether you use the term worm compost, worm dirt, worm castings or worm poo, all are referring to the same thing : Vermicompost!  


Worm Factory 360, compost, worm, vermicompost, garden, worm castings, fertilizer
Worm Factory 360 Cover


The Worm Factory Composting Accessories (included)

 "Vermicompost is the product or process of composting using various worms, usually red wigglers, white worms, and other earthworms to create a herterogeneous mixture of decomposing vegetable or food waste, bedding materials, and vermicast.  Vermicast, also called worm castings, worm humos or worm manure, is the end-product of the breakdown of organic matter by an earthworm.  These castings have been shown to contain reduced levels of contaminants and a higher saturation of nutrients than do organic materials before vermicomposting.  Containing water-soluble nutrients, vemicompost is an excellent, nutrient-rich organic fertilizer and soil conditioner.  The process of producing vermicompost is called vermicomposting."Wikipedia


Worm Factory 360, compost, worm, vermicompost, garden, worm castings, fertilizer
Worm Factory 360 base and cover


Recently I was given the opportunity to take one of these vermicomposters for a test drive and it is living up to its promise and beginning to produce some yummy..er.. worm dirt! 
Well my vegetable plants will sure think so!
The composter I am using in the illustrations below, is the Worm Factory 360 sold at Rainbow Worms. In a later post, I will do a more thorough review but for now I wanted to show you all just how easy this unit is to set up.  

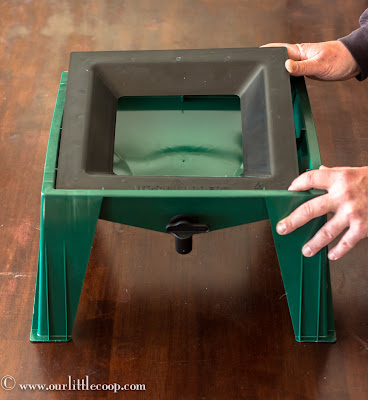
The first step in assembling the Worm Factory 360 is to drop in the "worm ladder".  This piece is critical to ensure any worms that fall through the bottom tray of the composter can crawl back up to its food source.

Worm Factory 360, compost, worm, vermicompost, garden, worm castings, fertilizer
Installing Worm Factory 360 "worm ladder"

Worm Factory 360, compost, worm, vermicompost, garden, worm castings, fertilizer


Worm Factory 360, compost, worm, vermicompost, garden, worm castings, fertilizer, trays
(4) Trays come with the Worm Factory 360

The Worm Factory 360 comes with 4 trays which will be added as time goes by.  In the beginning, you only need to put down one. The first tray fits perfectly into the Worm Factory base.

Worm Factory 360, compost, worm, vermicompost, garden, worm castings, fertilizer
Placing first tray onto Worm Factory base


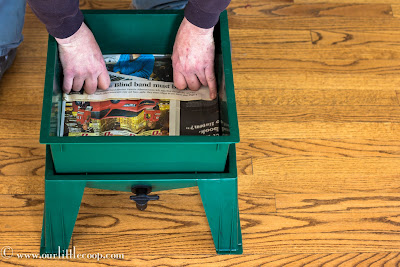
We now need to add a base layer, bedding, and food.  (Think lasagna)  First down is 2 layers of news paper. After neatly placing the layer of newspaper in the tray of the Worm Factory 360, you will need to add the bedding.  
Worm Factory 360, compost, worm, vermicompost, garden, worm castings, fertilizer
Adding (2) layers of newspaper in bottom of tray

A coir brick is included in the supplies and you will need one half to start with.

Worm Factory 360, compost, worm, vermicompost, garden, worm castings, fertilizer
Break apart coir brick

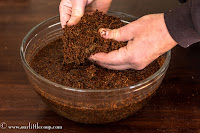
To ready the coir brick for your Worm Factory, you will need to let it soak in approximately 3 cups of warm water and aid in breaking apart the fibrous material with your hands. 
Worm Factory 360, compost, worm, vermicompost, garden, worm castings, fertilizer, coir
Soak and break up

Tightly squeeze out any excess water from the coir.

Worm Factory 360, compost, worm, vermicompost, garden, worm castings, fertilizer
Wring out water

Evenly spread the moist coir on top of the newspaper base.

Worm Factory 360, compost, worm, vermicompost, garden, worm castings, fertilizer
Spread a layer of wet coir to Worm Factory 360 tray

The next step is to add some pumice to the bedding.  I sprinkled it evenly over the coir and lightly mixed it in.


Worm Factory 360, compost, worm, vermicompost, garden, worm castings, fertilizer
Sprinkle pumice on top of coir

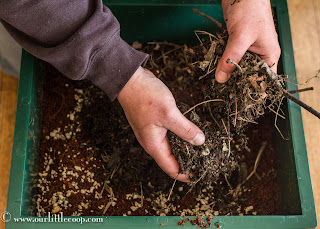
Adding a mix of your own semi-composted material is advised.  Although you will be adding food scraps for the worms to feed on, this will be an alternative source they will appreciate.  If you do not have any compost, go outside and look under some old bushes, in yours or a neighbors yard, and you will likely find some old leaves from the previous Fall.


Worm Factory 360, compost, worm, vermicompost, garden, worm castings, fertilizer
Add organic material


Worm Factory 360, compost, worm, vermicompost, garden, worm castings, fertilizer
A good source of organic material can be found in old leaves under your bushes.

Now is the time to add your first supply of kitchen food scraps.  The manufacturer recommends initially putting it into 2 corners (as pictured).


Worm Factory 360, compost, worm, vermicompost, garden, worm castings, fertilizer
Add kitchen scraps to the Worm Factory 360's corners


Worm Factory 360, compost, worm, vermicompost, garden, worm castings, fertilizer
A mix of old greens, banana peel and finely chopped carrots
The next and final step in assembling your Worm Factory 360 is to add a layer of shredded paper.  (Again this is provided)

Worm Factory 360, compost, worm, vermicompost, garden, worm castings, fertilizer
Add a layer of shredded newspaper to your composter

Ready for the fun part!? We get to add the worms!  There are a couple options for worms on the Rainbow Worms website, but from my research, the best are he Red Wigglers. 
(purchased separately)

Worm Factory 360, compost, worm, vermicompost, garden, worm castings, fertilizer red wigglers
Red wigglers going in!

Slowly add the worms into the center of the tray.

Worm Factory 360, compost, worm, vermicompost, garden, worm castings, fertilizer red wigglers
Place worms in the center of the tray

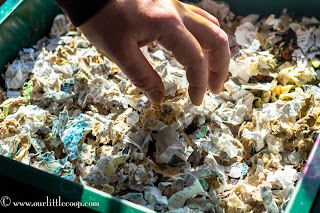
After all of your worms have been added, gently cover them with some of the shredded paper.
Worm Factory 360, compost, worm, vermicompost, garden, worm castings, fertilizer red wigglers
Tuck your worms in and leave them be for 3 days.

Place the cover on your Worm Factory 360 and walk away.  Let nature take it course.  In 3 days, you can remove the cover and check on the progress of your worms.  By this point, they should have all moved from the center and to either of the two corners with the food scraps.


Worm Factory 360, compost, worm, vermicompost, garden, worm castings, fertilizer red wigglers
Follow up with your worm compost in 3 days to make sure all worms have moved towards the kitchen scraps

As with gardening, composting with worms takes a little bit of time but the payoff is huge.  The vermicompost I eventually harvest will be used in a compost tea brewer.  Another great way to use it, is to lightly scratch into the dirt around your trees, ornamentals and any other plants and veggies you have growing.  At a later date, I will follow up with my progress.  

Cheers ~ Kevin

*Update June 15, 2013

compost, fertilizer, garden, red wigglers, vermicompost, worm, Worm Factory 360
Update on my Worm Factory 360 June 13, 2013
Since starting up this vermicomposter, I ended up with approximately 2100 red worms total!  I have been adding kitchen scraps, maple tree seeds (helicopters) and peat. On some days I have had to add a little sprinkle of water because things were looking a little too dry.  The bottom reservoir is full of compost tea which I will be sprinkling around my garden plants and trees.  I have started working on a second tray which I have added on top of the first and the worms are slowly finding their way there.  Now I am a little impatient, but by now I thought 2000 worms would have totally consumed everything in this box.  Not exactly the case...


To purchase your own Worm Factory 360 contact:

rainbow worms Worm Factory 360, compost, worm, vermicompost, garden, worm castings, fertilizer red wigglers
RAINBOW WORMS

Toll Free 877-280-5665

Rainbow Worms
1119 Via Los Trancos
San Lorenzo, CA 94580


Thursday, April 25, 2013

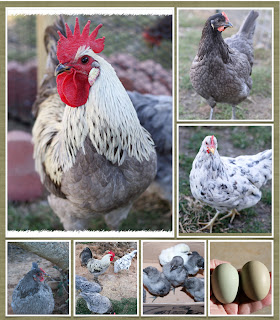
Le Bleu Peep's Breed of the Week : The Isbar


Around 1950 a Swedish Catholic monk named Martin Silverudd was toying around with Rhode Island chicken genetics and created a stunning silver feathered breed what is now called the "Isbar" (pronounced 'ice bar').  Silverudds goal was to create an auto-sexing breed that laid a high volume of unusually colored eggs. 

Click HERE for more information!

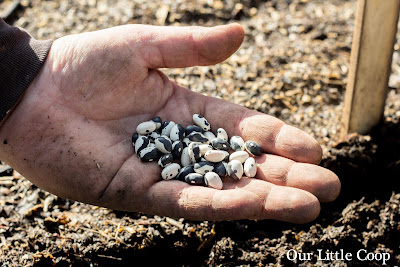
Seed To Table: Bean Bush - Calypso

botanical interests, bean bush calypso, garden, seed, yin yang, orca bean

"Whether you call them Calypso, the Yin Yang bean because of its unique design or the orca bean because it looks like a tiny killer whale, this unusual dry bean is pretty and delicious. Each bean has black and white markings with a contrasting dot. Cooked beans have a smooth texture and mild flavor that takes on the flavors in your favorite soup or stew. Each pod produces 4-5 seeds."

When to sow outside:
1 to 2 weeks after last frost when soil begins to warm 

When to start inside:
Not recommended 

Special Germination Instructions:
Seeds germinate best in warm soil 

Planting Guidelines:
Days to emerge: 3-10 days 
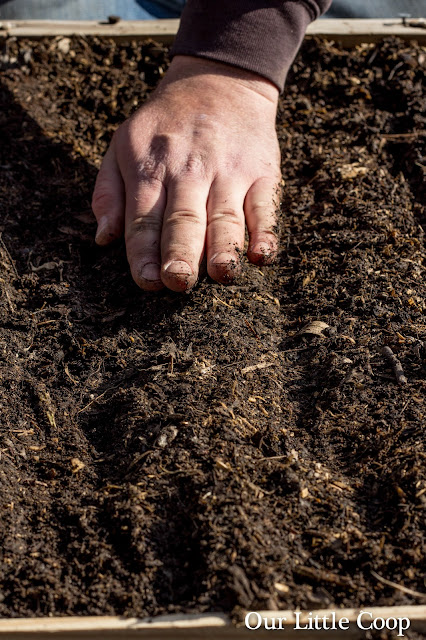
Seed depth: 1"
Seed Spacing: 2 seeds every 4"
Row Spacing: 18"-36"
Thinning: When 1" tall, thin to 1 plant every 4"


botanical interests, bean bush calypso, garden, seed, yin yang, orca bean

botanical interests, bean bush calypso, garden, seed, yin yang, orca bean

botanical interests, bean bush calypso, garden, seed, yin yang, orca bean

botanical interests, bean bush calypso, garden, seed, yin yang, orca bean

botanical interests, bean bush calypso, garden, seed, yin yang, orca bean

botanical interests, bean bush calypso, garden, seed, yin yang, orca bean

botanical interests, bean bush calypso, garden, seed, yin yang, orca bean


Check back for updates on our Calypso Beans! 
For more Seed to Table journeys, click HERE

Wednesday, April 24, 2013

Seed To Table: Swiss Chard - Five Color Silverbeet

garden, Five Color Silverbeet swiss chard, seed, botanical interests

 "Swiss Chard - Five Color Silverbeet is an improved color mix that provides beautiful shades of red, yellow, pink, orange and white stems topped with green or dark maroon leaves, often with contrasting deep red veins. Not only colorful, the stems and leaves provide delicious flavor packed with nutrition."

When to sow outside:
*1 to 2 weeks before the last frost. 
*As late as 2 months before first fall frost. 
*Sow in late summer for fall/winter crop

When to start inside:
Not recommended 

Planting Guidelines:
Days to emerge: 5-10 days 
Seed depth: 1/2"
Seed Spacing: a group of 2 to 3 seeds every 6" to 8"
Row Spacing: 18"
Thinning: When 1/2" tall, thin to 1 every 6" to 8"


garden, Five Color Silverbeet swiss chard, seed, botanical interests

garden, Five Color Silverbeet swiss chard, seed, botanical interests, planting, growing, how

garden, Five Color Silverbeet swiss chard, seed, botanical interests, planting, growing, how

garden, Five Color Silverbeet swiss chard, seed, botanical interests, planting, growing, how


garden, Five Color Silverbeet swiss chard, seed, botanical interests, planting, growing, how

garden, Five Color Silverbeet swiss chard, seed, botanical interests, planting, growing, how

Check back for updates on our Swiss Chard - Five Color Silverbeet!
For more Seed to Table journeys, click HERE


Seed To Table

This is the story of a seed. It is the documentation of the life that takes place from the time this tiny seed is poured from it's beautifully illustrated packaging to the time that it is fully grown, ready for harvest and is prepared for a delicious homemade meal.  Follow along as we document this life, from seed to table.


Monday, April 15, 2013

Le Bleu Peep's Breed of the Week : The Cherry Egger


While on a walk yesterday in the Chicago Botanic Gardens I stopped at a little Sour Cherry Tree and you know what popped in my head?  THE CHERRY EGGER!

Never heard of it?  I bet your first thought was , "O a red egg!".  Well, not exactly. 
Click HERE for more information! 

Monday, April 8, 2013

Le Bleu Peep's Breed of the Week : The Blue Andalusian


Once called the Blue Minorca the Andalusian is a striking medium ornamental bird thought to be one of the oldest of the Mediterreanean Breeds of Chickens.


Tuesday, April 2, 2013

The Chicken Fountain - Unboxing Pt.1

THE CHICKEN FOUNTAIN (whats in the box)

Alright so I guess it wasn't fair. I show our Facebook fans this awesome chicken waterer I just got and tell how excited I am to not have to waste time every morning cleaning out and filling up the chickens water bowls then just leave on that note. haha. Boy, you people are rough!

As most every backyard chicken keeper can agree to, having to wash out and refill the water bowls every morning, and depending on the weather, again in the afternoon is just plain no fun.  I mean come on.  It has honestly become an "I did it yesterday so its your turn today" daily, dragggggggged out debate between Emily and myself.  It ends right here with The Chicken Fountain.

Frank Cardaropoli is the owner of The Chicken Fountain LLC.  He has a Facebook page
(The Chicken Fountain) which is how we first hear about his poultry watering products.  He is a hardworking American and stands 100% behind his product.  Frank is the kind of guy you would want for a neighbor! There are only a few things I don't like about Frank and his product:

  • Frank Cardaropoli came up with this better than I could have.
  • He came up with and patented The Chicken Fountain before me.
  • AND HE MADE IT SO AFFORDABLE IT DOESNT MAKE SENSE TO EVEN TRY AND DUPLICATE IT! 
THE CHICKEN FOUNTAIN (whats in the box) parts assembly
THE CHICKEN FOUNTAIN (whats in the box)


As I stated  before, there is a very little bit of assembly required and in the next couple of days, I will walk you through that.  It takes like minutes and NO TOOLS OR SUPPLIES REQUIRED.  Frank even sends you the PVC glue. Frank also sends you the hangers, garden hose attachment, and a lid.  So no running out to the hardware store because you need something.  Its all in the box. Nice!

The Chicken Fountain Remote Additive System (RAS)  hose
The Chicken Fountain Remote Additive System (RAS)

The (RAS) is a separate purchase and easily attaches to the top of The Chicken Fountain.

The Chicken Fountain Remote Additive System (RAS)  hose
The Chicken Fountain Remote Additive System (RAS)
If you are going to purchase a Chicken Fountain, which everyone should, I highly advise you pick up the  Remote Additive System (RAS). Its like $10 and fits right onto The Chicken Fountain system and easily allows you to provide your birds with Apple cider vinegar, probiotics, or electrolytes.


The Chicken Fountain Bottle Brooder Cap nipple
The Chicken Fountain Bottle Brooder Cap

Another awesome product from The Chicken Fountain is the new Bottle Brooder Caps. You screw it onto a clean plastic soda bottle filled with water and hang it in your brooder.  Even though this is probably the best thing to give your chicks water with because there is no way for them to poop in it, Im using it in my quail cages. ;-) Quail are probably as bad as ducks when it comes to fouling up their water (pun intended). 

The Chicken Fountain Bottle Brooder Cap


So now you guys/gals can see why I was so excited when I received this today in the mail.  I haven't even used it yet and the future is already looking much brighter.

Cheers ~ Kevin

For More information and to order one of your own 
The Chicken Fountains or Brooder Bottle Caps:

Vist their website http://www.chickenfountain.com and tell them I said hi.
Give them a call 704.997.9426 .
Email info@chickenfountain.com

Other Posts You May Like