Saturday, February 21, 2015

And the winner of the Brinsea EcoGlow Brooder Giveaway is.....


Congratulations Amanda P! 
You are the lucky winner of a brand new Brinsea EcoGlow Brooder!  We have a feeling you will have some very happy and warm chicks this spring!  

We will be contacting you shortly! 

A huge THANK YOU to everyone who entered.  If you did not win and are interested in purchasing this or any other items from Brinsea, please visit www.brinsea.com  DONT FORGET to use the code COOP at checkout to receive 10% off your ENTIRE order.  

a Rafflecopter giveaway

Thanks for playing!

Friday, February 20, 2015

Brinsea OvaView and OvaScope: Kevin's Review


Brinsea OvaView and OvaScope egg candle
Brinsea OvaView & OvaScope

**Buying a Brinsea product? Enter the word "COOP" at checkout and save 10%!!


Brinsea has "taken" the market once again with their OvaView and OvaScope! Gone are the days of cupping fragile eggs between your thumb and forefinger, while trying to perfectly position it in front of a flashlight to check for chick development.  The Brinsea OvaView in itself, is a great egg candling lamp.  When paired with the OvaScope, there is nothing that can compare.

Brinsea OvaView and OvaScope egg candle
Brinsea OvaView
The OvaView's sturdy structure measures 5" long x 3.3" wide x 1.3"high and weighs only 3 oz. The high efficiency LED bulb is powered by 4 AA batteries which Brinsea supplies with the unit.  The beauty of being an LED bulb opposed to an incandescent, is the obvious longevity of the product, and little or no concerns about overheating the eggs during candling.  In the package you will also find, detailed instructions, and a flexible rubber ring which holds itself around the light bulb socket to insure you have a proper seal with the egg so there isn't any light leaking around, which can hinder your viewing.  This model has a very good quality push button switch to turn the light on or off. 

Brinsea OvaScope

If you are buying the Brinsea OvaView, *DO NOT FORGET to order the OvaScope.  The OvaScope is a great compliment to the candling light.  It simply fits over the OvaView and firmly snaps into place allowing the viewer to observe the egg in daylight and at a slight magnification. Simply remove a side cover and place your egg into the holder and its "in the dark". Brinsea again has listened to its customers and has strategically added 2 nubs, on the sides of the scope, in which a web cam can be placed over the viewing hole and held in place with a simple rubber band. The OvaScope also has a handy little wheel that allows you to rotate the egg without having to remove the side cover. 


Brinsea OvaView and OvaScope egg candle
Brinsea OvaScope firmly snaps over the OvaView

Brinsea OvaView and OvaScope egg candle
Brinsea OvaScope side "egg door".

Brinsea OvaView and OvaScope egg candle
Serama chicken egg-Day 5 as seen through the Brinsea OvaScope

In conclusion, there is not a better egg candling device on the market.  I will never juggle a flashlight or goofy cardboard box concoction again.
Cheers! ~ Kevin

Contact:
Brinsea Products Inc.
704 N. Dixie Avenue
Titusville
Florida
FL 32796
USA

Phone (888) 667 7009
Web http://www.brinsea.com

Thursday, February 19, 2015

Brinsea Mini Advance Incubator: Kevin's Review

Our Little Coop Brinsea Mini Advance incubator review
Brinsea Mini Advance incubator

**Buying a Brinsea product? Enter the word "COOP" at checkout and save 10%!!


When shopping for an incubator, look no further than the      
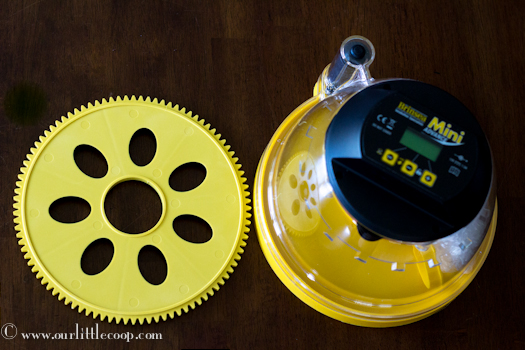
Brinsea Mini Advance.  This model is not intended for those looking to hatch large quantities of eggs at one single time.  Those folks looking to hatch a greater amount of eggs, should look into one of Brinsea's larger models. The total capacity for the Brinsea Mini Advance model is 7 Large eggs or 12 Quail eggs.  For me, I find the size a perfect fit for my needs.  Anything larger and I would quickly find myself over run with birds!
 The Mini Advance was designed for optimal 360 degree viewing of your incubating and hatching eggs thus making it the perfect choice for photographers looking for the best angles to take pictures or classrooms where this incubator can take center stage!

Our Little Coop Brinsea Mini Advance incubator review
Nicely Packaged
Upon arrival of your new Brinsea Mini Advance incubator, you will immediately see this company is truly proud of their products craftsmanship by how well packaged everything is and the literature that accompanies it.  The parts included are: (1) Incubator with the removable lid, (1) Egg disc, (1) Water Pot Guard, the 115volt power supply unit, a catalog, the user instruction pamphlet, a how to care for your chicks paper, and a free extend 2 year guarantee notice.

Our Little Coop Brinsea Mini Advance incubator review
Digital Control System

Our Little Coop Brinsea Mini Advance incubator review
Powered Fan
Simplicity has been achieved with the Mini Advanced's use of a digital control system and powered fan.  The control system is located on the very top of this model just over the heating element and fan, and utilizes three buttons to customize the settings to suit your needs.  The digital display "utilizes a highly accurate individually calibrated sensor for temperature" so no more need for multiple thermometers to confirm your temperature. You can adjust the temperature and have it displayed in either Celsius or Fahrenheit, and it reads to the tenth of a degree.


The digital display feature is loaded with a bunch of optional settings which include, Power Loss Display, High Temperature Alarm, Low Temperature Alarm, multiple turning adjustments, Cooling period feature ( used to simulate mother hen getting off of her eggs), a countdown to hatch calendar, and of course the option to save or cancel your settings.  I am totally impressed with the many turning adjustments which (briefly) include: "Auto" off on 2 days to hatch, turning interval timing, and turning angles which change the distance of the turn.
Our Little Coop Brinsea Mini Advance incubator review
Brinsea Mini Advance Incubator

In my opinion, the "only" things that can make this digital control system any better, would be the use of a back light on the display screen, and a humidity gauge (available on the EX model only).  Almost all digital displays these days have some sort of backlight. The lack of a humidity gauge really isn't "needed" in this particular model though because of the two section water pot located in the center.  Up until "lock down" you fill only half of the pot with water and at the two days until hatch period, you fill the second half.  Many people confirm this will put you at the perfect humidity level for hatching most types of poultry.

In closing, if you are looking into hatching your own birds for the first time or are an experienced small scaled hatcher, the Brinsea Mini Advanced is not only the best value on the market but the overall best choice.  Cheers! ~ Kevin

**Update:  Almost 3 years later and after many successful hatches, I still find this to be one of the best and most convenient incubators I have ever used.  I especially appreciate how our kids are able to observe the entire hatching process and watch the wonderful miracle of birth! 
~ Kevin


Contact:
Brinsea Products Inc.
704 N. Dixie Avenue
Titusville
Florida
FL 32796
USA

Phone (888) 667 7009
Web http://www.brinsea.com

Saturday, February 14, 2015

GIVEAWAY - Brinsea Eco Glow Brooder

I


Happy Valentines Day!  We are excited to be giving away a Brinsea Eco Glow Brooder to one lucky winner!  Giveaway starts NOW (February 14th, 2015) and will be ending next Saturday, February 21st, 2015 at midnight.  The lucky winner will be announced and contacted Saturday!  


What is an Eco Glow Brooder?
Clean, safe, tough and extremely economical chick brooder the EcoGlow is ideal for up to 20 chicks or ducklings and suitable for any waterfowl or gamebird chicks. Great for classroom hatches. 
The EcoGlow only uses 18 Watts (a tenth of the electricity of typical suspended infrared lamps) because the chicks are in contact with its warm underneath surface. 
The brooder runs at 12v for safety from a mains transformer (supplied) and with the convenience of a generous (about 10 feet) power lead. 
Different sizes of chicks are accommodated by three adjustable height settings and an indicator light confirms the brooder is connected. 
The low cost of the EcoGlow makes it possible for larger numbers of chicks to be warmed by multiples of brooders. Please also see the larger EcoGlow 50 chick brooder. 
Dimensions: 12" long x 8" wide x 8" high.

Interested in finding out more about Brinsea products?  Visit their website at www.brinsea.com and use the code COOP at checkout for 10% off your entire purchase! 


a Rafflecopter giveaway

Monday, January 19, 2015

White Bean Chicken Chili Crockpot Recipe


Serves: 6-8

Ingredients:
  • 1.5 pounds of chicken breasts
  • 1 teaspoon of chili powder 
  • 1 teaspoon of cumin 
  • 1/2 teaspoon garlic powder 
  • 14.5 ounces of chicken broth 
  • 4.5 ounce can of chopped green chiles (I used mild and only used half of the can)
  • 1/2 sweet onion, chopped
  • 15 ounce can of white corn, drained
  • 2 -15.5 ounce cans of white beans, drained (I used one can of Cannellini and one can of Navy)
  • 3 tablespoons of butter
  • 3 tablespoons of flour 
  • 1 cup of milk 
  • 1 teaspoon of Better Than Bullion chicken base
  • 1/2 teaspoon of salt 
  • 1/2 cup of sour cream 
  • 1/4 cup cilantro, chopped 
  • 1 cup of shredded cheese 
  • 1 bunch of green onions, chopped  
  • 1 lime 
Directions:
  1. Place your chicken breasts in the bottom of your crockpot and season with chili powder, cumin, and garlic powder.  Add the chicken broth, green chiles, onion, white corn and beans.  Cook on low for 6-8 hours. 
  2. An hour before serving: sin a saucepan, melt butter, whisk in flour and cook on medium heat allowing the mixture to brown a bit.  Slowly add milk and chicken base and simmer for 4-5 minutes until the sauce has thickened.  
  3. Pour the sauce into the crock pot, add the sour cream, and mix to combine. If the chicken is still whole, shred using two forks.  
  4. Allow the chili to cook for another hour. 
  5. Garnish chili with a dollop of sour cream, a pinch of chopped cilantro and green onions and a dash of fresh lime juice.  
  6. Enjoy! 

*Recipe adapted from Lovely Little Kitchen (THANK YOU!)

Thursday, September 11, 2014

Consonant Blends With Candy Land


We have a very reluctant little reader in our house who I always approach with great caution when it comes to her reading.  She loves to be read to and will sit for hours upon hours while I read her a chapter book,  but she instantly clams up and shuts down when she is the one asked to do the reading (even though she can). Usually I come up with creative ways to make our reading time and practice  more fun and to help lessen her anxiety.  This consonant blend Candy Land game was awesome and she really enjoyed playing it! If you are using the Oak Meadow Second Grade Curriculum, these are the blends that you will be asked to review.

First, print the tiles for your game cards HERE   

I apologize in advance, sizing documents properly in word programs is so not my thing,  so please check to make sure it is the right size before you print.  I originally sized this document to fit on a 3x5 index card but the cards would not feed through my printer,  so for my sanity I printed it on regular paper and trimmed up the sides.
After you've printed and trimmed, glue....


...stick the strip on your index card....


...cut between each blend...
And there you have it!  


How we played:

We played the exact same way that we would have played the original Candy Land game but with one added step.  Each time we picked a card we came up with a word for the consonant blend that was on the card before moving ahead.  For example, if I picked "dr" with one yellow square,  my word was "draw" and I advanced to the next yellow square.  If AG picked a double blue with "st" on the card, her word was "star" and she would advance two blue squares.

And thats really all there is to it. Easy way to practice consonant blends and have fun at the same time!


Wednesday, September 10, 2014

Magical Mask Making: Part Two


Last week we began learning about Ancient China in our Oak Meadow Curriculum!  We were instructed to make a mask similar to those used in Chinese festivals and now that our mask is done, it's time to decorate!  If you missed last weeks mask making post, you can find it HERE.

I let AG pick out the supplies to decorate her mask with.  I'm not so sure that the Ancient Chinese would have picked the same.   
AG began decorating by painting her entire mask with acrylic paints.  After the paint had dried,  she instructed me as to where she wanted her gems and feathers and I hot glued them onto the mask for her. 


Monday, September 8, 2014

Ant Farm in a Mason Jar


What you will need:

  • Two mason jars, one small enough to fit inside the other. 
  • About 2 cups of sand or soil 
  • Ants 
Directions:


Place the small mason jar inside of the large mason jar upside down or with the lid on.  This will force the ants to tunnel along the outside of the jar and allow you to see their paths! 

Once you have placed the smaller jar inside the larger jar, fill around it with sand just until the top of the smaller jar is covered.  
Search for ants!  From what I've read online it is important to collect ants from the same area because ants from different colonies will fight with each other.  I am defiantly not an ant expert and do not know if this is true, but we did our best to collect ants that were in the same area.  
Hard to see, but we did manage to collect a few! 
Once you have collected your ants, carefully place them in your farm.  This was a little tricky and we did end up losing a few so you should probably do this step outside.  Cover the jar with a piece of fabric and screw on the lid or use the lid of the mason jar, just make sure you poke some holes so the ants can get air!  Once your ants are in their farm, feed them once a week by dropping a few drops of sugar water on the top of the sand/soil!  If you aren't able to make an ant farm, there are plenty online that you can order, although I found them to be a little expensive.  

Have fun!  

Wednesday, September 3, 2014

Magical Mask Making: Part One


We had the best time this week making a plaster mask which was something I hadn't even done before! It was such an easy process and something I don't think I would have thought to do had it not been for our super creative Oak Meadow curriculum nudging us along!  Here is how you can make it at home:

What you will need:

  • Plaster cloth wrap.  We found ours at Hobby Lobby for 8.99 with a 40% off coupon and we had enough left over to make at least 10 more masks.  Well worth the money! 
  • Vaseline
  • Paint, feathers, gems, anything your little one might like to decorate their mask with once it is dry.
  • Hot glue gun 

Here is how you make it:

Tightly pull back all hair and liberally apply vaseline to the entire face taking extra care around the hairline and eyebrows.  This prevents the plaster from sticking to the child's face once it has hardened (we had absolutely no issues getting it off).

Cut your plaster cloth into strips of various sizes.  I found that it was easier to cut them as we went along.  Dip your cloth into a warm bowl of water and place on your child's face.  

Cover your child's entire face except for their eyes (in some cases nose) and mouth.  Allow the mask to sit for about 15 minutes so that it hardens.  You will be able to feel the mask and tell when it is about done.  At that point tell your child to make funny faces and with a little tug,  the mask will pop right off.

The inside of our mask was not entirely dry so we placed it in the toaster oven on "warm" for about a twenty minutes.  

Now is the fun part!  Time to decorate!!

CLICK HERE TO SEE THE FINISHED PRODUCT! 


Tuesday, September 2, 2014

Travel Tangram in a Tin


This week in our Oak Meadow second grade curriculum, we learned about Tangrams, a seven piece square that can be rearranged into thousands of shapes!  We had so much fun with the Tangram that was provided to us in our Oak Meadow curriculum that we decided to make our very own teeny tiny Tangram to take with us in the car! Here's how you can make yours at home.


What you will need:

  • The following printables.  Please note that I resized these before printing and they may need to be resized on your end as well in order to fit the box that you are using.  
1. "Tangram Puzzle" Printable 
2. Tangram Printable
3. Tangram Diagram Printable
  • An empty Altoids tin 
  • A sheet of magnetic contact paper (can be found at Walmart, made by Avery)
  • Mod Podge 
  • Hobby knife
Directions:

Peel the backing off of the magnetic paper 

Stick the Tangram printable to the back of the magnetic sheet and trim the sides.  

Carefully cut along the edges of the shapes within the Tangram. 

I found that you don't have to cut all of the way through the magnet.  Just a light knick and the magnet will bend and snap.  


Brush the inside bottom of the tin with Mod Podge and stick the diagram printable to the bottom.  Apply another coat of Mod Podge over the top of the diagram printable to.

Brush the top of the tin with Mod Podge and lay the "Tangram Puzzle" printable on top.  Apply another coat of Mod Podge over the top to seal. 

When the Mod Podge has dried, your Travel Tangram is ready to use!  


Other Posts You May Like