Showing posts with label incubator. Show all posts

Friday, February 20, 2015

Brinsea OvaView and OvaScope: Kevin's Review


Brinsea OvaView and OvaScope egg candle
Brinsea OvaView & OvaScope

**Buying a Brinsea product? Enter the word "COOP" at checkout and save 10%!!


Brinsea has "taken" the market once again with their OvaView and OvaScope! Gone are the days of cupping fragile eggs between your thumb and forefinger, while trying to perfectly position it in front of a flashlight to check for chick development.  The Brinsea OvaView in itself, is a great egg candling lamp.  When paired with the OvaScope, there is nothing that can compare.

Brinsea OvaView and OvaScope egg candle
Brinsea OvaView
The OvaView's sturdy structure measures 5" long x 3.3" wide x 1.3"high and weighs only 3 oz. The high efficiency LED bulb is powered by 4 AA batteries which Brinsea supplies with the unit.  The beauty of being an LED bulb opposed to an incandescent, is the obvious longevity of the product, and little or no concerns about overheating the eggs during candling.  In the package you will also find, detailed instructions, and a flexible rubber ring which holds itself around the light bulb socket to insure you have a proper seal with the egg so there isn't any light leaking around, which can hinder your viewing.  This model has a very good quality push button switch to turn the light on or off. 

Brinsea OvaScope

If you are buying the Brinsea OvaView, *DO NOT FORGET to order the OvaScope.  The OvaScope is a great compliment to the candling light.  It simply fits over the OvaView and firmly snaps into place allowing the viewer to observe the egg in daylight and at a slight magnification. Simply remove a side cover and place your egg into the holder and its "in the dark". Brinsea again has listened to its customers and has strategically added 2 nubs, on the sides of the scope, in which a web cam can be placed over the viewing hole and held in place with a simple rubber band. The OvaScope also has a handy little wheel that allows you to rotate the egg without having to remove the side cover. 


Brinsea OvaView and OvaScope egg candle
Brinsea OvaScope firmly snaps over the OvaView

Brinsea OvaView and OvaScope egg candle
Brinsea OvaScope side "egg door".

Brinsea OvaView and OvaScope egg candle
Serama chicken egg-Day 5 as seen through the Brinsea OvaScope

In conclusion, there is not a better egg candling device on the market.  I will never juggle a flashlight or goofy cardboard box concoction again.
Cheers! ~ Kevin

Contact:
Brinsea Products Inc.
704 N. Dixie Avenue
Titusville
Florida
FL 32796
USA

Phone (888) 667 7009
Web http://www.brinsea.com

Thursday, February 19, 2015

Brinsea Mini Advance Incubator: Kevin's Review

Our Little Coop Brinsea Mini Advance incubator review
Brinsea Mini Advance incubator

**Buying a Brinsea product? Enter the word "COOP" at checkout and save 10%!!


When shopping for an incubator, look no further than the      
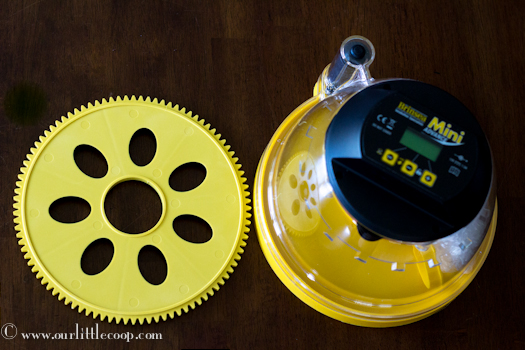
Brinsea Mini Advance.  This model is not intended for those looking to hatch large quantities of eggs at one single time.  Those folks looking to hatch a greater amount of eggs, should look into one of Brinsea's larger models. The total capacity for the Brinsea Mini Advance model is 7 Large eggs or 12 Quail eggs.  For me, I find the size a perfect fit for my needs.  Anything larger and I would quickly find myself over run with birds!
 The Mini Advance was designed for optimal 360 degree viewing of your incubating and hatching eggs thus making it the perfect choice for photographers looking for the best angles to take pictures or classrooms where this incubator can take center stage!

Our Little Coop Brinsea Mini Advance incubator review
Nicely Packaged
Upon arrival of your new Brinsea Mini Advance incubator, you will immediately see this company is truly proud of their products craftsmanship by how well packaged everything is and the literature that accompanies it.  The parts included are: (1) Incubator with the removable lid, (1) Egg disc, (1) Water Pot Guard, the 115volt power supply unit, a catalog, the user instruction pamphlet, a how to care for your chicks paper, and a free extend 2 year guarantee notice.

Our Little Coop Brinsea Mini Advance incubator review
Digital Control System

Our Little Coop Brinsea Mini Advance incubator review
Powered Fan
Simplicity has been achieved with the Mini Advanced's use of a digital control system and powered fan.  The control system is located on the very top of this model just over the heating element and fan, and utilizes three buttons to customize the settings to suit your needs.  The digital display "utilizes a highly accurate individually calibrated sensor for temperature" so no more need for multiple thermometers to confirm your temperature. You can adjust the temperature and have it displayed in either Celsius or Fahrenheit, and it reads to the tenth of a degree.


The digital display feature is loaded with a bunch of optional settings which include, Power Loss Display, High Temperature Alarm, Low Temperature Alarm, multiple turning adjustments, Cooling period feature ( used to simulate mother hen getting off of her eggs), a countdown to hatch calendar, and of course the option to save or cancel your settings.  I am totally impressed with the many turning adjustments which (briefly) include: "Auto" off on 2 days to hatch, turning interval timing, and turning angles which change the distance of the turn.
Our Little Coop Brinsea Mini Advance incubator review
Brinsea Mini Advance Incubator

In my opinion, the "only" things that can make this digital control system any better, would be the use of a back light on the display screen, and a humidity gauge (available on the EX model only).  Almost all digital displays these days have some sort of backlight. The lack of a humidity gauge really isn't "needed" in this particular model though because of the two section water pot located in the center.  Up until "lock down" you fill only half of the pot with water and at the two days until hatch period, you fill the second half.  Many people confirm this will put you at the perfect humidity level for hatching most types of poultry.

In closing, if you are looking into hatching your own birds for the first time or are an experienced small scaled hatcher, the Brinsea Mini Advanced is not only the best value on the market but the overall best choice.  Cheers! ~ Kevin

**Update:  Almost 3 years later and after many successful hatches, I still find this to be one of the best and most convenient incubators I have ever used.  I especially appreciate how our kids are able to observe the entire hatching process and watch the wonderful miracle of birth! 
~ Kevin


Contact:
Brinsea Products Inc.
704 N. Dixie Avenue
Titusville
Florida
FL 32796
USA

Phone (888) 667 7009
Web http://www.brinsea.com

Sunday, January 13, 2013

Be prepared with generator safety!

It is a given.  In most cases, the only time you will need to use your generator is when you are tired and the weather is less than desirable. 


Generator safety when prepping
Be safe while using a generator!

#1 Make sure when using your generator you leave it running outside your home away from flammable materials and far away from open windows.  Generators emit an exhaust similar to that produced from your car and can contain high amounts of carbon monoxide.  Remember carbon monoxide is a deadly odorless tasteless gas.  

#2 Do not overload the generators circuit.  Only plug in the recommended amount of extension cords and do not use an excessive amount of splitters.  Follow the UL listings on your extension cords as well.  If drawing more than the recommended amount of electricity, the cord can quickly become over-heated, melt and possibly start a fire.  

#3 Store any extra gas away from the generator and any pilot lights or flames.  This may seem like common sense but more times than not people leave their extra gas in too close to the running generator making future fill-ups that little bit more convenient.  Keep it far off to the side.

#4 When the temperature is hot, gasoline begins to evaporate and becomes more volatile.  Keep this in mind when the time comes to refill the generators fuel tank.  Shutting off the generator and letting it cool first is a very good idea!

Copper pendent light

 Following these few simple safety precautions will help you keep the  lights on!


Cheers! ~ Kevin


Wednesday, August 29, 2012

Candling chicken egg day 7 with Brinsea OvaScope - Embryo blinks its eyes.


              Look close, the little black dot is its eye blinking!!!!!!!!!!!!

Today Day 7, I candled the Serama chicken eggs I received from my friend Charlie Trevino.  Here is a quick clip of what we saw. In an upcoming post I will demonstrate the candling procedure using the Brinsea OvaScope. 


Other Posts You May Like