Monday, July 30, 2012

Keep your chickens healthy on the inside.

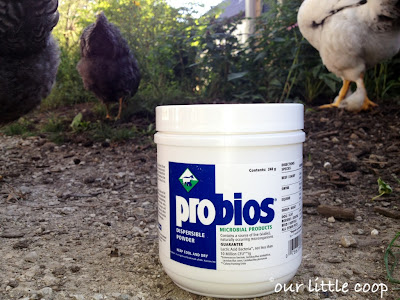
Provide your chickens probiotics for better health.


It wasn't until the recent battle with the upper respiratory issues our girls have been suffering with, that I had thought about giving them some sort of probiotic.  Typically when "we" get sick enough to be on antibiotics, we will supplement our diets with extra probiotics to help restore the good bacterias in our bodies.  Probiotics are good bacteria that help aid in digestion, and strengthen our immune systems.  Absence of those good bacterias leaves vulnerability to an over abundance of the bad which later leads to illness and poor health.  

*Providing your birds with probiotics from the day they hatch, can prevent them from developing dangerous diseases such as Salmonella. These probiotics also help chicks become healthier adult birds, digest their feed more efficiently for gaining weight and less waste and will also produce healthier eggs for you and your family. 
Probiotics in powdered form, can easily be added to your birds water.


Some people provide their birds with yogurt on a daily basis which is fine.  Like most other folks, I need an easier way to do so.  I find this to be in a powdered form I can easily add to their water. With the current brand I am using, a teaspoon mixed with a gallon of water does the trick. 
Cheers! ~ Kevin  

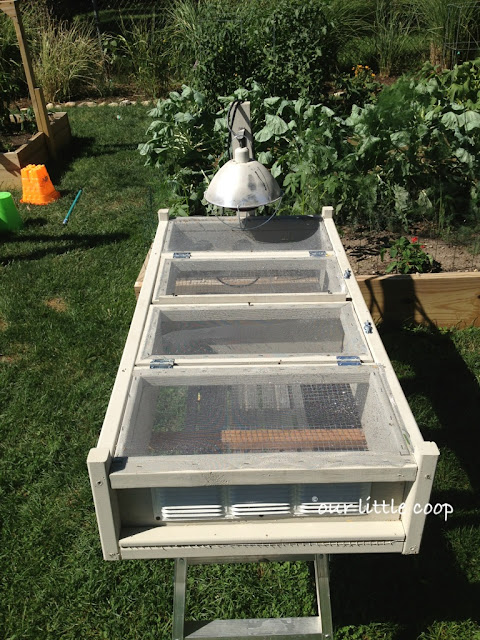
Our Little Coop Brooder

After hatching and rearing nearly hundreds of chicks and having them in our brooder, I now have confidence this design works and wanted to share it with you.


Our Little Coop Brooder with hanging heat lamp.

After doing a lot of research into what would be the best brooder to have for both chickens and quail chicks, I knew exactly what I needed wouldn't be available to purchase.  I wanted a brooder that would provide enough space for a small hatch of chickens yet would be large enough to hold a large hatch of quail.


Chicken and quail chick brooder

Although putting together a brooder for chickens is fairly simple, putting one together for quail is a little bit of a challenge.  The main concern with quail is their natural tendency to fly straight up when startled.  Unlike chickens, quail grow their flight feathers in a matter of days after hatching.  To overcome the safety concern of them hurting themselves if suddenly scared, I used backdoor screen material for the top, which will absorb any head strikes from flying quail. 


Divider to separate chicks or to aid in cleaning.


Keeping a brooder clean is also a  concern for many breeders.  As we all know, it is difficult to clean a brooder with little chicks running and jumping all over the place.  To overcome this challenge, I added a simple divider which slips in between the two doors, to section off the brooder.  At any given time, one side of the brooder is clean and I can flush the birds over to that side and keep them there while cleaning the other side out without risking any jumping out or getting sucked up into the vacuum. 

Shelf liner used in bottom of brooder to help against chicks getting leg injuries.

Spraddel leg is a common concern with newly hatched chicks.  As stated in one of my previous articles, I only keep them on shelf liner material for the first few days of there lives and the same holds true in this brooder.  After day 3, I add a layer of pine shavings right on top of the liner material.  This aids in clean up by being able to lift the liner out and dumping the contents into a garbage bag.  As the birds age, they are either left in this brooder for a little longer on the 1/2" hardware cloth or moved to a growing pen.

Brooder ventilation is important but having little or no drafts is critical.

Air circulation is provided by an open bottom design and the use of louvered vents on either side.  Drafts are prevented with the use of the solid walls used to construct this brooder. 

For those who hatch and sell chicks from home or at swaps, this is also a great way to show your birds to your customers.  Cheers! ~ Kevin


Friday, July 27, 2012

California Valley Quail

1 Day old California Valley quail chick
California Valley quail plumes on head


California Valley quail are another wonderful bird. They are most recognized by the front drooping plume of hair on the top of their heads. Their plumes are made up of 6 feathers and are black on the males and brown on the females.

California Quail often group themselves in the wild due to their highly social nature. They populate in dense grassland type settings. Unlike most other types of quail, California Valley quail love to perch above the ground at night.

Wednesday, July 25, 2012

Crock Pot Green Chile Chicken and Lime Soup


INGREDIENTS:
  • 1 tablespoon extra virgin olive oil 
  • 1 medium onion chopped
  • 3-4 cloves of fresh garlic, minced
  • 2 (32oz) cartons of chicken broth
  • 7 oz can mild green chile's (chopped)
  • 2 pounds chicken breasts
  • 1 fresh lime juiced 
  • 1 cup packed cilantro, chopped
  • 1 teaspoon salt (more or less depending on how much salt is in your broth)
  • 1/4 teaspoon freshly ground black pepper
  • 1 avocado, cubed
  • 1 cup cheddar cheese, shredded
  • Tortilla chips
  • 2-3 cups cooked rice 

DIRECTIONS:
  1. In a small pan saute onion and garlic 
  2. Place onions, garlic, chicken broth, green chile's, chicken breasts, lime juice, cilantro, salt and pepper in crock pot.  
  3. Set on low for 8 hours. 
  4. Cook rice according to package (I use a rice cooker)
  5. Remove chicken and shred
  6. Add chicken and rice back into soup and mix well
  7. Ladle soup into bowls, top with shredded cheese, avocado and tortilla chips.  
  8. Enjoy!

Creamy Avocado Chicken Enchiladas

Probably not the best thing to make on a 104 degree day, but this looked so good I couldn't wait to make it. this recipe on Pinterest (http://pinterest.com/pin/284993482640336544/) but modified it by eliminating the peppers and food processor (I can not stand cleaning my food processor and avoid using it at all cost).  The end result was awesome.  


Ingredients:

Enchiladas:
  • 1.5 lbs to 2 lbs of chicken breast (boiled and shredded)  You can also use rotisserie in a pinch
  • 8-10 small flour tortillas 
  • 3 cups of cheddar cheese shredded 
Sauce:
  • 2 TBS butter
  • 2 TBS flour
  • 1 onion diced  
  • 2 cups chicken broth
  • 3/4 cup sour cream
  • 1 cup Wholly Guacamole (see original recipe if you can't find pre-made guacamole)
  • 1/2 cup chopped cilantro 
  • 1 lime juiced
Directions:
  1. Preheat oven to 325 degrees
  2. Prepare your shredded chicken.  Once your chicken is shredded and start your sauce.  
  3. In a large sauce pan melt 2 TBS of butter. Add TBS of flour and whisk until the mixture begins to brown.  
  4. Add diced onion and sauté until onion begins to turn translucent. 
  5. Slowly add your 2 cups of chicken broth, sour cream, prepared guacamole, cilantro and lime.  Cook for 10 minutes or until your sauce begins to thicken.  Remove from heat
  6. Take one of your tortillas and spoon in about 1/4 cup of shredded chicken, 1/4 cup of avocado cream sauce and a sprinkle of cheese.  Fold both sides around the mixture and place fold down in a medium casserole dish.  Repeat until you run out of room or ingredients! :)
  7. Once all of the tortillas are folded and in your dish, cover with the remainder of your creamy avocado sauce and top with cheese.  
  8. Cook uncovered for 20 minutes on 325 degrees or until the cheese begins to bubble.  
  9. Enjoy!


Andalusian

The Andalusian chicken originating from Spain is often called the Blue Andalusian and is a very rare breed of chicken.  Crossing two blues can result in some white and some black offspring, however the APA only recognizes the Blue Andalusian.  The Andalusian is a good egg layer, and may lay up to 160 eggs per year!

Photo by Cowgirl Jules

Photo by lyzadanger

Photo by Cowgirl Jules 
Photo by equessaquagrl

Thursday, July 19, 2012

Grit and Crushed Oyster Shell

All birds need some form of grit or small stones to help "chew" their food. Chickens are one of those birds simply due to the fact they don't have teeth. When a chicken eats bugs, seeds, greens, etc. that food goes into their crop to begin the digestive process. Basically. To aid with digestion, they will also eat small stones or sand that also enters the crop and mashes and breaks up the food much like we do in our mouths.

There are several ways one can provide that much needed grit to their flocks diet. The grit can be mixed directly into the feed, or offered "free choice" in either a separate feed cup or as a pile on the ground near their eating area. I do the latter. The reason for my "grit pile" is to both offer it as free choice and to give the chickens a little extra something to scratch.

If your chickens are of the laying age, you should also supplement their diet with some calcium. For every egg the hen lays, she is depleting her body of this important mineral to produce the egg shells. For me, I find the best way to offer up that extra calcium is with crushed oyster shell. Crushed oyster shell is just that, and resembles the store bought bags of grit. I also offer this free choice and mix it into my grit pile. Cheers!
Backyard Chicken Grit and Manna Pro Oyster Shell
Backyard Chicken grit pile

Wednesday, July 18, 2012

How To Set Up A Brooder

As with everything, there are many ways to set up a brooder.  Some people use fish tanks, others use coolers, some build their own out of wood.  There is no real right wrong way to make a brooder as long as the chicks have space to move around, the brooder is kept clean and dry,  and the chicks are always kept at a comfortable temperature.  To keep this as simple as possible (because it really is) we are not going to go into great detail about the components of the brooder.  One of my biggest fears of keeping chickens was setting up the brooder properly.  After we used it time and time again, I realized it was really not complicated at all. There are a few things you need to make a brooder a success. We are going to show you what we have used and what has worked the best for us.  You can use your imagination and make whatever suits your fancy!  If you have any specific questions PLEASE do not hesitate to comment or contact us via e-mail!  


Choose a "container."  We use a 16 gallon galvanized tub.  You can choose whatever you would like as long as there is enough space,  the brooder can be cleaned out and kept dry, and the chicks can't escape. The only thing you  should never use is a cardboard box.  It can get wet, deteriorate and can catch fire.  


Choose a bedding.  We use pine shavings.  


Buy a heat lamp and bulb.  We use a red bulb because it is easier for the chicks to sleep and they tend not to peck each other under the red lighting.  When buying a fixture make sure that the bulb wattage doesn't exceed the maximum wattage of the socket.  We recommend using a fixture with a ceramic socket.  


Choose a feeder and waterer.  You can pick these up at any feed store.  I personally like the plastic dispensers.  They clean up better than the galvanized.  Make sure you place water away from the heat lamp so that it stays as cool as possible and doesn't breed bacteria. 

Monitor your chicks to make sure that their temperature in their brooder is comfortable.  You will know if it is too cold (they will all be in a pile under the heat lamp) or too hot (they will all be as far away from the light as possible).  Here you see the chicks are all evenly dispersed.


Monday, July 16, 2012

Chicken Breeds

Can you guess what one of the most exciting parts about owning chickens aside from actually getting them in your possession is?  Picking them out and buying them!  Every week we will be adding another breed of chicken with information and pictures to help you decide what breed is right for you! Check back often!


Ameraucana
Ancona 
Andalusian
Isbar


Ancona

The Ancona chicken, first named the Marchegiana, originates from Italy and are named after the seaport Ancona after they were brought by boat to England during the mid 19th century.  Anconas do extremely well in both high and low temperatures and are exceptional egg layers.  


Photo by .Brioso. 

Photo by Dale McNeill

Sunday, July 15, 2012

Giveaway From Our Sponsors Backyard Poultry Magazine and Happy Hen Treats!!

Win a 1-Year Subscription to Backyard Poultry Magazine AND a bag of Happy Hen Treats!

First, a word about our sponsors.  


About Backyard Poultry Magazine

Backyard Poultry is published bi-monthly in north-central Wisconsin by Countryside Publications, Ltd.
Departments:
In addition to feature articles, each issue contains informative articles in the following departments:
  • Breed Selection
  • Housing
  • Management
  • Health and Nutrition
  • Rare and Historic Breeds
  • News and Views
  • Other topics of interest to promote more and better raising of small-scale poultry.
Staff
Publisher: Dave Belanger
Editor: Elaine Belanger
Managing Editor: Anne-marie Ida
Circulation, fulfillment, and a flock of other tasks: Laura Ching, Ellen Waichulis, Kate Tucker
Bookstore: Ann Tom
Advertising Representatives: Alicia Komanec, Gary Christopherson

Countryside Publications, Ltd. also publishes:
Visit www.backyardpoultrymag.com for a ton of useful information and to subscribe.


About Happy Hen Treats

Mealworm Frenzy (3.53 oz) or (10 oz)
Spoil your chickens with the tasty all-natural mealworms found in Happy Hen Treats™ Mealworm Frenzy™.

-The world's first line of treats specifically made for chickens
-Offer chickens the taste they love without the inconvenience of live worms
- Resealable zip top bag for freshness and easy storage

Ingredients:
100% natural whole-dried mealworms.

Guaranteed Analysis:
Crude Protein (min.) 56.58%, Crude Fat (min.) 18.0%, Crude Fiber (max.) 7.2%, Moisture (max.) 5.0%.

Visit  www.happyhentreats.com for more products and information. 


How To Enter:

1. Please head over to Happy Hen Treats and Backyard Poultry Magazine on Facebook, give them a like and tell them that Our Little Coop sent you!

2. Leave a comment below telling us one thing you wish you knew BEFORE you got chickens that you know now that you have them.  

3. Please follow our blog (check the right side bar for ways to follow).  You don't HAVE to but it sure would be nice! :) 


We will announce the winner by responding to your comment in this blog post!  Winner announced Friday July, 20th 2012 at 12:00 NOON/CST.  

Good Luck!


Thursday, July 12, 2012

Our Little Coop modification.

Underneath the our little coop roost/ nest box, I had enclosed the area to give our chickens a safe place to hide during inclement weather. The ground mostly consists of a combination of dirt and pine shavings and seems to be the next best place for our chickens (next to my gardens) to enjoy a late morning dust bath. Like most of my projects, they are done as a last minute "emergency". The case was the same for enclosing this space due to late cold, windy and rainy weather this past spring. One day after work I screwed up some plywood, rather quickly, right over the already there hardware cloth, leaving the back open for fresh air. Knowingly, the day would soon come where I would need to figure out a way to get in there and clean it out. Ugh. Well today was that day! My thoughts were this: I need to make it removable, yet very secure, so I can put in place a screen "door" during the summer and an insulated door during the winter. The doors are to be held in place with 4 turn buttons. So this is what I came up with. ~ Kevin

Wednesday, July 11, 2012

25 Alternative Uses For Olive Oil


1.  Shaving Cream. Olive oil can be used as a substitute for shaving cream leaving your skin moisturized. 

2.  Furniture Polish. Us a teaspoon of olive oil on a soft rag and polish away! 

3.  Fingernails. Mix a bit of olive oil and water and soak your nails before a manicure.  Or apply to moisturize cuticles. 

4.  Treating Lice. Saturate your scalp and hair in olive oil, cover with a shower capo and leave on for a minimum of 3 hours.  

5.  Makeup Remover.  Apply olive oil under your eyes and face.  Rub gently and remove with a wet cloth

6.  Hair Conditioner. Use a small amount after shampooing to replace hair conditioner.  

7.  Shine Stainless Steel and Brass. Rub a small amount of olive oil on a rag and rub onto stainless steel and brass to prevent streaking and tarnish. 

8.  Help Earaches.  Carefully with a q-tip or cotton ball, apply olive oil to the outside of the ear cavity.  

9.  Hinge Lubricant. Wipe down your squeaky hinge with a cotton ball dipped in olive oil.  

10.  Shoe Polish. Buff your shoes with olive oil using a cloth.

11.  Diaper Rash.  Gently rub olive oil onto your babes bottom to help prevent diaper rash.

12.  Polish Your Floor. Mix 1/3 cup olive oil, 2/3 cup white vinegar, add to a spray bottle, spritz floor and shine with a soft rag.

13. Control Hair Frizz. Comb a small amount of olive oil through hair to control frizz. 

14.  Remove Paint From Hair and Skin.  Apply olive oil to paint on hair or skin and rub until the paint loosens.  

15.  Lip Balm.  Rub olive oil on lips.  Easy Peasy! 

16.  Foot Softener.  Rub feet with olive oil before bed, apply clean white cotton socks, sleep with socks on remove in morning

17.  Skin Moisturizer.  Rub olive oil on your skin daily to keep skin moisturized and healthy.  Reduces wrinkles and doesn't clog pores. 

18.  Unstick A Zipper. Apply olive oil to the teeth of the zipper with a cotton ball and work zipper down. 

19.  Stop Snoring.  Sipping a small amount of olive oil before bed lubricates the throat and can help curb disruptive snoring.  

20.  Use As Bath Oil.  Add a few tablespoons of olive oil to running bath water.  Be careful the tub will be slippery. 

21.  Clear Up Acne.  Add 3 tablespoons oil oil with 4 tablespoons of salt and rub onto your face.  Leave on for one minute and rinse off with war my soapy water.  

22.  Clean Greasy Hands.  Rub a few tablespoons of oil oil in greasy hands. Wash with warm water and soap.  

23.  Recondition An Old Baseball Mitt.  This will take a little longer than traditional treatments.  Rub oil into the mitt until desired condition has been met.  

24.  Freezing Herbs. Fill ice cub trays with olive oil and chopped herbs. Place in freezer.  Once frozen, remove from tray and place in a freezer bag.  Use as desired. 

25. Hairball Care. Help your cat pass hairballs by adding 1/4 tsp to their food daily. 

Tuesday, July 10, 2012

Ameraucana

Not to be confused with an Easter Egger, the Ameraucana is a blue egg layer that is thought to have originated in United States, however their origin is still up for debate.  Some believe that the Ameraucana was developed from the Araucana, while others believe that its origin is from South American blue egg layers.   


Ameraucana, Chicken, backyard, urban, farm, poultry, Eggs, Chickens, Americana chicken
Photo by Will Merydith


Ameraucana, Chicken, backyard, urban, farm, poultry, Eggs, Chickens, Americana chicken, chicks,
Photo by Will Merydith


Roosting Hens, Ameraucana, Chicken, backyard, urban, farm, poultry, Eggs, Chickens, Americana chicken, chicks,
Photo by Will Merydith
Backyard Chickens, Ameraucana, Chicken, backyard, urban, farm, poultry, Eggs, Chickens, Americana chicken, chicks,
Photo by Will Merydith


Milk Beak, Ameraucana, Chicken, backyard, urban, farm, poultry, Eggs, Chickens, Americana chicken, chicks,

Photo by Will Merydith


Sunday, July 8, 2012

Why Some Chickens Just Don't Like Being Wet

With all of the hot weather we have been having and temps reaching triple digits, chicken owners everywhere have been frantically trying to find ways to keep their flocks cool and alive in these extreme conditions.  Most everyone has agreed that ample shade, watermelon, bottles of ice water, fans, cool fresh drinking water, electrolytes, and frozen vegetable treats are proven safe ways to help chickens combat the heat and keep their body temperatures lower.  But one tip and trick that seems to  have caused quite the stir within the chicken community: The homemade "MISTER."
I saw quite a few concerned chicken owners asking advice online worried that the use of "misters" could cause respiratory distress, elevate their birds body temperature even more, and ultimately in some cases cause death to the animal.  I realized that while a high pressure mister would work great for chickens on a hot day by cooling the air and not getting them wet, a homemade "mister" would indeed cool the air, but if not used properly and with caution, would also soak the chickens.  Something about a wet chicken on a hot day seemed like a great idea to me!  After all, the first place I would want to be when the temp outside is 110 would be in a pool!!  But was that the same for a chicken?  I spent a good hour the other day in the hot sun adjusting our homemade "mister" just right so that it would hit the girls and every time I put it near them they took off.  Trying to prop it up, pin it up, point it this way, point it that way, turn the spray higher, turn the spray lower and the only one who got even remotely close to the water was Janis....go figure.  I myself was wet and annoyed and ended up turning off the water.  So I left it at that and wasn't too concerned about the risks involved with using a "mister" because, well....there was going to be no use of a "mister" at our house.  I did however begin to wonder why our girls disliked the water so much.  I mean, we are talking about chickens that feel A DROP of water, and high tail it out of there so fast you would think they were going to be eaten alive....by water droplets. Was there scientific or structural reasoning behind this strong hatred towards water that my girls seemed to have.  I searched and searched and could not find anything that would even suggest a reason as to why chickens didn't like to get wet, only other owners accounts to their own personal experiences.  Feeling a bit defeated and convinced I would never find an answer, I e-mailed our friends over at My Pet Chicken and explained why I was writing.  I did not want to put out any bad information and I had heard everyones opinions,  from "My chicken loves it," to "My chicken hates it," to "It can kill your chicken,"  to "That is ridiculous!" but what  I wanted to know was WHY most chickens didn't like to get wet.  So this morning I got a wonderful response from Laree who explained everything beautifully and I would love to share the information with all of you.

Hi Emily,
Thank you for contacting My Pet Chicken.
As with most animals, chickens are individuals--and I do have several silkies (especially a little silkie roo) that do like to be misted in the extreme heat.  However, silkies have a different feather structure than other birds, so they probably don't count ;)
The reason most chickens don't like to get wet it because the water prevents them from regulating their body temperature.  Sudden temperature changes causes stress, and  can be detrimental to a chicken's health.   While warm-blooded, birds cannot regulate their temperatures with the same efficiency as mammals. (They are missing several glands mammals have, but I don't know them off-hand.)
The feathers help insulate the chicken, and keep the chicken cool in the summer, as well as warm in the winter. 
When the barbs of the feather get wet, they collapse on top of themselves, and allow air to circulate next to the skin.  The water also becomes trapped in the downy barbs, under the feather barbs, which prevents the water from evaporating.  I suspect this then raises the humidity within the chicken's feathers, which then warms up the trapped water from both the air and the chicken's own body heat. 
The chicken has gone from hot, to wet and cold, to wet and hot---without any hope of relief.  It would be like walking around in a thermal tank top and a sweatshirt on a hot day.  As long as you walked in the shade, the heat would be bearable.  Suddenly, you fall in a lake, and get chilled--so you sit in the sun to dry off.  The outside of your sweatshirt might dry quickly, but your tank top would stay wet and clammy and you'd start to overheat.  Sitting in the shade would make you cold and uncomfortable, while moving into the sun would make you too hot.
Mmm...clammy humid chicken smell.
Also, water would leave calcium and other deposits on the feathers, which would make the barbs stick together after the water had dried.  Have you ever tried to wash a feather?  They never quite look the same when you are done.  The chicken would have to spend a significant amount of time preening to restore their feathers into working order.


When I read Laree's response it all began to make sense.  After all, that water ride at the amusement park seems like a really refreshing idea until you get off and have to walk around in wet clothes for the rest of the day.  We have ALL been there and know that feeling and it is naaaaaasty!! The point I'm trying to make is that homemade "misters" are not going to kill your chickens (I don't think) if used properly.  Intentionally soaking your chicken might.  Use them in a way that they will cool the air near your chickens but not close enough to get your chickens wet. Do not force your chickens into a mister, do not place it where they can not access food or water without entering it, do not put them in a position where they will get wet OR ELSE.   MOST chickens do not want to be wet because it will cause them some discomfort, please do not force them to.  On another note, you may happen to have chickens that love to get a good spray on a hot day.  If your chickens want to play in your homemade mister and soak themselves silly, well, people are still going to go on the water rides and walk around in sopping wet clothes all day.  May the mist be with them.  


Other Posts You May Like