Showing posts with label garden. Show all posts

Wednesday, December 18, 2013

Solstice Sowing Celebration

Photo Credit Ryan's Winter Solstice Survival Guide 
The Winter Solstice is upon us my friends and just so happens to be one of my favorite days of the year! This year the Winter Solstice falls on Saturday,  December the 21st which is not even a week away!  Each year the winter solstice marks the day when the sun will appear at noon at its lowest altitude above the horizon resulting in the shortest day and longest night of the year.  Not to be confused with the "first day of winter," the winter solstice is based entirely upon the season significance of the lengthening of days and the shortening of nights. 

The importance of the Solstice dates back as far as the neolithic times and is still celebrated today around the world with ceremonies custom to the different beliefs of many cultures. To some, the winter solstice symbolizes the rebirth of the sun and during ancient times the Solstice symbolized fertility and harvest. Traditionally winter sowing begins on the day of the Solstice. Trudi Davidoff developed a beautiful way to celebrate the beginning of your winter sow by planting four symbolic sets of seeds honoring remembrance, life, Mother Nature and faith. For more information about winter sowing CLICK HERE.

Which seeds to choose:

Seeds of Remembrance: Choose a flower seed at reminds you of someone you knew and loved but has since gone and is no longer with you. 

Seeds of Life: Choose seeds from a plant that produces fruit or nectar.  One that will invite birds and butterflies to your garden.

Seeds of Trees: Choose seeds of trees.  These seeds should be sown in honor of Mother Nature.

Seeds of Faith: Choose seeds of plants that would grow in a zone beyond the warmth that you live in.  This seed is sown to accept "the leap of faith" in or hearts and remind us of the miracles that Mother Nature is capable of.  

Tuesday, June 11, 2013

The Pocket Hose. Kevin's Review

As the Pocket Hose promises: 

"The Hose That Fits In A Pocket But Grows To A Full Size Hose".


Now let me start by saying this,  "Time will tell".  The reason Im going to start at this point is because I have been scouring the internet reading other peoples reviews and they are less than promising.  I have only owned this hose for a couple of days, and have not had any of the problems listed but I do in fact have my doubts:

"Plastic end pieces crack or leak"
"Hose develops pin holes and drips"
"Hose, if left full of water under pressure, will burst"

The Pocket Hose expanding garden hose, shut off, material
The Pocket Hose expanding garden hose

What I do love about the Pocket  Hose, and the reason for my write up , is the fact it is super light and very easy to manage around the yard.  The Pocket Hose has yet to tangle or kink, and stores super easy in a flower pot sitting right by your hose bib.  If this thing lasts, I plan on purchasing a couple more....

Cheers ~ Kevin


⬇   Please +1 our posts  ⬇

Thursday, June 6, 2013

My Luck with Growing Green Arrow peas


How to, Growing green arrow peas, wind damage, green arrow pea flower
Green Arrow Peas garden bed, flower, pea pod.
The weather this Spring has been a little crazy.  We just recently experienced some nasty winds that blew through our area and had lasted just long enough to do a little bit of damage to some of our gardens. Fortunately it didn't completely ruin everything but that is part of a gardeners life: Dealing with the unexpected.

Last year was so hot, so early, I had a terrible time trying to grow one of my favorite vegetables.  Green arrow peas are "usually" one of the easiest to grow but for some reason I haven't had much luck.   So you can understand the joy I had this morning when I went out and saw some pods hanging from the vines!  I have another area in the yard which I plan on sowing a different variety of pea there and hope it goes well. 

Cheers ~ Kevin


Thursday, May 9, 2013

Get 'em while the gettin' is good! Free seed flats and pots at a store near you!

Alright as the saying goes, it isn't stealing if they are throwing it away and you ask permission to take.  As so many people rush to their local garden centers and buy up all kinds of vegetables and flowers, they are leaving behind a very valuable resource.  And your closest friends and family?!? They are even more guilty.  But you need to take action. Now while you can! haha

  Dear friends and family, 
 YOU ARE NOW PUT ON NOTICE! When you are finished planting all of your veggies and annuals, save me the trays and 4" pots. Please......  

Free seed and flower pots and trays

Free seed and flower pots and trays

Grab what you can and keep for next year.  If you can, save some for your fellow gardeners.  Do not let these babies end up in some landfill. ugh...

Free seed and flower pots and trays
Cucumber seedlings in some freebie 4" pots

Just this year, I nabbed some 4" inch pots from my brother before he threw them out and used them to start some cucumbers.  After they are planted out in the garden, I'll use them probably 5 more times.  Re-use, Reduce, Recycle.

Cheers ~ Kevin

Now is the Time to plant Thyme.


How to grow thyme from seed, seeds. Perennial plant, garden sow, evergreen, cook, non gmo
Thyme seeds courtesy of Mike The Gardener

Over the years we have always had some type of thyme growing around our home. And for good reason! We use a lot of thyme for cooking.  Im not sure it is true, but I consider thyme somewhat of an "evergreen" type plant.  Well, at least for the most part.  I can remember in years past, brushing snow from the area where our thyme plants were growing, to reveal its emerald beauty, and to snip some off for for something cooking on the stove.

Ancient Egyptians used thyme for embalming.  The ancient Greeks used it in their baths and burnt it as incense in temples believing it was a source of courage.  Romans used thyme to purify their rooms and to flavor cheese and liqueurs.  At various point throughout time, thyme was used as an incense and placed on coffins during funeral, as it was supposed to insure passage into the next life. Source:Wikipedia

How to grow thyme from seed, seeds. Perennial plant, garden sow, evergreen, cook, non gmo
How one "should" plant thyme.

Back in February, I had received a packet of non GMO thyme seeds as a part of Seeds of the Month Club.  Today Im finally planting them.  

How to grow thyme from seed, seeds. Perennial plant, garden sow, evergreen, cook, non gmo, small size
Thyme seeds are quite small and require a little concentration when handling.

Thyme seeds are pretty small.  A little attention to detail is needed when sowing.  As a side note, I have had much success starting thyme in seed flats or sprinkling the tiny seeds on top of potting soil in an old flower pot.  Think "edible accent".  

How to grow thyme from seed, seeds. Perennial plant, garden sow, evergreen, cook, non gmo, small size

But as usual, I dare to be different...  Since thyme seeds do not require much when sowing, sprinkling over an area you wish for it to grow can also be a lot of fun! Just remember to lightly tap or step them into the soil to prevent them either washing or blowing away.  

I would love to hear how you have either used or grown thyme.  Please leave a comment below! :)
Cheers! ~ Kevin

The Seeds of the Month club by Mike the Gardener is a fun and inexpensive way to to receive various seeds of your own in the mail.  For more information, please check out my other article:

Seeds of The Month Club


Friday, April 26, 2013

Composting With The Worm Factory 360 (overview and setup)


When I hear the term "worm compost" it brings back memories of a friend who used to use the term "worm dirt" as a way to describe someone less than desirable. Whether you use the term worm compost, worm dirt, worm castings or worm poo, all are referring to the same thing : Vermicompost!  


Worm Factory 360, compost, worm, vermicompost, garden, worm castings, fertilizer
Worm Factory 360 Cover


The Worm Factory Composting Accessories (included)

 "Vermicompost is the product or process of composting using various worms, usually red wigglers, white worms, and other earthworms to create a herterogeneous mixture of decomposing vegetable or food waste, bedding materials, and vermicast.  Vermicast, also called worm castings, worm humos or worm manure, is the end-product of the breakdown of organic matter by an earthworm.  These castings have been shown to contain reduced levels of contaminants and a higher saturation of nutrients than do organic materials before vermicomposting.  Containing water-soluble nutrients, vemicompost is an excellent, nutrient-rich organic fertilizer and soil conditioner.  The process of producing vermicompost is called vermicomposting."Wikipedia


Worm Factory 360, compost, worm, vermicompost, garden, worm castings, fertilizer
Worm Factory 360 base and cover


Recently I was given the opportunity to take one of these vermicomposters for a test drive and it is living up to its promise and beginning to produce some yummy..er.. worm dirt! 
Well my vegetable plants will sure think so!
The composter I am using in the illustrations below, is the Worm Factory 360 sold at Rainbow Worms. In a later post, I will do a more thorough review but for now I wanted to show you all just how easy this unit is to set up.  

The first step in assembling the Worm Factory 360 is to drop in the "worm ladder".  This piece is critical to ensure any worms that fall through the bottom tray of the composter can crawl back up to its food source.
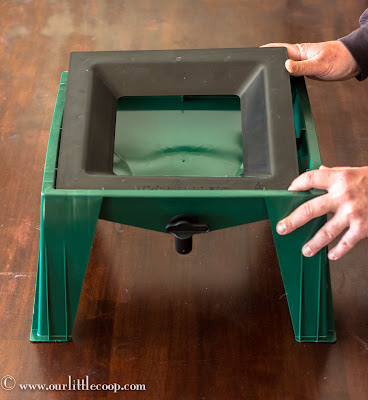

Worm Factory 360, compost, worm, vermicompost, garden, worm castings, fertilizer
Installing Worm Factory 360 "worm ladder"

Worm Factory 360, compost, worm, vermicompost, garden, worm castings, fertilizer


Worm Factory 360, compost, worm, vermicompost, garden, worm castings, fertilizer, trays
(4) Trays come with the Worm Factory 360

The Worm Factory 360 comes with 4 trays which will be added as time goes by.  In the beginning, you only need to put down one. The first tray fits perfectly into the Worm Factory base.

Worm Factory 360, compost, worm, vermicompost, garden, worm castings, fertilizer
Placing first tray onto Worm Factory base


We now need to add a base layer, bedding, and food.  (Think lasagna)  First down is 2 layers of news paper. After neatly placing the layer of newspaper in the tray of the Worm Factory 360, you will need to add the bedding.  
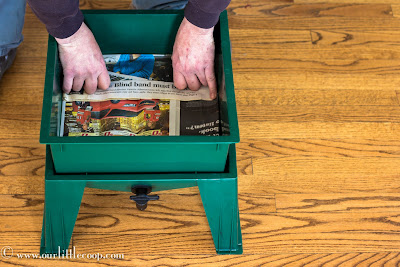
Worm Factory 360, compost, worm, vermicompost, garden, worm castings, fertilizer
Adding (2) layers of newspaper in bottom of tray

A coir brick is included in the supplies and you will need one half to start with.

Worm Factory 360, compost, worm, vermicompost, garden, worm castings, fertilizer
Break apart coir brick

To ready the coir brick for your Worm Factory, you will need to let it soak in approximately 3 cups of warm water and aid in breaking apart the fibrous material with your hands. 
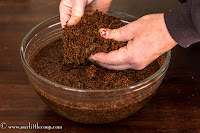
Worm Factory 360, compost, worm, vermicompost, garden, worm castings, fertilizer, coir
Soak and break up

Tightly squeeze out any excess water from the coir.

Worm Factory 360, compost, worm, vermicompost, garden, worm castings, fertilizer
Wring out water

Evenly spread the moist coir on top of the newspaper base.

Worm Factory 360, compost, worm, vermicompost, garden, worm castings, fertilizer
Spread a layer of wet coir to Worm Factory 360 tray

The next step is to add some pumice to the bedding.  I sprinkled it evenly over the coir and lightly mixed it in.


Worm Factory 360, compost, worm, vermicompost, garden, worm castings, fertilizer
Sprinkle pumice on top of coir

Adding a mix of your own semi-composted material is advised.  Although you will be adding food scraps for the worms to feed on, this will be an alternative source they will appreciate.  If you do not have any compost, go outside and look under some old bushes, in yours or a neighbors yard, and you will likely find some old leaves from the previous Fall.
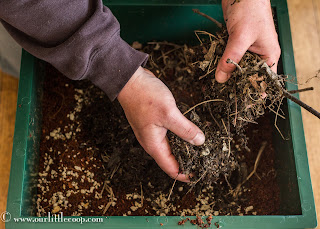


Worm Factory 360, compost, worm, vermicompost, garden, worm castings, fertilizer
Add organic material


Worm Factory 360, compost, worm, vermicompost, garden, worm castings, fertilizer
A good source of organic material can be found in old leaves under your bushes.

Now is the time to add your first supply of kitchen food scraps.  The manufacturer recommends initially putting it into 2 corners (as pictured).


Worm Factory 360, compost, worm, vermicompost, garden, worm castings, fertilizer
Add kitchen scraps to the Worm Factory 360's corners


Worm Factory 360, compost, worm, vermicompost, garden, worm castings, fertilizer
A mix of old greens, banana peel and finely chopped carrots
The next and final step in assembling your Worm Factory 360 is to add a layer of shredded paper.  (Again this is provided)

Worm Factory 360, compost, worm, vermicompost, garden, worm castings, fertilizer
Add a layer of shredded newspaper to your composter

Ready for the fun part!? We get to add the worms!  There are a couple options for worms on the Rainbow Worms website, but from my research, the best are he Red Wigglers. 
(purchased separately)

Worm Factory 360, compost, worm, vermicompost, garden, worm castings, fertilizer red wigglers
Red wigglers going in!

Slowly add the worms into the center of the tray.

Worm Factory 360, compost, worm, vermicompost, garden, worm castings, fertilizer red wigglers
Place worms in the center of the tray

After all of your worms have been added, gently cover them with some of the shredded paper.
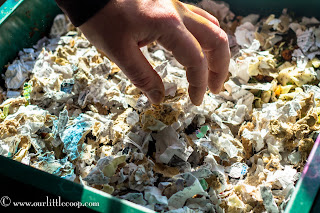
Worm Factory 360, compost, worm, vermicompost, garden, worm castings, fertilizer red wigglers
Tuck your worms in and leave them be for 3 days.

Place the cover on your Worm Factory 360 and walk away.  Let nature take it course.  In 3 days, you can remove the cover and check on the progress of your worms.  By this point, they should have all moved from the center and to either of the two corners with the food scraps.


Worm Factory 360, compost, worm, vermicompost, garden, worm castings, fertilizer red wigglers
Follow up with your worm compost in 3 days to make sure all worms have moved towards the kitchen scraps

As with gardening, composting with worms takes a little bit of time but the payoff is huge.  The vermicompost I eventually harvest will be used in a compost tea brewer.  Another great way to use it, is to lightly scratch into the dirt around your trees, ornamentals and any other plants and veggies you have growing.  At a later date, I will follow up with my progress.  

Cheers ~ Kevin

*Update June 15, 2013

compost, fertilizer, garden, red wigglers, vermicompost, worm, Worm Factory 360
Update on my Worm Factory 360 June 13, 2013
Since starting up this vermicomposter, I ended up with approximately 2100 red worms total!  I have been adding kitchen scraps, maple tree seeds (helicopters) and peat. On some days I have had to add a little sprinkle of water because things were looking a little too dry.  The bottom reservoir is full of compost tea which I will be sprinkling around my garden plants and trees.  I have started working on a second tray which I have added on top of the first and the worms are slowly finding their way there.  Now I am a little impatient, but by now I thought 2000 worms would have totally consumed everything in this box.  Not exactly the case...


To purchase your own Worm Factory 360 contact:

rainbow worms Worm Factory 360, compost, worm, vermicompost, garden, worm castings, fertilizer red wigglers
RAINBOW WORMS

Toll Free 877-280-5665

Rainbow Worms
1119 Via Los Trancos
San Lorenzo, CA 94580


Thursday, April 25, 2013

Seed To Table: Bean Bush - Calypso

botanical interests, bean bush calypso, garden, seed, yin yang, orca bean

"Whether you call them Calypso, the Yin Yang bean because of its unique design or the orca bean because it looks like a tiny killer whale, this unusual dry bean is pretty and delicious. Each bean has black and white markings with a contrasting dot. Cooked beans have a smooth texture and mild flavor that takes on the flavors in your favorite soup or stew. Each pod produces 4-5 seeds."

When to sow outside:
1 to 2 weeks after last frost when soil begins to warm 

When to start inside:
Not recommended 

Special Germination Instructions:
Seeds germinate best in warm soil 

Planting Guidelines:
Days to emerge: 3-10 days 
Seed depth: 1"
Seed Spacing: 2 seeds every 4"
Row Spacing: 18"-36"
Thinning: When 1" tall, thin to 1 plant every 4"


botanical interests, bean bush calypso, garden, seed, yin yang, orca bean

botanical interests, bean bush calypso, garden, seed, yin yang, orca bean

botanical interests, bean bush calypso, garden, seed, yin yang, orca bean

botanical interests, bean bush calypso, garden, seed, yin yang, orca bean

botanical interests, bean bush calypso, garden, seed, yin yang, orca bean

botanical interests, bean bush calypso, garden, seed, yin yang, orca bean

botanical interests, bean bush calypso, garden, seed, yin yang, orca bean


Check back for updates on our Calypso Beans! 
For more Seed to Table journeys, click HERE

Wednesday, April 24, 2013

Seed To Table: Swiss Chard - Five Color Silverbeet

garden, Five Color Silverbeet swiss chard, seed, botanical interests

 "Swiss Chard - Five Color Silverbeet is an improved color mix that provides beautiful shades of red, yellow, pink, orange and white stems topped with green or dark maroon leaves, often with contrasting deep red veins. Not only colorful, the stems and leaves provide delicious flavor packed with nutrition."

When to sow outside:
*1 to 2 weeks before the last frost. 
*As late as 2 months before first fall frost. 
*Sow in late summer for fall/winter crop

When to start inside:
Not recommended 

Planting Guidelines:
Days to emerge: 5-10 days 
Seed depth: 1/2"
Seed Spacing: a group of 2 to 3 seeds every 6" to 8"
Row Spacing: 18"
Thinning: When 1/2" tall, thin to 1 every 6" to 8"


garden, Five Color Silverbeet swiss chard, seed, botanical interests

garden, Five Color Silverbeet swiss chard, seed, botanical interests, planting, growing, how

garden, Five Color Silverbeet swiss chard, seed, botanical interests, planting, growing, how

garden, Five Color Silverbeet swiss chard, seed, botanical interests, planting, growing, how


garden, Five Color Silverbeet swiss chard, seed, botanical interests, planting, growing, how

garden, Five Color Silverbeet swiss chard, seed, botanical interests, planting, growing, how

Check back for updates on our Swiss Chard - Five Color Silverbeet!
For more Seed to Table journeys, click HERE


Other Posts You May Like