Showing posts with label heat. Show all posts

Sunday, January 13, 2013

Be prepared with generator safety!

It is a given.  In most cases, the only time you will need to use your generator is when you are tired and the weather is less than desirable. 


Generator safety when prepping
Be safe while using a generator!

#1 Make sure when using your generator you leave it running outside your home away from flammable materials and far away from open windows.  Generators emit an exhaust similar to that produced from your car and can contain high amounts of carbon monoxide.  Remember carbon monoxide is a deadly odorless tasteless gas.  

#2 Do not overload the generators circuit.  Only plug in the recommended amount of extension cords and do not use an excessive amount of splitters.  Follow the UL listings on your extension cords as well.  If drawing more than the recommended amount of electricity, the cord can quickly become over-heated, melt and possibly start a fire.  

#3 Store any extra gas away from the generator and any pilot lights or flames.  This may seem like common sense but more times than not people leave their extra gas in too close to the running generator making future fill-ups that little bit more convenient.  Keep it far off to the side.

#4 When the temperature is hot, gasoline begins to evaporate and becomes more volatile.  Keep this in mind when the time comes to refill the generators fuel tank.  Shutting off the generator and letting it cool first is a very good idea!

Copper pendent light

 Following these few simple safety precautions will help you keep the  lights on!


Cheers! ~ Kevin


Monday, July 30, 2012

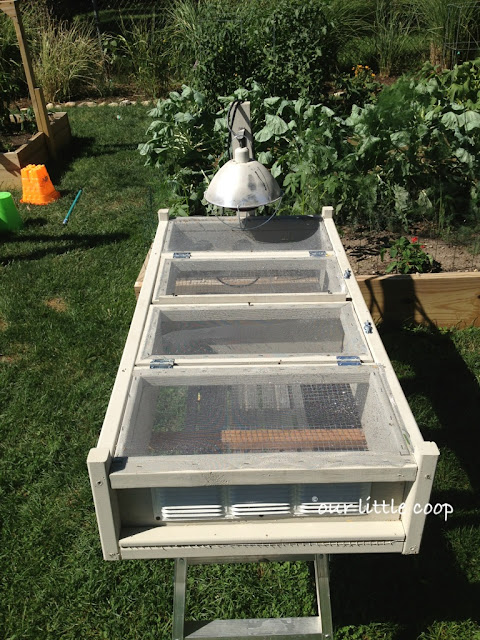
Our Little Coop Brooder

After hatching and rearing nearly hundreds of chicks and having them in our brooder, I now have confidence this design works and wanted to share it with you.


Our Little Coop Brooder with hanging heat lamp.

After doing a lot of research into what would be the best brooder to have for both chickens and quail chicks, I knew exactly what I needed wouldn't be available to purchase.  I wanted a brooder that would provide enough space for a small hatch of chickens yet would be large enough to hold a large hatch of quail.


Chicken and quail chick brooder

Although putting together a brooder for chickens is fairly simple, putting one together for quail is a little bit of a challenge.  The main concern with quail is their natural tendency to fly straight up when startled.  Unlike chickens, quail grow their flight feathers in a matter of days after hatching.  To overcome the safety concern of them hurting themselves if suddenly scared, I used backdoor screen material for the top, which will absorb any head strikes from flying quail. 


Divider to separate chicks or to aid in cleaning.


Keeping a brooder clean is also a  concern for many breeders.  As we all know, it is difficult to clean a brooder with little chicks running and jumping all over the place.  To overcome this challenge, I added a simple divider which slips in between the two doors, to section off the brooder.  At any given time, one side of the brooder is clean and I can flush the birds over to that side and keep them there while cleaning the other side out without risking any jumping out or getting sucked up into the vacuum. 

Shelf liner used in bottom of brooder to help against chicks getting leg injuries.

Spraddel leg is a common concern with newly hatched chicks.  As stated in one of my previous articles, I only keep them on shelf liner material for the first few days of there lives and the same holds true in this brooder.  After day 3, I add a layer of pine shavings right on top of the liner material.  This aids in clean up by being able to lift the liner out and dumping the contents into a garbage bag.  As the birds age, they are either left in this brooder for a little longer on the 1/2" hardware cloth or moved to a growing pen.

Brooder ventilation is important but having little or no drafts is critical.

Air circulation is provided by an open bottom design and the use of louvered vents on either side.  Drafts are prevented with the use of the solid walls used to construct this brooder. 

For those who hatch and sell chicks from home or at swaps, this is also a great way to show your birds to your customers.  Cheers! ~ Kevin


Friday, July 6, 2012

DIY water mister photos

Hi all. Just wanted to share with you a few pictures of my water mister setup. I can break this down into a step by step for those interested in the how to. All of these parts used can be found at your local home improvement stores and mainly consist of drip irrigation parts. Total cost = less than 4$! The nozzle I use has an adjustment on it so I can get the finest spray of water possible without having to buy a $1500 setup.

Thursday, July 5, 2012

Confusion about using misters on chickens

Hi all. With the recent bouts of extreme temperatures, the concept of using a mister to keep your chickens cool has been a hot topic.

**Just so you don't think this is coming from someone who has chickens, has a blog and a Facebook page and knows nothing about "evaporative cooling", I own and operate a heating and air conditioning company and have also graduated with a degree in thermodynamics.

CHICKENS DON'T LIKE TO BE WET. This is obvious by reading everyone's comments about how their chickens have reacted to their misters.

The most simplest form and example of evaporative cooling is perspiration, or the sweat secreted by our bodies. The constant evaporation occurring on the skin helps to cool the bodies temperature down. The amount of heat transfer depends on how quickly the evaporation occurs but on a typical 95 deg day is about 890 BTU per pound of water. The rate of evaporation depends on the temperature and humidity of the air (wet bulb temperature), which is why on those super hot, humid days our bodies are soaking wet because that perspiration does not evaporate fast enough.

What is a real mister? Well a real mister is not one you purchase for 7$ from an amazon link or big box store. Also those are not true evaporative coolers, and are not designed to be used in such a manner. Those are intended to be used on delicate plantings that benefit from light droplets of water. A mister or evaporative cooler, in the professional world, consists of a pure water supply, properly sized tubing, a compressor, filters and multiple appropriate sized nozzles. They are designed to cool the air without the targeted area or subjects ever getting wet. If you would rather invest in this type, get ready to spend some money because the entry level systems begin at around $1500.00-2000.00.

My bottom line to this discussion is use common sense. Do not try to force something on anything that clearly doesn't like it. If it is hot out, make sure to provide your birds with cold fresh water, plenty of shade, a fan and leave them alone. If you say your chickens dig your mister setup, please show me pictures of them in action. I love to be proven wrong. Peace out. ~ Kevin

Photo credits: Advancedmistingsystems.com

Friday, May 18, 2012

If you can't take the heat... neither can your peeps!

As summer begins to settle in,  Our Little Coop is typically missing its man of the house.  As many of you know, I work for myself as an HVAC service provider.  For those of you that are new here, the name of my company is Thermo Green, Inc. HVAC. I usually find myself away from home on average of anywhere between 8-16 hours a day, leaving our free-range chickens and dogs to fend for themselves.

The few precautions I usually take to make sure everyone will be ok during the day always pay off.  The most critical of all, is to ensure everyone has access to plenty of fresh water and shade from the sun.  Every morning I rinse/ refill 3 drinking containers and a large dog bowl with a combo of water and Kent VITA-PAK.  The VITA-PAK can be found at most feed stores or online.  I do not worry about the dogs drinking the chicken water or visa versa because they all get this combination.  The Kent is nothing more than extra vitamins and electrolytes which are critical as the mercury climbs.


To provide shade,  we have 2 large silver maples on our property as well as many ornamental grasses that are alone our property line.  At least half of our yard at any given time is shaded.  Additional shade can be provided with the use of anything that would totally block out the sun, like a piece of plywood or even a bed sheet draped over a clothes line. STAY COOL! ~ Kevin

Update ***** How to make the waterer pictured:

Kevin has fallen behind but is going to post a more detailed version. Basically what you do is take a clean 5 gallon bucket and drill a few 1/4" holes around the top (opening) of the bucket about 2 inches down. Find a pan that has sides that are at least 3-4 inches high. Fill up the bucket, place the pan over the top, and carefully flip the whole thing upside down. The water will fill the pan up to the holes that you drilled, and will maintain a constant height there. Hope this helps!? Stay tuned for the more detailed version. :-)

Other Posts You May Like