Showing posts with label feed. Show all posts

Friday, August 24, 2012

Meal worm farming


meal worm in palm of hand, farm, how to
As we all know, meal worms are a great feed supplement for all poultry flocks, and they LOVE them.  Thanks to companies like Happy Hen Treats they are easy to purchase and simple to feed to our chickens, ducks and quail.  Over time, depending on how often you like to give your birds meal worms, it can indeed get quite pricey.  In a time where the "name of the game" is to spend as little as possible and be more self sufficient, one finds themselves looking for alternatives to buying certain things.  Although there is an initial investment to meal worm farming, the pay off is quite nice and in some cases you can even make money by selling your worms.
Meal worm farm field.  Substrate used is wheat bran.
Meal worm farm field.  Substrate used is wheat bran.


I recently started up my own meal worm farm about 2 weeks ago after much research and consulting with several "professionals".  Like anything else, the more people you ask the more different answers you will receive.  What I did was to start simple and combined bits and pieces from each persons point of view.

The meal worm farm is the cheapest farm you can possibly buy.

The first thing you will need to start farming your own meal worms is obviously the farm itself.  I am using a plastic 3 drawer organizer I had left over from our office which had been used to store paper products in.  Since we no longer use paper, it was the perfect item to repurpose. The reason for 3 drawers is because you should separate the worms as they go through their life cycles from worm to pupa to beetle and back again.  All of the drawers will need a layer approximately 2 inches deep and also some sort of  moisture for the worms to drink from usually just in the form of a cut potato or carrot.  Since these worms are going to be a food source for our hens and our family eats their eggs, I didn't skimp on the substrate which the worms feed from.  In my farm I used an all natural wheat bran at about $2 per box with each drawer using about 2 boxes.  You can also use non - instant oat meal if you prefer.

Feed meal worms wheat bran by using as substrate or bedding
Feed them right by using a good substrate.

The first drawer of my meal worm farm contains the worms themselves.  This initial purchase of worms can either be bought in bulk from an online distributor or through your local pet store. You will want to start with about 500-2000 worms if you will be feeding your birds right from your farm. Stay away from the "super worms" and "giant meal worms" as these are somehow treated to prevent them from further developing.

The second drawer of my meal worm farm will contain the pupa I gather from my first drawer.  These are easy to distinguish because you will most likely find them on the top of the substrate, motionless, and will be a creamy white color.  Their color will slowly turn to brown during its pupation which may take anywhere from three days up to one month.

The third drawer of my meal worm farm will contain the beetles which "hatch" from the pupa.  The Tenebrio molter, or flour beetles, are then left in this drawer on the same substrate as in the other two, where they will eventually lay up to three hundred eggs each!  As these eggs hatch into worms and the worms get large enough for me to strain out, they will be placed into the first drawer and the cycle will begin all over again.  

Mealworm Nutritional Information:

Fat 27.2%, Protein 49.6%, Carbohydrates 6.9 grams/100, Calories 471 calories/100 grams


Happy Farming! 
Cheers ~ Kevin


(Purchase your supplies below with these great deals!)


Friday, August 17, 2012

DIY PVC Chicken Gravity Feeder and Waterer

The old fashioned feeders are quickly becoming a thing of the past.  Although they may still work for some, people are finding themselves frustrated at the fact that their chickens are either pooping or kicking bedding into the feeder, which can quickly spread illness and disease. 


"A properly constructed gravity feeder will be the solution to most feeder problems.  It can contain as much or as little feed as the handler wishes to keep, it prevents any possible ways for your chickens to get waste into their feed, and it will keep the inside contents dry and pest free."
"A properly constructed gravity feeder will be the solution to most feeder problems.  It can contain as much or as little feed as the handler wishes to keep, it prevents any possible ways for your chickens to get waste into their feed, and it will keep the inside contents dry and pest free."

A properly constructed gravity feeder is the solution to most feeder problems.  It can contain as much or as little feed as the handler wishes to keep, it prevents any possible way for chickens to get waste into their food, and it will keep the contents dry and pest free.  If you are looking for an alternative means of providing your girls crushed oyster shell other than in a bowl, this will accommodate that offering as well.


duck, chicken, diy, gravity feeder, make, easy, good, best
Got ducks? They quickly adapt to this style of feeder too.
All of the materials needed to construct these feeders can be found at your local home improvement store.  The tools required should be available in most everyones home or by borrowing from a neighbor.


Tools needed:


- Tape measure
- Power drill
- 1/4" Drill bit
- 7/16" socket and 7/16" wrench or adjustable wrench
- PVC primer (clear or purple)
- PVC cement
- A hand saw or PVC pipe cutter capable of cutting up to 4" PVC.  


Materials needed:

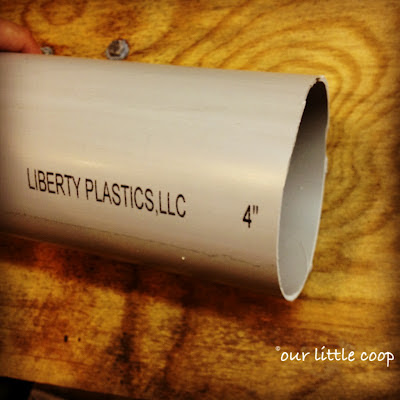
- 24" of Schedule 35 PVC.  This is a grey pipe and is used as waste pipe. 
  *(Regular Schedule 40 PVC will not work properly as noted in my explanation)


pvc pipe for gravity feeder, best
Schedule 35 PVC waste pipe
- (2) 1/4"x 1" length bolts, washers, and nuts

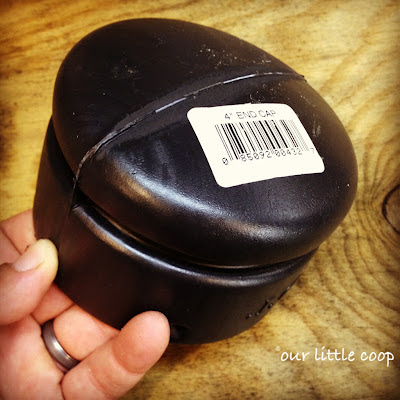
- 4"Black corrugated waste drain cap


best diy gravity feeder cap
Corrugated waste pipe end cap
- PVC fencing post cap

- 4"x 2"x3" waste pipe fitting.  This is found near the corrugated waste pipe and can be used for tying in downspouts. 


pvc gravity feeder parts, best, pvc, free, cap, trough
PVC fence post cap (left) Downspout adapter (right)
Start out by taking the fence post cap and slipping it over the square end of the waste pipe fitting.  This will be a snug fit.  On the lip of the post cap, measure 1" from the end and mark a dot on either side.  "Carefully" with the 1/4" drill bit, drill a hole thru these marks and slightly ream out to remove any burrs. 


Drill a 1/4" hole on either side 1" in from the corners
Push the 1/4" bolts into each one of these holes, and by reaching into the circular opening of the fitting, slide a washer and thread a nut on each of the two bolts.  Tighten enough where these connected fittings can just barely hinge apart.
pvc gravity feeder parts, best, pvc, free, cap, trough, poultry, urban, pest
Poultry gravity feeder assembly

With the PVC primer, lightly coat one end of the pipe approximately 2" down and the opening side of the fitting you just constructed.  Apply a light coat of PVC cement and firmly slide the fitting over the end of the pipe and hold in place for 10 seconds.  

Slide the black cap over the top, and you are done!


fill gravity feeder with chick starter
The handy cap keeps out dirt and debris.


Mounting can be done in several different ways.  In my very first picture, you will see I used a chimney pipe bracket, but a couple of heavy duty zip ties will work as well if mounting to a fence post or such.  Be creative!

pvc gravity feeder parts, best, pvc, free, cap, trough, poultry, urban, pest, chicken
Build multiple feeders for larger flocks.

Waterer:


Chicken water nipples screwed into PVC cap
The gravity waterer is constructed in almost the exact same manner except with the use of a 4" slip cap and as many water nipples as you would like to use.  I always recommend a minimum of at least two nipples just incase one fails.  Check the operation of this waterer daily.

Fill and ENJOY! 
Cheers ~ Kevin
*********Please subscribe, comment and share!************

Thursday, August 2, 2012

Organic vs. Processed chicken layer feed.

Organic vs. Non-organic chicken layer feed, gmo free
Organic vs. Non-organic chicken layer feed

*Let me start this post out by clarifying that I am not trying to start a debate or lecture about an already "beat to a pulp" topic.  My intentions are just to visually show the difference when it comes to organic chicken feed verses non-organic processed chicken feed.  When it comes to our birds, I believe you can only get out what you put in, so why not put in the best?  


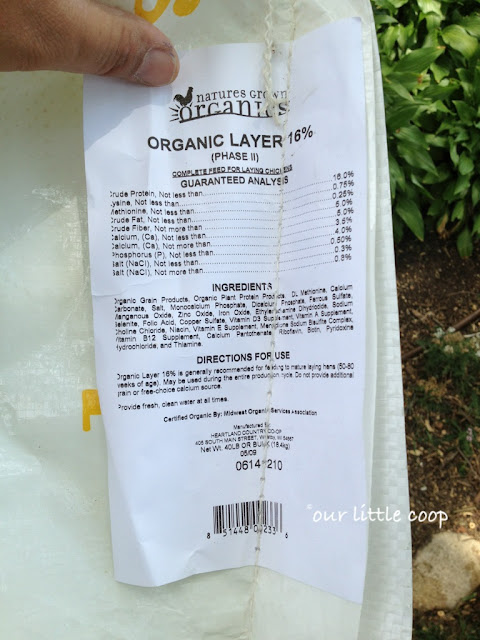
Organic feed is just what it says it is, organic.  It has been developed without the use of pesticides and fertilizers.  It is fact that when an animal eats a feed that contains fertilizer and pesticides, it stores in the body and it consumed by the end user.  What I find most interesting about organic feed is that I can visually see what it contains.  There is a mixture of cracked corn, barley, oats, etc.  It smells delicious, to say the least.  The protein content is about 16% which is comparable to non-organic layer feed.
Organic chicken layer feed gmo free, no gmo
Organic chicken layer feed


Non-organic chicken layer feed has a totally different texture and smells a little weird (in my opinion).  It is clear and without question processed and contains some sort of fillers.  I have read on other sites, some or the processed feeds actually may contain a plastic coating or filler.  This feed is more readily available and also costs about $16.00 for a 50 pound bag opposed to $24.00 for a 40 pound bag of the organic feed.  This works out to almost double the cost and may not be in your budget, escpecially if you have a lot of birds.  
Non-organic chicken layer feed

At Our Little Coop, we feed our laying hens the organic feed and the quail non-organic.  I choose to do this mainly because they are my pets and I love to spoil them, but more importantly, the whole reason we keep chickens for eggs is so WE KNOW WHAT IS "IN THEM". Cheers! ~ Kevin
Organic chicken feed label. Natures Grown Organics, gmo free
Organic chicken feed label. Natures Grown Organics

Join us on FACEBOOK!


Thursday, July 19, 2012

Grit and Crushed Oyster Shell

All birds need some form of grit or small stones to help "chew" their food. Chickens are one of those birds simply due to the fact they don't have teeth. When a chicken eats bugs, seeds, greens, etc. that food goes into their crop to begin the digestive process. Basically. To aid with digestion, they will also eat small stones or sand that also enters the crop and mashes and breaks up the food much like we do in our mouths.

There are several ways one can provide that much needed grit to their flocks diet. The grit can be mixed directly into the feed, or offered "free choice" in either a separate feed cup or as a pile on the ground near their eating area. I do the latter. The reason for my "grit pile" is to both offer it as free choice and to give the chickens a little extra something to scratch.

If your chickens are of the laying age, you should also supplement their diet with some calcium. For every egg the hen lays, she is depleting her body of this important mineral to produce the egg shells. For me, I find the best way to offer up that extra calcium is with crushed oyster shell. Crushed oyster shell is just that, and resembles the store bought bags of grit. I also offer this free choice and mix it into my grit pile. Cheers!
Backyard Chicken Grit and Manna Pro Oyster Shell
Backyard Chicken grit pile

Other Posts You May Like