Showing posts with label Button quail. Show all posts

Friday, August 17, 2012

Last minute - DIY FREE chick waterer


1 week old Coturnix quail chicks in brooder
1 week old Coturnix quail chicks

Poultry chicks, regardless of species or breed, are extremely cute and very hard to pass up to a family just getting started in backyard poultry keeping, especially if on a whim.

Sometimes poor planning gets the best of us and we start this great and wonderful hobby not by planning first, but with the chicks! Either the kids bring a few home from school, a friend had a better hatch than expected and decides to pawn a few cute little babies off on you, or maybe Tractor Supply is conveniently having their annual "Chick Days" while you just so happen to be there picking up dog food, you will suddenly find yourself scrambling to gather the necessary supplies and equipment needed.

After the first 24 hours of life, it is critical that a chick is eating food and drinking water. Although offering food is a simple thing to figure out, or can even be sprinkled on the floor, providing water in a safe manner can get a little hairy. I have read horror stories from folks who thought they had no other alternative than to leave a bowl of water with the chicks, later to find one had drown.

*While providing water for your newly hatched babies, it is always best to use some kind of recommended waterer. If you find yourself in a jam, you can quickly improvise with a soup can, plastic lid and a piece of heavy string.

Materials you will need to make this waterer for chick brooder
Materials you will need to make this waterer

Materials/Tools needed:


- 1 Soup can 

- 1 Plastic lid (slightly larger in diameter than the soup can)

- 1 piece of string

- Scratch awl or power drill with small sized drill bit

Location of holes to be made for chick waterer in brooder
Location of holes to be made

Mark the approximate height on can, with open side facing down, equal to half the height of the sides on lid.  This mark will be the height in which you want your water level at.

Location of holes to be made in chick waterer for brooder
Keep your holes slightly below the sides on the lid

Carefully punch or drill 2 holes across from each other at the height you previously marked making sure you do not have your hand on the opposite side you will be making your holes, as you can cause injury to yourself. 

diy chick waterer, quail, chickens, poultry
Fill with fresh water


Fill the can with water just below the holes you have just made, and firmly hold the lid over the top on the can.  Quickly while holding the lid in place, flip the can over, tightly tie a string around both and you are done!

Finished chick water ready for the brooder!


Cheers! ~ Kevin

*****Please Subscribe, comment and share!*****


Monday, July 30, 2012

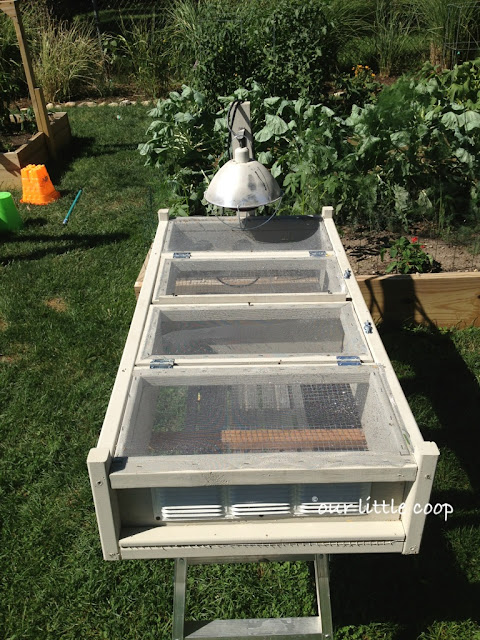
Our Little Coop Brooder

After hatching and rearing nearly hundreds of chicks and having them in our brooder, I now have confidence this design works and wanted to share it with you.


Our Little Coop Brooder with hanging heat lamp.

After doing a lot of research into what would be the best brooder to have for both chickens and quail chicks, I knew exactly what I needed wouldn't be available to purchase.  I wanted a brooder that would provide enough space for a small hatch of chickens yet would be large enough to hold a large hatch of quail.


Chicken and quail chick brooder

Although putting together a brooder for chickens is fairly simple, putting one together for quail is a little bit of a challenge.  The main concern with quail is their natural tendency to fly straight up when startled.  Unlike chickens, quail grow their flight feathers in a matter of days after hatching.  To overcome the safety concern of them hurting themselves if suddenly scared, I used backdoor screen material for the top, which will absorb any head strikes from flying quail. 


Divider to separate chicks or to aid in cleaning.


Keeping a brooder clean is also a  concern for many breeders.  As we all know, it is difficult to clean a brooder with little chicks running and jumping all over the place.  To overcome this challenge, I added a simple divider which slips in between the two doors, to section off the brooder.  At any given time, one side of the brooder is clean and I can flush the birds over to that side and keep them there while cleaning the other side out without risking any jumping out or getting sucked up into the vacuum. 

Shelf liner used in bottom of brooder to help against chicks getting leg injuries.

Spraddel leg is a common concern with newly hatched chicks.  As stated in one of my previous articles, I only keep them on shelf liner material for the first few days of there lives and the same holds true in this brooder.  After day 3, I add a layer of pine shavings right on top of the liner material.  This aids in clean up by being able to lift the liner out and dumping the contents into a garbage bag.  As the birds age, they are either left in this brooder for a little longer on the 1/2" hardware cloth or moved to a growing pen.

Brooder ventilation is important but having little or no drafts is critical.

Air circulation is provided by an open bottom design and the use of louvered vents on either side.  Drafts are prevented with the use of the solid walls used to construct this brooder. 

For those who hatch and sell chicks from home or at swaps, this is also a great way to show your birds to your customers.  Cheers! ~ Kevin


Tuesday, June 26, 2012

DIY Button Quail Brooder

If you just hatched or are looking to hatch baby button quails, you WILL need a brooder to keep them in. A brooder is a safe, clean place where the button quail chicks will spend at least the very first three weeks of their lives. At this time you will also need to maintain a "safe" temperature. The suggested temperatures are one hundred degrees for the first week, ninety five degrees the second and 85-90 the third. At about the third week for quail I start turning the heat lamp off during the day (provided the surrounding ambient temperatures are at least 70 degrees) and back on at night. Unlike chickens, quail feather out rather quickly.

There are a ton of great brooder ideas you can find on the Internet. For my coturnix quail, I use a larger permanent one that show off all the birds to my potential buyers. In this brooder, I do not regulate the temperature but it's large enough where if they get too hot they can quickly move from the light spot. For my button quail I did the following:

Find a 10gallon aquarium tank. Sanitize it. Measure and cut a piece of 1/2" plywood to fit in the lip surrounding the top. This lip is usually used to hold the tank hood. On one side, drill a hole to fit the socket portion of a small clamp light through and from the other side screw on the reflector. On the other half of you plywood, cut approximately a 9"x 9" square opening and cover with screening. This opening allows fresh air to change in and out, excess heat to escape yet small enough where any drafts won't touch the baby buttons.

To regulate the recommended temperature, you can purchase an outlet style dimmer switch (like the one pictured) for around 10$ at your local big box store. After a little while of adjusting the temperatures, you will find the dimmers sweet spot.

*Very important: because of how small most quail chicks are, I do not use pine shavings for bedding. This is just personal preference. I cut a piece of rubber drawer liner material for them to walk on instead.
Baby Button Quail enjoying their brooder!

Other Posts You May Like