Sunday, August 19, 2012

Free ranging coturnix quail

"Girls day out".  Coturnix quail hens enjoying their little bit of freedom dust bathing. free range, urban
"Girls day out".  Coturnix quail hens enjoying their little bit of freedom dust bathing.

Yesterday the quail received a little bit of freedom, just for the day.  I keep quail for eggs to hatch and eat, however they are still our pets as I had mentioned before. One of the ways I spoil our quail, is by giving them a "free-range" day every once in a while.  
I must note, there are a few safety precautions taken to ensure their safety.

Trimming flight feathers on Coturnix quail ensures they do not fly away finding themselves hopelessly lost.

The most important of those safety precautions is on the days I decide to let them free-range, I take them out of their cage one at a time and trim their flight feathers.  Coturnix quail are unlike most other types of quail in the fact that they are very domesticated and would likely not survive on their own in the wild.  They rely heavily on a normal feed and water source, and without would likely perish.  The other major concern of mine is our dogs.  Luckily we are fortunate enough to have an enclosed run for all of our birds, and this is where the Coturnix quail stay for the day.  
Chickens and quail can live in Harmony, together, urban
Chickens and quail can live in Harmony.


Despite popular belief, Quail and Chickens can live in harmony.  This doesn't go without saying that I have not seen the chickens peck at the quail from time to time and even bully them.  It is my belief that like any other bird, any "new comers" must be properly placed within the confines of the pecking order.  
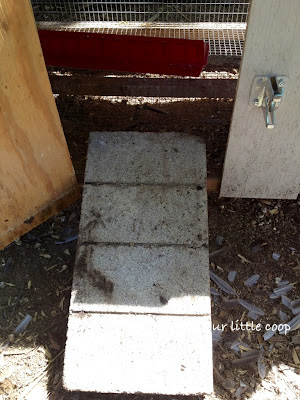
Access back into quail house, backyard, urban, coturnix, house
Access back into quail house

Quail are much smaller than chickens and can easily find hiding spots if they are being bullied too much.  One way to help this situation is to ensure the proper type of environment for them and also leaving access back into their house if they decide to do so.

Cheers! ~ Kevin


*****Please comment, subscribe and share*****


Saturday, August 18, 2012

Dr. Bronner's All Natural Liquid Detergent Recipe

I posted a recipe for homemade liquid laundry detergent a few months back and received a few negative comments regarding the use of the Fels-naptha bar soap.  I did a little research and it does seem that there are some environmental concerns involved with the ingredients of the soap, one ingredient being titanium dioxide which is known to contaminate the lakes, oceans and cause harm to wildlife.   I was a little bummed out to read this because I have had such great luck with my detergent, but I decided to seek out a more natural recipe.  I went to our health food store in town and picked up a bar of Dr. Bronners All-One Hemp Citrus Orange bar soap.  Made with certified fair trade and organic ingredients,  I was not able to find anything concerning the safety of this product and smells SO yummy!  I am head over heels for this recipe and it always feels good to know you're using a safe product!  

borax, soup, pure, castile, washing soda, natural detergent, recipe
Ingredients:
1/2 cup borax
1/2 cup washing soda
1/3 bar Dr. Bronner All-One Bar Soap
Dr. Bronner soap bar, grater, grate, recipe
Using a cheese grater, grate 1/3 of your Dr. Bronner soap bar


Add 4 cups of water and your Dr. Bronner soap shavings to a medium pot and heat until soap has dissolved.  
Add the 1/2 cup of borax and 1/2 cup of washing soda to the soap and water mixture

Heat and stir until the borax and washing soda have dissolved.
Heat and stir until the borax and washing soda have dissolved. 


In a large bucket, add 1 gallon of warm water


Add your soap/borax/washing soda mixture to your bucket of water


Stir and allow to rest overnight 


Using a funnel, pour your Dr. Bronner liquid laundry detergent into an empty container (make sure you ask your friends and family to save their empty detergent containers!)

Use 1/2 cup of detergent per load and enjoy! 


Join us on FACEBOOK!


Friday, August 17, 2012

Last minute - DIY FREE chick waterer


1 week old Coturnix quail chicks in brooder
1 week old Coturnix quail chicks

Poultry chicks, regardless of species or breed, are extremely cute and very hard to pass up to a family just getting started in backyard poultry keeping, especially if on a whim.

Sometimes poor planning gets the best of us and we start this great and wonderful hobby not by planning first, but with the chicks! Either the kids bring a few home from school, a friend had a better hatch than expected and decides to pawn a few cute little babies off on you, or maybe Tractor Supply is conveniently having their annual "Chick Days" while you just so happen to be there picking up dog food, you will suddenly find yourself scrambling to gather the necessary supplies and equipment needed.

After the first 24 hours of life, it is critical that a chick is eating food and drinking water. Although offering food is a simple thing to figure out, or can even be sprinkled on the floor, providing water in a safe manner can get a little hairy. I have read horror stories from folks who thought they had no other alternative than to leave a bowl of water with the chicks, later to find one had drown.

*While providing water for your newly hatched babies, it is always best to use some kind of recommended waterer. If you find yourself in a jam, you can quickly improvise with a soup can, plastic lid and a piece of heavy string.

Materials you will need to make this waterer for chick brooder
Materials you will need to make this waterer

Materials/Tools needed:


- 1 Soup can 

- 1 Plastic lid (slightly larger in diameter than the soup can)

- 1 piece of string

- Scratch awl or power drill with small sized drill bit

Location of holes to be made for chick waterer in brooder
Location of holes to be made

Mark the approximate height on can, with open side facing down, equal to half the height of the sides on lid.  This mark will be the height in which you want your water level at.

Location of holes to be made in chick waterer for brooder
Keep your holes slightly below the sides on the lid

Carefully punch or drill 2 holes across from each other at the height you previously marked making sure you do not have your hand on the opposite side you will be making your holes, as you can cause injury to yourself. 

diy chick waterer, quail, chickens, poultry
Fill with fresh water


Fill the can with water just below the holes you have just made, and firmly hold the lid over the top on the can.  Quickly while holding the lid in place, flip the can over, tightly tie a string around both and you are done!

Finished chick water ready for the brooder!


Cheers! ~ Kevin

*****Please Subscribe, comment and share!*****


DIY PVC Chicken Gravity Feeder and Waterer

The old fashioned feeders are quickly becoming a thing of the past.  Although they may still work for some, people are finding themselves frustrated at the fact that their chickens are either pooping or kicking bedding into the feeder, which can quickly spread illness and disease. 


"A properly constructed gravity feeder will be the solution to most feeder problems.  It can contain as much or as little feed as the handler wishes to keep, it prevents any possible ways for your chickens to get waste into their feed, and it will keep the inside contents dry and pest free."
"A properly constructed gravity feeder will be the solution to most feeder problems.  It can contain as much or as little feed as the handler wishes to keep, it prevents any possible ways for your chickens to get waste into their feed, and it will keep the inside contents dry and pest free."

A properly constructed gravity feeder is the solution to most feeder problems.  It can contain as much or as little feed as the handler wishes to keep, it prevents any possible way for chickens to get waste into their food, and it will keep the contents dry and pest free.  If you are looking for an alternative means of providing your girls crushed oyster shell other than in a bowl, this will accommodate that offering as well.


duck, chicken, diy, gravity feeder, make, easy, good, best
Got ducks? They quickly adapt to this style of feeder too.
All of the materials needed to construct these feeders can be found at your local home improvement store.  The tools required should be available in most everyones home or by borrowing from a neighbor.


Tools needed:


- Tape measure
- Power drill
- 1/4" Drill bit
- 7/16" socket and 7/16" wrench or adjustable wrench
- PVC primer (clear or purple)
- PVC cement
- A hand saw or PVC pipe cutter capable of cutting up to 4" PVC.  


Materials needed:

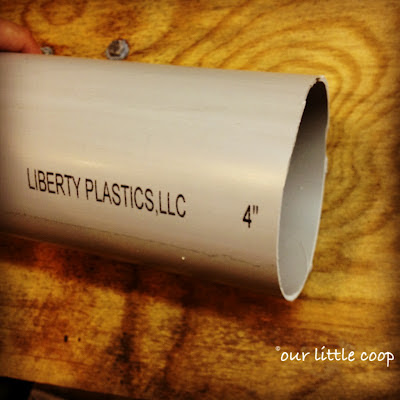
- 24" of Schedule 35 PVC.  This is a grey pipe and is used as waste pipe. 
  *(Regular Schedule 40 PVC will not work properly as noted in my explanation)


pvc pipe for gravity feeder, best
Schedule 35 PVC waste pipe
- (2) 1/4"x 1" length bolts, washers, and nuts

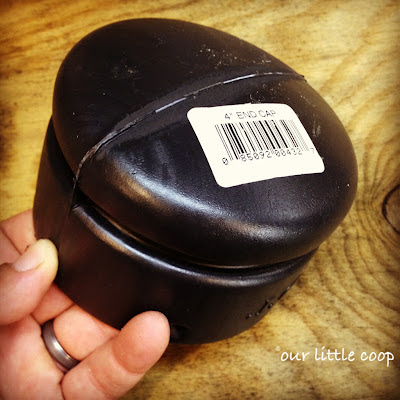
- 4"Black corrugated waste drain cap


best diy gravity feeder cap
Corrugated waste pipe end cap
- PVC fencing post cap

- 4"x 2"x3" waste pipe fitting.  This is found near the corrugated waste pipe and can be used for tying in downspouts. 


pvc gravity feeder parts, best, pvc, free, cap, trough
PVC fence post cap (left) Downspout adapter (right)
Start out by taking the fence post cap and slipping it over the square end of the waste pipe fitting.  This will be a snug fit.  On the lip of the post cap, measure 1" from the end and mark a dot on either side.  "Carefully" with the 1/4" drill bit, drill a hole thru these marks and slightly ream out to remove any burrs. 


Drill a 1/4" hole on either side 1" in from the corners
Push the 1/4" bolts into each one of these holes, and by reaching into the circular opening of the fitting, slide a washer and thread a nut on each of the two bolts.  Tighten enough where these connected fittings can just barely hinge apart.
pvc gravity feeder parts, best, pvc, free, cap, trough, poultry, urban, pest
Poultry gravity feeder assembly

With the PVC primer, lightly coat one end of the pipe approximately 2" down and the opening side of the fitting you just constructed.  Apply a light coat of PVC cement and firmly slide the fitting over the end of the pipe and hold in place for 10 seconds.  

Slide the black cap over the top, and you are done!


fill gravity feeder with chick starter
The handy cap keeps out dirt and debris.


Mounting can be done in several different ways.  In my very first picture, you will see I used a chimney pipe bracket, but a couple of heavy duty zip ties will work as well if mounting to a fence post or such.  Be creative!

pvc gravity feeder parts, best, pvc, free, cap, trough, poultry, urban, pest, chicken
Build multiple feeders for larger flocks.

Waterer:


Chicken water nipples screwed into PVC cap
The gravity waterer is constructed in almost the exact same manner except with the use of a 4" slip cap and as many water nipples as you would like to use.  I always recommend a minimum of at least two nipples just incase one fails.  Check the operation of this waterer daily.

Fill and ENJOY! 
Cheers ~ Kevin
*********Please subscribe, comment and share!************

Monday, August 13, 2012

Black gold for your garden with a "kick"

Free coffee grounds are like black gold for your garden. 


 I am often blessed with gigantic blooms and luscious green and healthy plants around the yard and I owe much of this success not to Miracle Grow, but coffee grounds.  There are a couple ways to obtain free coffee grounds. One way is obviously by saving the ones you used to make your morning cup of java and the other is to contact your local coffee shop or restaurant and by kindly asking them to save some for you.  The bigger chain stores are recognizing the benefits of their used grounds, and even instruct their employees to save and place them by the front door so customers can easily grab them on their way out.  "First come - first serve" of course.

A lot of times, the restaurants will bag them up "filter and all" but that is OK too.  The filters can be added to your compost pile or buried directly into your soil.  I take the bag of coffee grounds and sprinkle a 1" layer around all of my plants, starting with the vegetable garden and fruit trees first, then lightly water it in. Other times I save up the grounds in buckets and mix it with fresh compost to be later cultivated into the soil before planting. 

The benefits are almost endless...


Nitrogen/ Plant Food.

Used coffee grounds are very high in Nitrogen, which as we all know is the fuel to fast and vigorous growth.  These grounds are slightly acidic so plants such as tomatoes and roses greatly appreciate a healthy dose but be aware not to pile it on too thick as you can create a mold growth. 


Slugs, Snails, and other pests

These little buggers hate these grounds very much and will usually stay far away.  If you have plants that are constantly being damaged by slugs, sprinkle a healthy dose of coffee grounds around the plant and as the slug passes over it, they will absorb the caffeine which acts as a poison.

Worms Love It! 

I'm no expert, but we do have a TON of worms in our garden.  From what I can see, the worms seem to  love to feed on the coffee grounds and its probably due to the small particle size which makes it easier for them to eat.  Worms then digest the grounds leaving you with fresh worm poop which is highly beneficial itself!

So the next time you brew a cup of Joe or pick up your latte, remember to ask for or keep the used coffee grounds.  Your plants will show their appreciation by providing you with a healthy growing season!

Cheers ~ Kevin


*********Please subscribe, comment and share!************


Sunday, August 12, 2012

Quail hatch day!


Newly hatched Coturnix quail

Yes, I am a border-line quail hatching addict. Luckily for me, I have a lot of people interested in starting to raise quail for both their eggs and for meat.

Today is day 16 and I have both Coturnix and Tuxedo Coturnix hatching. This is my first time hatching the tuxedos and so far a success. I am very happy to be adding these to my flock to add a little color variation.
Tuxedo Coturnix quail (Left) & normal Coturnix quail (Right)


Tuxedo and regular Coturnix chicks


Just hatched baby quail in the brooder.

Cheers! ~ Kevin

Join us on FACEBOOK!


*********⬇   Please +1 our posts  ⬇************


Saturday, August 11, 2012

DIY "Scentsy" Bars


A few months back my husband's aunt turned me on to Scentsy, a candle warming system that claims to "never release the harmful chemicals that you can find in regular jarred candles."  I have really enjoyed using the Scentsy warmer but had one dilemma:  I couldn't smell the scents before buying them.  I'm sure I could have found a Scentsy rep closer or could have asked her to send me samples, but I am really hung up on a few scents over at Bath and Body Works and some that I found over at www.jbcandles.etsy.com, a small company that  hand pours their candles and uses American grown soy beans and cotton wicks.  I really wanted to see if I could make my own "Scentsy" bars,  so I waited until Bath and Body Works had their 2 for $20 sale and started my experiment!  I used an old candle to start with in case the it was a FAIL but I'm happy to report that this was a huge success!
Here is what I did:


diy scents bars, cook, make, free, scentsy, bars, cheap, DIY, melt, scentsy, wax,  make your own, burner, candles, Ameraucana, Chicken, backyard, urban, farm, poultry, Eggs, Chickens, Americana chicken, chicks, kids, best, children, pets, sentsy
Place the candle of your choice in a double boiler and heat on LOW heat. This might take awhile so be patient.   


diy scents bars, cook, make, free, scentsy, bars, cheap, DIY, melt, scentsy, wax,  make your own, burner, candles, Ameraucana, Chicken, backyard, urban, farm, poultry, Eggs, Chickens, Americana chicken, chicks, kids, best, children, pets, sentsy
Once the wax has melted, carefully remove the candle with an oven mitt, the glass may be hot.


diy scents bars, cook, make, free, candle, melt, scentsy, bars, cheap, DIY, melt, scentsy, wax,  make your own, burner, candles, Ameraucana, Chicken, backyard, urban, farm, poultry, Eggs, Chickens, Americana chicken, chicks, kids, best, children, pets
Pour melted candle wax into your tray(s)....

diy scents bars, cook, make, free, hold, scentsy, table, bars, cheap, DIY, melt, scentsy, wax,  make your own, burner, candles, Ameraucana, Chicken, backyard, urban, farm, poultry, Eggs, Chickens, Americana chicken, chicks, kids, best, children, pets
and allow the wax to harden.


finished making scentsy bars candles, bars, cheap, DIY, melt, scentsy, wax,  make your own, burner, candles, Ameraucana, Chicken, backyard, urban, farm, poultry, Eggs, Chickens, Americana chicken, chicks, kids, best, children, pets
Use as you would a normal bar!


The cost of what I did:

Candles: (2) 14.5oz for $20.00 at Bath and Body Works = $24.43 (includes shipping, tax, and coupon code)

Scentsy Bars: (1) 2.6oz package for $5.00

2 candles = approx. 11 packages of Scentsy Bars


   Please +1 our posts CLICK HERE!

Friday, August 10, 2012

How to Freeze Basil

I finally made a point to get out into the garden today and prune back the basil plants that have now gone to seed. Whoops!  Now that the chickens have been confined to their run and are no longer trampling through gardens, the basil plants were able to regain their posture a bit over the last week or so and were in desperate need of some TLC.   As with everything else in the garden, it all seems to comes at once.  I knew there was no way I would be using the amount of basil that I harvested today any time soon,  so I did a little research and devised a plan to freeze my basil in ice cube trays, bag it up and keep it in the fridge for future occasions when a recipe called for a few tablespoons of chopped basil!  Here is what to do:

store basil from the garden over winter, urban, homestead, prepper, harvest
Harvest your basil.


Pull basil leaves from the stems and place them into a food processor or blender.
Pull the leaves from the stems and place them into a food processor or blender.  

basil and olive oil in food processor
Pour one to two tablespoons of olive oil into the food processor 


pulse basil leaves
Pulse!


.....until it looks like this.


store basil from the garden over winter, urban, homestead, prepper, ice cube tray
Spoon about a tablespoon of basil into each section of your ice cube tray. 


Add a little water to help the cubes hold their shape.


Place the ice cube trays in the freezer for a few hours .

  
frozen cube of basil ready for storage, freeze
Once the cubes are frozen, remove the basil cubes.... 


frozen basil in ziplock bag
...and bag them up in a freezer bag, throw them back into the freezer and use as needed!  

Join us on FACEBOOK!

Thursday, August 2, 2012

Organic vs. Processed chicken layer feed.

Organic vs. Non-organic chicken layer feed, gmo free
Organic vs. Non-organic chicken layer feed

*Let me start this post out by clarifying that I am not trying to start a debate or lecture about an already "beat to a pulp" topic.  My intentions are just to visually show the difference when it comes to organic chicken feed verses non-organic processed chicken feed.  When it comes to our birds, I believe you can only get out what you put in, so why not put in the best?  


Organic feed is just what it says it is, organic.  It has been developed without the use of pesticides and fertilizers.  It is fact that when an animal eats a feed that contains fertilizer and pesticides, it stores in the body and it consumed by the end user.  What I find most interesting about organic feed is that I can visually see what it contains.  There is a mixture of cracked corn, barley, oats, etc.  It smells delicious, to say the least.  The protein content is about 16% which is comparable to non-organic layer feed.
Organic chicken layer feed gmo free, no gmo
Organic chicken layer feed


Non-organic chicken layer feed has a totally different texture and smells a little weird (in my opinion).  It is clear and without question processed and contains some sort of fillers.  I have read on other sites, some or the processed feeds actually may contain a plastic coating or filler.  This feed is more readily available and also costs about $16.00 for a 50 pound bag opposed to $24.00 for a 40 pound bag of the organic feed.  This works out to almost double the cost and may not be in your budget, escpecially if you have a lot of birds.  
Non-organic chicken layer feed

At Our Little Coop, we feed our laying hens the organic feed and the quail non-organic.  I choose to do this mainly because they are my pets and I love to spoil them, but more importantly, the whole reason we keep chickens for eggs is so WE KNOW WHAT IS "IN THEM". Cheers! ~ Kevin
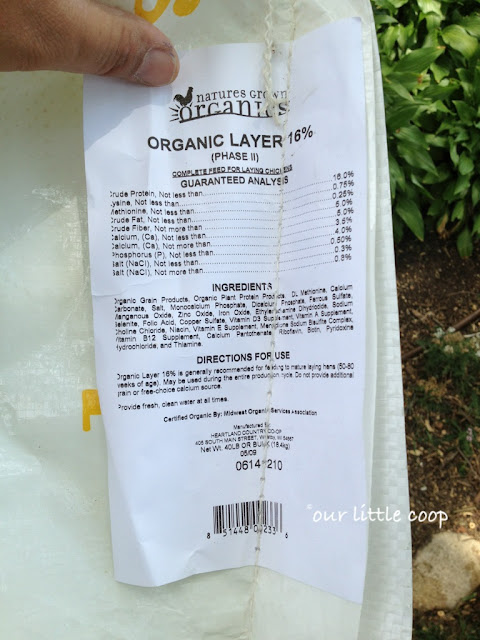
Organic chicken feed label. Natures Grown Organics, gmo free
Organic chicken feed label. Natures Grown Organics

Join us on FACEBOOK!


Crock Pot Apple Butter Pork Loin


SERVES: 5-6
INGREDIENTS:
3-4 pound pork loin roast
1 tablespoon olive oil
2 cloves garlic minced
4 apples peeled, cored, and sliced
8 ounces of Baby Carrots
1/4 cup apple cider
1/4 cup brown sugar
1 teaspoon thyme
1/8 teaspoon dry mustard
1/4 teaspoon ground cinnamon
1/2 cup apple butter

DIRECTIONS:
1. Remove excess fat from pork loin.
2. In a large pan, heat olive oil. Season both sides of roast with salt and pepper and place in the heated pan. Cook until both sides are nice and brown.
3. Add garlic, carrots, apples and apple cider in the bottom of the crock pot
4. Place pork in crock pot and cover with the brown sugar, thyme, dry mustard, cinnamon and apple butter.
5. Set your Crock Pot on low and cook for 8 hours.
6. To serve, slice thin and plate. Scoop juices, apples and carrots from the crock pot and spread over the top of meat. Suggested sides: Sweet potatoes, mashed potatoes, rice.
6. Enjoy!

Other Posts You May Like