Pages

Thursday, November 28, 2013

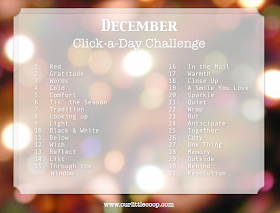
December 2013: Click-a-Day Photo Challenge


I have wanted to create a monthly photo challenge for over a year now and I finally sat down this morning and did it!  For those that have never done a photo challenge, it is simple. Each month there will be a new list, every day you take a photo using the list to inspire you and if you would like, share your photos with us on Facebook or Instagram. That's it!   The photos you take as a result of just a word or two of inspiration will amaze you.  These challenges are great for sparking creativity!

Welcome to the Click-a-Day Photo Challenge! 
 For those that have never participated in a photo challenge, it is simple! 

The Unofficial Rules:
  • Each month there will be a list.  
  • Every day you will take a photo using the list to inspire you.
  • After you have "clicked," post your photo to Facebook, Twitter and/or Instagram using the hashtag #clickadaychallenge
  • Happy clicking! 

To see other participants photos, simply click or search using the hashtag #clickadaychallenge 

If you would like a daily reminder, you can sign up for our "Click-A-Day Photo Challenge" Google Calendar. Google Calendar ID:
clickadaychallenge@gmail.com

Challenge begins December 1st 2013! Can't wait! 


Tuesday, November 26, 2013

Our 2013 Holiday Photo - The BIG Reveal


Wishing you a holiday season filled with joy, blessings and LOVE. 
From Our Little Coop, to yours. 

Thank you Kate, from Farmhouse 38 for your help, creativity and for being one of the greatest friends.  We love you! 

Monday, November 25, 2013

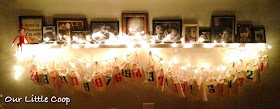
Burlap Bag Christmas Advent Calendar


advent calendar, christmas, DIY, burlap bags, DIY, advent, calendar, christmas, decorations, make, how-to, burlap, home, lights, elf on the shelf
One of my favorite holiday memories as a child is waking up in the morning, running to my advent calendar, prying open the tiny little doors and seeing what surprise awaited me.  The last door was always the largest which meant one thing, Christmas was only a sleep away!  Today, with two children of my own, I wanted to create an advent calendar that would bring the same excitement to their holiday season mornings that I felt as a child.  With this simple DIY, you too can create a tradition for your family that will last for years and years to come.  Stuff the bags with ornaments to hang on the tree, little pieces of candy, notes, or create homemade coupons for adventures that you will take. The possibilities are endless,  the memories will last forever.  


What you will need:
-24 burlap bags.  These can be purchased online or sewn at home.  Size is of no importance unless you plan on packing the bags with larger objects such as ornaments.  Keep in mind that you will be hanging them and if you plan on doing so above your fireplace or other small area, you may want to keep them on the smaller size.  
-Red and Green fabric paint.  
-Number stencils 0-9
-Two stencil brushes
-Twine or rope to hang your bags from.
-Clothespins to hang your bags with.

Directions:
1. Lay your number stencil on top of your burlap bag.  
2. Using your stencil brush, apply a small amount of paint to the inside of the stencil until you have achieved the desired amount of coverage.  
*Take note that the paint will probably soak through the bag and onto the other side.  If this is bothersome to you,  you may want to put a plastic bag inside to prevent the paint from soaking through.  
3. As you paint your bags, alternate between the red and green paint. 
4. Paint your bags 1-24.
5. Allow your bags at least a few hours to dry before hanging.

6. When hanging your bags,  begin with the number 24, counting backwards. Don't forget to remove each bag after it has been opened to allow your children to see how many days are left until Christmas!   


advent calendar, Christmas, DIY, burlap bags, tree, advent calendar, christmas, DIY, burlap bags, DIY, advent, calendar, christmas, decorations, make, how-to, burlap, home, lights, elf on the shelf


Wednesday, November 6, 2013

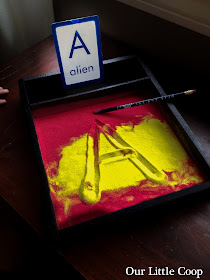
DIY Montessori Sand Writing and Drawing Tray


DIY sand writing tray, learn the letter A, montessori, alphabet, colored sand


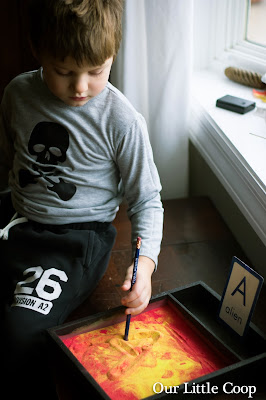
Yay!  This was such an awesome DIY for our family.  Our son just turned four years old has been showing a very strong interest in learning his letters and after struggling with the traditional pencil and paper method, I knew this would be a lot easier for him to learn with.  Lucky me, we own almost every Melissa and Doug product on the market so I had absolutely no problem finding the perfect tray for this project! 

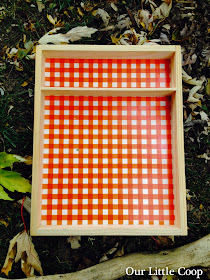
     Melissa and Doug toy tray


What You Will Need:
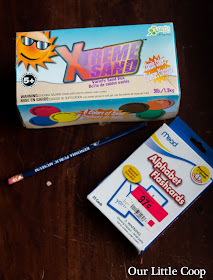
  • Sand, salt or rice.
  • Alphabet cards.
  • A shallow box.  I used an old Melissa and Doug box from a wooden pie set.
  • A writing tool (finger is actually best)
How To Make It:
There really was nothing to this and the only step I feel I should share is that I painted the Melissa and Doug box black, but only because I felt the box would be less distracting.  


Our boy learning to write the letter A


            ⬇   Please +1 our posts  ⬇

How To Keep Chicken Waterer From Freezing


As I watch the few remaining leaves from our Maple trees fall to the ground, I am again reminded old man winter is knocking on our front door.  This is my "last call" to ensure everything is in tact for another midwest winter.  There is nothing worse than finding out too late you should have, forgot to, or something isn't working as expected when the snow is flying and its blowing cold out of the North.  Remember the story about the Ant and the Grasshopper?

For probably as long as man has kept chickens on his/ her homestead, there has always been the question of how to make sure the water doesn't freeze for their flock.  Fortunately for us now 'a days there are many new heaters and gizmos to lend a helping hand, and one which will probably fit your application.  

All summer long we have thoroughly enjoyed the ease in using the Chicken Fountain which has been hooked up to our garden hose and had eliminated any need for the "fill and spill" game.  As mentioned this automatic watering system is great, except it falls short (here) come winter.  The Chicken Fountain used to sell a heater for their system but for reasons unknown to me, no longer do at this time... 


So back to the starting board:

Some companies offer these plastic fountain type water fountains that have a heating element built into the base.  Do they work? You bet they do, but the question is for how long.  This waterer as like any other made from plastic have a short life span.  
If you are using a metal style fountain which can be placed on the ground, there is an option for a metal base which has a heating element.  If you think of it like a hot plate for your metal waterer, you will get the idea.  I have even found blog posts in years past that show you step by step how to make one of these using a lamp fixture and a metal cookie tin.  


The last option I will mention is the trough saucer shaped heaters.  These basically work by placing them in a bath style type of waterer that your birds normally drink from.  It works by keeping at the very least a small area around itself free from ice allowing your flock access to water in the frigid cold months.  

So as you probably have already noticed, all of these heaters require one thing.  Electric!  So how do you keep your water from freezing if you don't have electric out in your coop?  You don't!  For years and years and years, electricity was only a luxury for most.  Having electric and running water in your house was a rarity so you sure as heck didn't have it in your chicken coop.  

So what do you do? You let it freeze.  In the winter our chickens have free access to our backyard.  I allow them as much space as they want.  Every day or sometimes every other day, I go outside and grab my metal waterer, bring it inside and thaw/ wash it out under hot water, refill, add a little salt (maybe a teaspoon for 2 gallons), and repeat as needed.  What I find is when there is snow on the ground, the chickens are usually content with eating the snow.  Think this is cruel?  Ask yourself what birds in the wild do?  


One thing different I am going to try this year, is painting the outside of a metal waterer BLACK with some spray paint.  This "should" act as a natural heater when the sun comes out to help thaw a little of the water.  

Update:  I found a similar article on our friend Lisa's blog Fresh Eggs Daily.  Here is a snippet you can click which will bring you to her article. 

"Large Black Rubber Tub - The first and easiest way to keep water unfrozen longer is to switch from a traditional metal waterer to a wide, deep black rubber tub set in the sun. These metal waterers freeze up so fast because the metal gets cold and there's so little surface area. Conversely the black rubber tub absorbs the heat from the sun to keep the water warmer. Even more imporrtantly, the larger surface area will help keep the water from freezing as fast." ~ Lisa - Fresh Eggs Daily

I hope this helps some of you out.  If you have any questions or wish to share what you do I would love to hear!
Cheers! ~ Kevin


⬇   Please +1 our posts  ⬇

Tuesday, November 5, 2013

Pumpkin Seeds Done Five Ways


I'm a little late getting this post up because this year we carved our pumpkins on Halloween and I didn't get around to roasting the seeds until the day after.  Below are five recipes that we made and tested 

Directions: 

  1. For each recipe you will need two cups of raw, washed, gooberless pumpkin seeds.  
  2. Preheat your oven to 300 degrees. 
  3. In a sauce pan melt the butter, add the ingredients, remove from heat, add the two cups of pumpkin seeds and mix until all of the pumpkin seeds are coated.  
  4. Spread the pumpkin seeds evenly over a foil lined baking sheet and bake, stirring every so often until the seeds are golden.  About 25-30 minutes.    

1. Buffalo 
  • 2 cups raw pumpkin seeds 
  • 1/4 cup of wing sauce 
  • 1 teaspoon butter 
  • 1 teaspoon salt 
2. Maple Spice
  • 2 cups raw pumpkin seeds
  • 1/4 cup butter
  • 1 tablespoon of allspice or pumpkin pie spice 
  • 3 tablespoons real maple syrup 
3. Sweet & Savory
  • 2 cups raw pumpkin seeds 
  • 2 Tablespoons butter
  • 1 teaspoon garlic salt
  • 1 Tablespoon Worcestershire sauce 
  • 4 Tablespoons brown sugar 
4. Dill
  • 2 cups raw pumpkin seeds 
  • 2 Tablespoons butter
  • 1 Tablespoon dried dill 
  • 1/2 teaspoon garlic salt 
  • 1/2 teaspoon onion powder 


5. Sugared Honey
  • 2 cups raw pumpkin seeds 
  • 2 Tablespoons butter
  • 1/4 honey
  • 2 Tablespoons brown sugar
  • 1/2 white sugar 


               ⬇   Please +1 our posts  ⬇


Saturday, November 2, 2013

How to Fold Your Clothes the Right Way


I'm not too proud to admit that finding this post completely changed my life. I can not tell you how many times I fold and refold my kids tshirt drawers because they have decided to tear through every perfectly folded shirt in search of what they are going to wear. So imagine my excitement when I saw this and realized "I have been doing this wrong my entire life!!" Now both the kids and I can see what is in their drawers, no demolition needed.

So to achieve this awesomeness it's really very simple, but I've included pictures and steps...just in case.  

⬇   Please +1 our posts  ⬇


Friday, November 1, 2013

Homeschooling: Our First Month


"I can not promise you it will be easy, BUT I can promise you it will be worth it."


It has been over a month since we made the very difficult decision to pull our five year old out of kindergarten.  I know that the time that has passed is short in comparison to what lies ahead, but I feel I have learned so much and wanted to share some thoughts.  

What I have learned thus far: 

*That pretty little classroom that I obsessively threw together at the last minute? It never gets used.  Instead, I ask the children each day where they would like to do their work and allow them to pick the spot where they feel most comfortable. 

*The question I ask myself every day: "What in the world was I so worried about?!"  I spent years researching the schools in our area, homeschool curriculums, pros vs. cons, homeschool vs. public school vs. private school.  Hours upon hours I spent talking to my girlfriends going over the "should I's or shouldn't I's." In all honesty I was too scared to homeschool and felt like I would somehow fail our daughter by doing so. Sending her to school felt like the most secure option at the time and ultimately just ended up giving me a very false sense of security.  Now that she is home, I honestly can not imagine our lives any other way. 

*To go along with the thought "What was I so worried about?!" Homeschooling has been so incredibly natural for us.  I have been home with my children since they were born and they are a part of my everyday life. Having them home with me and teaching them a curriculum is no different than what I have been doing with them all along.  Whether we are singing, painting, counting or reading, these are all things that we have been doing together for years.  The only difference now is that we have a nifty little  manual to help plan our days.  

*My relationship with our daughter has done a complete 180, in a wonderful and amazing way.  If you know our AG you know that she is just about the brightest, sassiest, toughest little girl you will ever come across and if you don't, take my word for it. She talked at a very early age and has not stopped since.  She is very opinionated and very open about how she feels.  Our relationship has always been a little combative and we do have our moments when we need to take timeouts from each other, but lately we seem to be more on the same side. She realizes the sacrifice that we made for her to keep her home with us and most importantly, that we listened.  

*It hasn't all been rainbows and unicorns.  We have our days where AG just isn't into the curriculum and has decided that she has more important things to do, like build a fort or play Doctor.  I'm learning that this is ok and to turn off the part of my brain that has been programmed by traditional school and remind myself that there is an opportunity to learn in everything even when you're not following a curriculum. 

*We still have a lot to learn and a few kinks to work out, but I think we can all agree that this is the bravest and best decisions we have ever made and I know that it will be worth it! 

Are you a homeschooler? I would LOVE to hear about your experiences and what you learned early on.  Feel free to comment below!

                                        ⬇   Please +1 our posts  ⬇