Pages

Wednesday, February 27, 2013

Crock Pot French Dip Panini


Ingredients:

  • 4 pound rump roast
  • salt
  • freshly ground black pepper
  • olive oil
  • 2 yellow onions, cut into rings 
  • 10 cloves garlic, minced
  • 8 tablespoons Worcestershire sauce
  • 1/2 cup red wine
  • 4 tablespoons tomato paste
  • 3 cups beef broth
  • 4 sprigs of fresh thyme 
  • 4 bay leaves
  • Sourdough bread
  • Mayo
  • Provolone Cheese
Directions:
  1. Heat your olive oil in a pan and season your chuck roast on all sides. Seer your roast and place in your crock pot. 
  2. Sauté the onions and garlic until fragrant and place into crock pot
  3. In a small dish, combine Worcestershire sauce, red wine, tomato paste, and beef broth and pour over your roast.  
  4. Add the thyme and bay leaves to the crock pot. 
  5. Cook your roast on low for 10-12 hours.  
  6. One hour before serving slice the beef thin and place back into the crock pot.  Cook on low for an additional hour.  
  7. When the beef is done, layer your beef, mayo and provolone cheese between two pieces of sourdough bread and grill.  
  8. Serve your panini with a side of au jus for dipping. 
  9. Enjoy!


Monday, February 25, 2013

Purple Ombre Cake With Buttercream Frosting


It was my mother in law's birthday this week and my daughter and I were bound and determined to make Nana the most fabulous cake she had ever seen.  As with most things I do, I found myself saying "NEVER AGAIN!!!!!" over and over, but the end result was really quite impressive and DELICIOUS if I do say so myself. Most importantly, Nana was happy (she's the baker in our family so I was happy to have impressed)!   As hard as this looks to make it wasn't.  Just plan on it taking you all day and you're good to go! ;)

So....I started out with my cake recipe.

CAKE RECIPE
Ingredients:
  • 2 boxes of plain white cake mix 
  • 2 cups of cour cream 
  • 1 cup vegetable oil
  • 6 large eggs 
  • 2 teaspoons of vanilla extract. 
  • Gel Food Color
Directions:
  1. Preheat over to 350 degrees
  2. Grease as many cake pans as you have (I only had two!)
  3. Mix cake mix, sour cream, oil, eggs and vanilla on low until the batter is combine and thickened. 
  4. Divide your cake into as many bowls as you will make layers.  I had 8 layers - 8 bowls.  
  5. Begin adding your color to each bowl starting light to dark.  A little of this goes a long way so start slow. 
  6. Once you have your cake colors mixed, pour each color into it's own separate cake pan and bake for 12 minutes, or until the cake springs back when pressed. 
  7. Allow your cake to cool in the pan on a wire rack for at least 20 minutes. 
  8. Remove the cake from pan and allow to cool completely for 30 minutes. 
  9. Stack and frost! 
CREAM CHEESE FROSTING:
This was used to frost the cake and in-between the layers. This was NOT used for the roses.  
Ingredients:
  • 4 ounces unsalted butter, softened 
  • 4 ounces cream cheese, softened 
  • 2 cups powdered sugar
  • 1 teaspoon vanilla extract 
Directions:
  1. In your mixer, combine butter and cheese on low
  2. SLOWLY add the powder sugar until smooth and creamy. 
  3. Add vanilla extract
ASSEMBLY
Starting with the lightest cake (or darkest if you choose to do dark to light), place your first cake on a cake stand and frost the top of the first cake with the cream cheese frosting.  Continue to stack the cakes from light to dark frosting the top of the cake (between each layer).  Once the cakes are stacked the cake might look a little haggard...at least mine did.  I'm sure that in the fancy world of baking you are supposed to trim the cakes so that they don't look so awkward and uneven but I wasn't about to sacrifice my cakes to a knife without really knowing what I was doing, so i just stacked them up and frosted the sides to cover up the imperfections.   It took quite a bit of frosting to fill the gaps, but it ended up looking perfect! 

BUTTERCREAM FROSTING
This was used for the roses! 
Ingredients:
  • 2 cups salted butter (4 sticks) 
  • 8 cups of powdered sugar
  • 2 tablespoons vanilla extract
  • 1/2 cup of heavy cream 
Directions:
  1. Using a paddle beater, beat butter for 3 minutes
  2. Add confectioners sugar until mixed
  3. Add vanilla extract and heavy cream and beat on high for 3 minutes 
  4. Separate your frosting into three bowls and again, add coloring from light to dark. 
  5. FROST!  The video below was very helpful! 


Sorry the pictures weren't very good!  I REALLY didn't expect this to turn out.  Next time I make it (hahaha!!!) I will take better pictures! Please let me know if you have any questions.

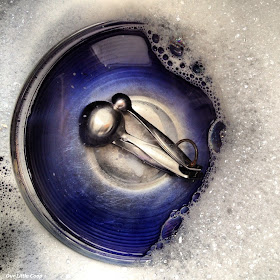
Even my dishes were ombre! 

Wednesday, February 6, 2013

DIY Egg Carton Flower Lights


How many lights on your strand is going to determine how many egg cartons you will need.  I used three egg cartons total. 
Cut your egg cartons through the middle, on either side of your "flowers"....
\
....so you are left with only the "flowers."


Cut in between each "flower" to separate them from one another. 


Your flowers! 

On the top of your flower cute four small slits on all four side of the top to allow access for the light bulb.


I used LED battery powered lights that I picked up at Walmart after Halloween and down 75%.  These are great because they can be used anywhere there isn't an outlet and the strand is only 15 lights making is very short.  

Insert your light bulb into the top of the flower.


Hang your flower lights and enjoy! 


30 Days of Juicing

Kevin and I started juicing again this morning and are following the 30 Days of Juicing off of the William Sonoma website.  This program is particularly nice because it gradually works you up to the leafy greens and earthy vegetables, starting with sweet ingredients and slowly incorporating the "mean greens."  


We use the Breville Juice Fountain Elite .  It is an awesome product and we love it. 

Day 1- Strawberry Pineapple Mint Juice 


Sunday, February 3, 2013

So God made a farmer.

Paul Harvey

And on the eighth day, God looked down on his planned paradise and said, "I need a caretaker." So God made a farmer.

God said, "I need somebody willing to get up before dawn, milk cows, work all day in the field, milk cows again, eat supper, then go to town and stay past midnight at a meeting of the school board." So God made a farmer.

God said, "I need somebody willing to sit up all night with a newborn colt and watch it die, then dry his eyes and say,'Maybe next year,' I need somebody who can shape an ax handle from an ash tree, shoe a horse with hunk of car tire, who can make a harness out hay wire, feed sacks and shoe scraps. Who, during planting time and harvest season will finish his 40-hour week by Tuesday noon and then, paining from tractor back, put in another 72 hours." So God made the farmer.

God said, "I need somebody strong enough to clear trees and heave bales, yet gentle enough to yean lambs and wean pigs and tend the pink-comb pullets, who will stop his mower for an hour to splint the leg of a meadowlark."

It had to be somebody who'd plow deep and straight and not cut corners. Somebody to seed, weed, feed, breed, and brake, and disk, and plow, and plant, and tie the fleece and strain the milk, . Somebody who'd bale a family together with the soft, strong bonds of sharing, who would laugh, and then sigh and then reply with smiling eyes when his son says that he wants to spend his life doing what Dad does. "So God made a farmer."

http://youtu.be/AMpZ0TGjbWE

Saturday, February 2, 2013

"All You Need Is Love" Sheet Music-Valnetines Day Decor

Here's a quick and cute DIY project for a little valentines day decor that will easily transfer over to a year round piece for your home. 


You'll need:
-8x10 picture frame (I picked mine up at Goodwill for $3.00)
-a piece of black construction paper
-paper to print your sheet music on
-double sided tape
-paper cutter, optional

Print the "All You Need Is Love" Sheet music and trim. 

Use the glass from your picture frame to trace the size of your background paper. 

Place double sided tape on the back of your sheet music and adhere to your black background paper. 


Lettuce, Turnip, the Beet! DIY Wall Hanging

diy wall art, lettuce turnip the beet, how to, paint, wood art, plywood, boy, rustic
Lettuce Turnip the Beet - wall art by Emily McGrath

Food Inc. recently posted a picture on Facebook of a little boy wearing a t-shirt that read "Lettuce, Turnip the Beet" in black, with a small peace sign on the sleeve.  I was in love.  Anything that has to do with produce and music I need in my life. I found the t-shirt here, along with countless other items with the saying.  So I got to thinking. There is a wall in my kitchen that has been blank since the day bought our house 5 years ago and I never could find anything I liked enough to hang in the spot....I sure can have this in my life and I will hang this in my kitchen.  A piece of plywood, three tubes of acrylic paint, and $1.68 later (thats right!) my kitchen has a new accessory!  Here's how I did it.   

Find an old piece of wood. I started with this old piece of plywood, but any kind of wood will do.  This just so happened to be tucked behind the buffet in the dining room and was previously being used to keep the cat and dog out of the bedrooms at night. The cat learned to knock it over, they both ended up in our bedrooms and while hounding my husband for a piece of old wood he said "use the cat gate!" PERFECT.
Pick your colors.  I used Apple Barrel Acrylic Paint in Kings Gold, Bahama Blue, and Tuscan Red (this stuff is CHEAP!!)  and applied them in that order.  Make sure you use the brightest color(s) first. 

Starting with  Kings Gold I applied enough paint so that the color of the wood was not showing through.  This doesn't have to be perfect and a little of this paint goes a long way.
Next, I used Bahama Blue.  With the second color apply sparingly.  I dripped the paint randomly over the board and worked it around, brushing the paint to the point of the brush almost being dry is the technique you're going for here.  Less is more.  If you need more, you can always add more. 


Final color, Tuscan Red.  I used the same technique as with the blue. Again, this doesn't have to be perfect.  Work it around and see where it takes you! Start with a little and add more if you want more coverage. 

Finished product, all three colors applied.
While you're waiting for the paint to dry lets move on to the lettering. My wonderful, beautiful and incredibly talented friend Kate over at www.farmhouse28.wordpress.com (please visit her blog, you will love it!) taught me the most brilliant way to transfer lettering onto just about anything and now I will teach you, the Farmhouse 38 Way. This is something you will want to keep in your bag of trick forever and ever because it's..did I already say brilliant?

Pick and print your lettering. I used Academy Engraved LET,  font size 450. This part can be a bit tricky and you're going to have to cut and tape a little here to make this work for your board. Clearly, not all of your words are going to fit on one sheet of paper, so try and trim as much as you can to ensure that there is uniform spacing between your letters.

Once you have your lettering trimmed up, spaced out, spaced out and level flip over your first word.....


and get your grease pencil ready....

Now don't listen to what anyone ever told you about coloring in the lines and color the back of each letter, paying close attention to coloring OUTSIDE of the lines.  I know, this is kind of a bad example because I'm using a white grease pencil but hopefully you get the idea.  


When you're done coloring the backs of your letters,  flip your word back over and outline your letters using a pencil.  It helps if you use short scratchy lines rather than one continuous line to better transfer the color onto the plywood. 

Is that not fantastic?!

Letter transfer done. 

Now to paint the letters.  I used a stiff angled brush.  I find them easier to work with, possibly because I have used a brush similar to do my eyeliner for 10 years now?  Thinking back,  I used that same brush to paint a 5 x 10 foot mural on my daughters bedroom wall when I was 7 months pregnant with my son So maybe the angled brush is really just my thing.  Anyway,  find a brush your comfortable with and a color that you would like to use for your lettering. I used an off white that my husband used to paint shelves in our front room.  

Again, the key is to use the paint sparingly.  Start with a little and try and stretch the paint as far as it will let you.  It will help give it that aged look. 

Finished!  


Now, if  you're planning on mounting your board to the wall you will need to screw a bracket to the back.  My husband used something that  he referred to as a tie down bracket but I'm sure something less heavy duty would work just fine. Haha!  

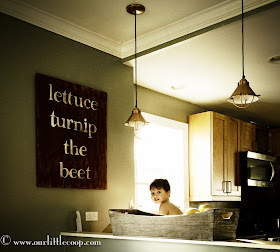
And finally the $1.68 masterpiece if finished and hung!  I have to say that I absolutely love it and could not be happier with how it turned out!