Pages

Saturday, February 2, 2013

Lettuce, Turnip, the Beet! DIY Wall Hanging

diy wall art, lettuce turnip the beet, how to, paint, wood art, plywood, boy, rustic
Lettuce Turnip the Beet - wall art by Emily McGrath

Food Inc. recently posted a picture on Facebook of a little boy wearing a t-shirt that read "Lettuce, Turnip the Beet" in black, with a small peace sign on the sleeve.  I was in love.  Anything that has to do with produce and music I need in my life. I found the t-shirt here, along with countless other items with the saying.  So I got to thinking. There is a wall in my kitchen that has been blank since the day bought our house 5 years ago and I never could find anything I liked enough to hang in the spot....I sure can have this in my life and I will hang this in my kitchen.  A piece of plywood, three tubes of acrylic paint, and $1.68 later (thats right!) my kitchen has a new accessory!  Here's how I did it.   

Find an old piece of wood. I started with this old piece of plywood, but any kind of wood will do.  This just so happened to be tucked behind the buffet in the dining room and was previously being used to keep the cat and dog out of the bedrooms at night. The cat learned to knock it over, they both ended up in our bedrooms and while hounding my husband for a piece of old wood he said "use the cat gate!" PERFECT.
Pick your colors.  I used Apple Barrel Acrylic Paint in Kings Gold, Bahama Blue, and Tuscan Red (this stuff is CHEAP!!)  and applied them in that order.  Make sure you use the brightest color(s) first. 

Starting with  Kings Gold I applied enough paint so that the color of the wood was not showing through.  This doesn't have to be perfect and a little of this paint goes a long way.
Next, I used Bahama Blue.  With the second color apply sparingly.  I dripped the paint randomly over the board and worked it around, brushing the paint to the point of the brush almost being dry is the technique you're going for here.  Less is more.  If you need more, you can always add more. 


Final color, Tuscan Red.  I used the same technique as with the blue. Again, this doesn't have to be perfect.  Work it around and see where it takes you! Start with a little and add more if you want more coverage. 

Finished product, all three colors applied.
While you're waiting for the paint to dry lets move on to the lettering. My wonderful, beautiful and incredibly talented friend Kate over at www.farmhouse28.wordpress.com (please visit her blog, you will love it!) taught me the most brilliant way to transfer lettering onto just about anything and now I will teach you, the Farmhouse 38 Way. This is something you will want to keep in your bag of trick forever and ever because it's..did I already say brilliant?

Pick and print your lettering. I used Academy Engraved LET,  font size 450. This part can be a bit tricky and you're going to have to cut and tape a little here to make this work for your board. Clearly, not all of your words are going to fit on one sheet of paper, so try and trim as much as you can to ensure that there is uniform spacing between your letters.

Once you have your lettering trimmed up, spaced out, spaced out and level flip over your first word.....


and get your grease pencil ready....

Now don't listen to what anyone ever told you about coloring in the lines and color the back of each letter, paying close attention to coloring OUTSIDE of the lines.  I know, this is kind of a bad example because I'm using a white grease pencil but hopefully you get the idea.  


When you're done coloring the backs of your letters,  flip your word back over and outline your letters using a pencil.  It helps if you use short scratchy lines rather than one continuous line to better transfer the color onto the plywood. 

Is that not fantastic?!

Letter transfer done. 

Now to paint the letters.  I used a stiff angled brush.  I find them easier to work with, possibly because I have used a brush similar to do my eyeliner for 10 years now?  Thinking back,  I used that same brush to paint a 5 x 10 foot mural on my daughters bedroom wall when I was 7 months pregnant with my son So maybe the angled brush is really just my thing.  Anyway,  find a brush your comfortable with and a color that you would like to use for your lettering. I used an off white that my husband used to paint shelves in our front room.  

Again, the key is to use the paint sparingly.  Start with a little and try and stretch the paint as far as it will let you.  It will help give it that aged look. 

Finished!  


Now, if  you're planning on mounting your board to the wall you will need to screw a bracket to the back.  My husband used something that  he referred to as a tie down bracket but I'm sure something less heavy duty would work just fine. Haha!  

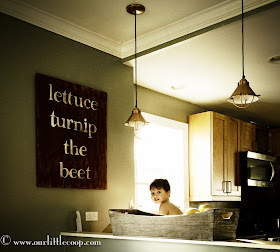
And finally the $1.68 masterpiece if finished and hung!  I have to say that I absolutely love it and could not be happier with how it turned out! 


2 comments:

  1. This turned out so great! I saw that photo of the t-shirt the other day and fell in love, too :)

    I adore what you did here and can't believe it was so cheap! Way to go!

    ReplyDelete

Thank you for your comment!