Pages

Friday, February 27, 2015

Tap My Trees Maple Sugaring Starter Kit GIVEAWAY


The giveaway for the Tap My Trees Maple Sugaring Starter Kit has begun!

The Prize:
One lucky winner will receive a Maple Sugaring Starter Kit compliments of Tap My Trees.  This starter kit includes everything you will need to tap up to three maple trees.  You will receive:
  • 3 Aluminum Buckets 
  • 3 Metal Lids
  • 3 Stainless Steel Spiles
  • 3 Hooks
  • Maple Sugaring at Home book
  • Drill Bit 
  • Cheesecloth 

For more information detailed information about this kit, please click here.  

The giveaway begins NOW and will end 3/6/2015 at 12:00 am central time.  

 Enter below for your chance to win! Good luck! 


a Rafflecopter giveaway

Thursday, February 26, 2015

March 2015: Click-a-Day Photo Challenge


Welcome to the Click-a-Day Photo Challenge! 
 For those that have never done a photo challenge, it is simple! 

The Unofficial Rules:
  • Each month there will be a list.  
  • Every day you will take a photo using the list to inspire you.
  • After you have taken your photo,  post your photo to Facebook, Twitter and/or Instagram using the hashtag #clickadaychallenge
  • Happy clicking! 

To see other participants photos, simply click or search using the hashtag #clickadaychallenge 

Tuesday, February 24, 2015

Tap My Trees "Maple Sugaring Starter Kit" - Kevin's review

If you only read one article on making maple syrup, read this one.  I promise everything you need to know is contained in the included content.  


I am very excited to be sharing "Tap My Trees" with our readers!

If you are not already making your own maple syrup at home or with your classroom you are really, really missing out.

A few years ago I stumbled onto the whole maple syrup making at home thing and gave it a shot.  Like any other endeavor, I spent hours upon hours researching products, looking for one that I could afford from a reputable site.  I quickly found myself overwhelmed but before giving up, I grabbed my cordless drill, a short length of 1/2" pvc, a utility hook, and a plastic bucket. As luck would have it, I struck gold (well not exactly... but I had collected a lot of maple sap in a very short amount of time).  I will never forget running in to the house to grab Emily and the kids and dragging them outside to witness the very first sign of Spring!  We were going to be making the most delicious PURE maple syrup ever.

Here is what I quickly learned:

  • Collecting sap and making maple syrup is addicting.
  • Collecting sap and making maple syrup is contagious.
  • You will find yourself spotting out potential maple trees to tap at your family, neighbors and friends house all year.
  • "Sugaring" is the proper terminology.
  • The sugaring season is WAY TOO SHORT!
  • Everything in one site www.tapymytrees.com
But most importantly:

  • EVERY DROP OF SAP COUNTS.

Every single drop of sap counts. What is lost to overflow or not making it into the bucket, does not result in syrup.  

Everything you need to know about making maple syrup is included in this simple to understand book,  included in the kits available only from www.tapmytrees.com.
*Remember Joe put together this kit with educating children in mind.
 

Tap My Trees LLC. is not only a company providing amazing and affordable kits at a reasonable cost, they are very dedicated in educating those who are interesting in the maple syrup making process.  Their owner Joe McHale was kind enough to send us one of the Maple Sugaring Starter Kits to review and will also be donating a Maple Sugaring Starter Kit for a Give-away in the VERY near future.  

Here is what is included in the "Starter Kit"

Tap My Trees Maple Sugaring Kit

Unboxing the Maple Sugaring Starter Kit.


Everything comes conveniently packaged in one box and is individually wrapped.

Everything needed to collect sap is included,  except for a cordless drill and a tree!

3 - Aluminum (2 gallon) buckets are included in this kit.

3 - Metal lids are included, which help to prevent rain, snow, and debris from falling in to the buckets while collecting sap.

Everything is excellent quality, or as I like to call it, "heirloom quality."

The beautiful stainless steel spiles included in this kit will outlast my kids, kids.

The quality of this kit is truly amazing and much better than I had expected.  This kit is it.  Im done.  No more messing around with plastic buckets, pvc pipe, or utility hooks.  At the end of the season I will wash these components out and put them up in the rafters of the garage anxiously awaiting the next sugaring season.  

Lets face the facts.  If something is difficult to do, we are quickly robbed of a potentially great experience.  Children have short attention spans and are not going to wait while you figure out how to efficiently collect sap.  Trust me.  The maple sugaring season doesn't last forever unfortunately but the experience surely will.  My family is greatly appreciative to now be able to throw on our coats, grab this kit, go outside and start collecting sap.  While the buckets begin to fill with the sugary goodness, we will sit down and again read Joe's book about sugaring in anticipation for what should be the most enjoyable maple syrup season yet!


A couple of noteworthy mentions:

Tap My Trees stainless steel maple sugaring funnel
I was unable to find this through the website and will update this as it becomes available.  This is not a "needed" item due to the fact the kit includes cheesecloth.  I was fortunate enough to find this at our local Farm and Fleet store in the "Tap My Trees section" and can tell you for the $8.00 it cost me, it will be well worth it.  This funnel or the cheesecloth is used to filter out any bark or debris that makes its way past the lid and into your sap before you boil it.  

Tap My Trees syrup bottles or small canning jars.
Don't forget a few glass jars (or more) to store your maple syrup in.  Jars of pure maple syrup your family has made also make great gifts for friends and family.

Photo Credit: Tap My Trees site.  The Teachers Kit

Classroom teachers or homeschool parents:  Our kids get really excited about this lesson every year!  Joe offers a kit just for you which will include a lesson plan that is adaptable all the way up to high school.  


Preparation:

  • Identify your maple trees
  • Obtain the equipment needed to tap trees


Tapping Trees:

  • When to tap maple trees
  • Select maple trees to tap
  • Clean equipment
  • Gather equipment
  • Tap the tree
  • Hang the bucket and attach lid


Collect Sap and
Make Syrup:

  • Transfer sap from buckets to storage containers
  • Storing your sap
  • Process sap into maple syrup and other uses
  • When to stop collecting saps


Cleanup:

  • Remove spiles (taps), buckets, and lids from trees
  • Clean equipment
  • Store equipment for next year
Photo Credit: Tapmytrees.com

I found this handy little time line on the Tap My Trees website.

I'm out of space for now, but Im going to call this my part one of this article.  At the current time of this writing, we are almost but not quite into maple sugaring season as the daytime temperatures are still way below freezing.  In part two I am going to show you how simple the sap collecting process is.  I think you will be amazed.

But DO NOT WAIT FOR ME!  The maple sugaring season varies from state to state and only lasts for a short period of time as I have previously mentioned.  Here is the information so you can order your own kit and supplies:

www.TapMyTrees.com
All orders include a 100% Satisfaction Guarantee for one full year from date of purchase.
Email: info@tapmytrees.com
Mail: Tap My Trees LLC, 268 Simpaug Turnpike Suite 125, Redding, CT 06896
Toll Free Telephone: (888) 990-9948 
Fax: (888) 666-9120
Cheers! ~ Kevin

Saturday, February 21, 2015

And the winner of the Brinsea EcoGlow Brooder Giveaway is.....


Congratulations Amanda P! 
You are the lucky winner of a brand new Brinsea EcoGlow Brooder!  We have a feeling you will have some very happy and warm chicks this spring!  

We will be contacting you shortly! 

A huge THANK YOU to everyone who entered.  If you did not win and are interested in purchasing this or any other items from Brinsea, please visit www.brinsea.com  DONT FORGET to use the code COOP at checkout to receive 10% off your ENTIRE order.  

a Rafflecopter giveaway

Thanks for playing!

Friday, February 20, 2015

Brinsea OvaView and OvaScope: Kevin's Review


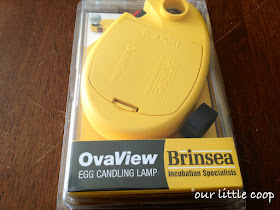
Brinsea OvaView and OvaScope egg candle
Brinsea OvaView & OvaScope

**Buying a Brinsea product? Enter the word "COOP" at checkout and save 10%!!


Brinsea has "taken" the market once again with their OvaView and OvaScope! Gone are the days of cupping fragile eggs between your thumb and forefinger, while trying to perfectly position it in front of a flashlight to check for chick development.  The Brinsea OvaView in itself, is a great egg candling lamp.  When paired with the OvaScope, there is nothing that can compare.

Brinsea OvaView and OvaScope egg candle
Brinsea OvaView
The OvaView's sturdy structure measures 5" long x 3.3" wide x 1.3"high and weighs only 3 oz. The high efficiency LED bulb is powered by 4 AA batteries which Brinsea supplies with the unit.  The beauty of being an LED bulb opposed to an incandescent, is the obvious longevity of the product, and little or no concerns about overheating the eggs during candling.  In the package you will also find, detailed instructions, and a flexible rubber ring which holds itself around the light bulb socket to insure you have a proper seal with the egg so there isn't any light leaking around, which can hinder your viewing.  This model has a very good quality push button switch to turn the light on or off. 

Brinsea OvaScope

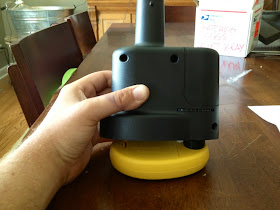
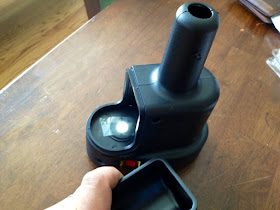
If you are buying the Brinsea OvaView, *DO NOT FORGET to order the OvaScope.  The OvaScope is a great compliment to the candling light.  It simply fits over the OvaView and firmly snaps into place allowing the viewer to observe the egg in daylight and at a slight magnification. Simply remove a side cover and place your egg into the holder and its "in the dark". Brinsea again has listened to its customers and has strategically added 2 nubs, on the sides of the scope, in which a web cam can be placed over the viewing hole and held in place with a simple rubber band. The OvaScope also has a handy little wheel that allows you to rotate the egg without having to remove the side cover. 


Brinsea OvaView and OvaScope egg candle
Brinsea OvaScope firmly snaps over the OvaView

Brinsea OvaView and OvaScope egg candle
Brinsea OvaScope side "egg door".

Brinsea OvaView and OvaScope egg candle
Serama chicken egg-Day 5 as seen through the Brinsea OvaScope

In conclusion, there is not a better egg candling device on the market.  I will never juggle a flashlight or goofy cardboard box concoction again.
Cheers! ~ Kevin

Contact:
Brinsea Products Inc.
704 N. Dixie Avenue
Titusville
Florida
FL 32796
USA

Phone (888) 667 7009
Web http://www.brinsea.com

Thursday, February 19, 2015

Brinsea Mini Advance Incubator: Kevin's Review

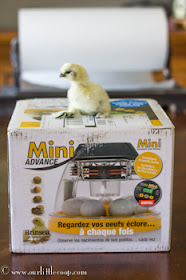
Our Little Coop Brinsea Mini Advance incubator review
Brinsea Mini Advance incubator

**Buying a Brinsea product? Enter the word "COOP" at checkout and save 10%!!


When shopping for an incubator, look no further than the      
Brinsea Mini Advance.  This model is not intended for those looking to hatch large quantities of eggs at one single time.  Those folks looking to hatch a greater amount of eggs, should look into one of Brinsea's larger models. The total capacity for the Brinsea Mini Advance model is 7 Large eggs or 12 Quail eggs.  For me, I find the size a perfect fit for my needs.  Anything larger and I would quickly find myself over run with birds!
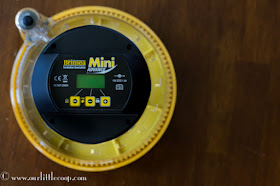
 The Mini Advance was designed for optimal 360 degree viewing of your incubating and hatching eggs thus making it the perfect choice for photographers looking for the best angles to take pictures or classrooms where this incubator can take center stage!

Our Little Coop Brinsea Mini Advance incubator review
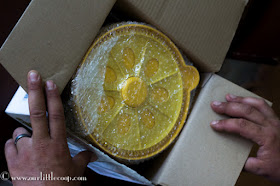
Nicely Packaged
Upon arrival of your new Brinsea Mini Advance incubator, you will immediately see this company is truly proud of their products craftsmanship by how well packaged everything is and the literature that accompanies it.  The parts included are: (1) Incubator with the removable lid, (1) Egg disc, (1) Water Pot Guard, the 115volt power supply unit, a catalog, the user instruction pamphlet, a how to care for your chicks paper, and a free extend 2 year guarantee notice.

Our Little Coop Brinsea Mini Advance incubator review
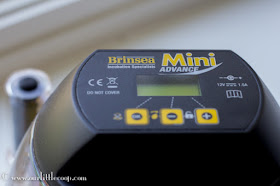
Digital Control System

Our Little Coop Brinsea Mini Advance incubator review
Powered Fan
Simplicity has been achieved with the Mini Advanced's use of a digital control system and powered fan.  The control system is located on the very top of this model just over the heating element and fan, and utilizes three buttons to customize the settings to suit your needs.  The digital display "utilizes a highly accurate individually calibrated sensor for temperature" so no more need for multiple thermometers to confirm your temperature. You can adjust the temperature and have it displayed in either Celsius or Fahrenheit, and it reads to the tenth of a degree.


The digital display feature is loaded with a bunch of optional settings which include, Power Loss Display, High Temperature Alarm, Low Temperature Alarm, multiple turning adjustments, Cooling period feature ( used to simulate mother hen getting off of her eggs), a countdown to hatch calendar, and of course the option to save or cancel your settings.  I am totally impressed with the many turning adjustments which (briefly) include: "Auto" off on 2 days to hatch, turning interval timing, and turning angles which change the distance of the turn.
Our Little Coop Brinsea Mini Advance incubator review
Brinsea Mini Advance Incubator

In my opinion, the "only" things that can make this digital control system any better, would be the use of a back light on the display screen, and a humidity gauge (available on the EX model only).  Almost all digital displays these days have some sort of backlight. The lack of a humidity gauge really isn't "needed" in this particular model though because of the two section water pot located in the center.  Up until "lock down" you fill only half of the pot with water and at the two days until hatch period, you fill the second half.  Many people confirm this will put you at the perfect humidity level for hatching most types of poultry.

In closing, if you are looking into hatching your own birds for the first time or are an experienced small scaled hatcher, the Brinsea Mini Advanced is not only the best value on the market but the overall best choice.  Cheers! ~ Kevin
**Update:  Almost 3 years later and after many successful hatches, I still find this to be one of the best and most convenient incubators I have ever used.  I especially appreciate how our kids are able to observe the entire hatching process and watch the wonderful miracle of birth! 
~ Kevin


Contact:
Brinsea Products Inc.
704 N. Dixie Avenue
Titusville
Florida
FL 32796
USA

Phone (888) 667 7009
Web http://www.brinsea.com

Saturday, February 14, 2015

GIVEAWAY - Brinsea Eco Glow Brooder

I


Happy Valentines Day!  We are excited to be giving away a Brinsea Eco Glow Brooder to one lucky winner!  Giveaway starts NOW (February 14th, 2015) and will be ending next Saturday, February 21st, 2015 at midnight.  The lucky winner will be announced and contacted Saturday!  


What is an Eco Glow Brooder?
Clean, safe, tough and extremely economical chick brooder the EcoGlow is ideal for up to 20 chicks or ducklings and suitable for any waterfowl or gamebird chicks. Great for classroom hatches. 
The EcoGlow only uses 18 Watts (a tenth of the electricity of typical suspended infrared lamps) because the chicks are in contact with its warm underneath surface. 
The brooder runs at 12v for safety from a mains transformer (supplied) and with the convenience of a generous (about 10 feet) power lead. 
Different sizes of chicks are accommodated by three adjustable height settings and an indicator light confirms the brooder is connected. 
The low cost of the EcoGlow makes it possible for larger numbers of chicks to be warmed by multiples of brooders. Please also see the larger EcoGlow 50 chick brooder. 
Dimensions: 12" long x 8" wide x 8" high.

Interested in finding out more about Brinsea products?  Visit their website at www.brinsea.com and use the code COOP at checkout for 10% off your entire purchase! 


a Rafflecopter giveaway