Pages

Thursday, October 31, 2013

DIY Onset and Rime Paint Chip Cards


Now that we are homeschooling, I try and do everything possible to find exciting ways to teach the kids thing that might normally be kind of a bore.  Right now AG is learning about onsets and rimes and the curriculum that I have for teaching it is incredibly boring.  I found these AMAZING DIY cards here and had to make them for her!  They took a little bit, and I still may switch them around a bit but she picked them up right away and started to use them which is a score in my book! 


What you will need:
  • Paint chips found at any store that sells paint.  You will need large chips displaying only one color and strips displaying multiple colors.  The large chips will be for the "onsets" and the other for the "rimes." I smuggled about 200 paint swatches out of Walmart today and must admit that I felt like a smooth criminal. 
  • A large square paper puncher.  I was way too cheap to buy one so I made a template and used a hobby knife to cut out the squares.  
  • A black permanent marker. 
Directions:
There really isn't a whole lot to this DIY project.  All you really need to do is make sure that you have a cut out large enough on your "onset" paint chip to display your "rimes" paint chips.    Decide how big your hole needs to be, cut or punch (again, I cut by making a template from one of the "rime" chips), and write your onset and rimes accordingly!


Onsets:

  • ag
  • ad
  • ab
  • ail
  • ain
  • ack
  • ake
  • am
  • an
  • ank
  • ap
  • all
  • at
  • ay
  • eed
  • ell
  • est
  • ew
  • ick
  • ight
  • ill
  • ine
  • ing
  • ink
  • ip
  • ob
  • go
  • ore
  • ot
  • out
  • ow
  • uck
  • um
  • unk
  • y
Rimes:
  • b
  • c
  • d
  • f
  • g
  • h
  • j
  • k
  • l
  • m
  • n
  • p
  • q
  • r
  • s
  • t
  • v
  • w
  • x
  • y
  • z
  • bl
  • cl
  • fl
  • gl
  • pl
  • sl
  • br
  • cr
  • dr
  • fr
  • gr
  • pr
  • tr
  • sc
  • sk
  • sp
  • st
  • sm
  • sn
  • sw
  • spl
  • spr
  • str
  • squ
  • ch
  • wh
  • th
  • sh
  • ph
  • thr
  • str


Monday, October 28, 2013

Sensory Cloud Dough Recipe


 I've seen and heard about this cloud dough recipe for a few years now.  Today AG said "Mom, I really miss summer." Translated: "Mom, I'm bored to death and miss playing outside in the sunshine and warmth." So I ventured into the crawl space, dumped a few things out of a low sided bin and combined it with another bin of miscellaneous stuff (organization and it's finest) and we sacrificed almost an entire bag of flour in order to make the infamous cloud dough recipe! This recipe is super easy and will literally take you a few minutes to make. Chances are you already have everything in the house to make it so this is great on days you're really grasping for something to do!

Ingredients:

  • 8 cups of flour 
  • 1 cup of oil (Some people use baby oil, I used vegetable oil and a splash of Rusk moroccan hair oil. Don't judge).
  • A few drops of patchouli oil, because we are hippies like that. 
  • Low sided rubber container.  
Directions:
  1. Mix.
  2. Play.
  3. Enjoy!
Notes:
  • I doubled the recipe because the kids were so into it.  Some people do half, some stick with the actual above recipe. 
  • It's not the cleanest things your kids will ever play with so be prepared to sweep up after they're done.  
  • We ended up using two rubbermaid bins, one for each kid because they were having creative differences.  
  • Does anyone know how long this stuff will last?

Sunday, October 27, 2013

Sanyo eneloop rechargeable batteries - "Super Power Pack"

Sanyo Eneloop rechargeable batteries Super Power Pack, review
Sanyo Eneloop rechargeable batteries "Super Power Pack" combo, review
Every year about this time I begin my annual stocking up on batteries.  With the holidays right around the corner, there are usually some very good deals to be found on the different sizes available.  As much as we sometimes wish to deny, we use a lot of batteries.  From portable radios, smoke and carbon monoxide detectors, remote controls, wireless keyboards, wireless mouse, TOYS, and flashlights there are many power suckers on the average urban homestead.

In the past I have tried a couple rechargeable batteries and they kind of left a bad taste in my mouth.  After wishing to give it a try yet again, I stumbled upon a lot of positive reviews on the Sanyo Eneloop rechargeable batteries.  So with all of the sales going on and coming up why would one invest in these batteries you may ask?  Savingsand I hope the previous reviewers were correct.  Using these batteries will save you money in the long run with their 1800 + possible charges on each one. 

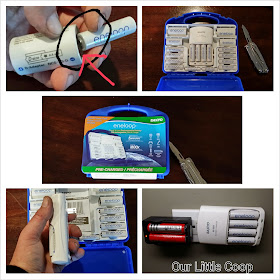
Here is what was included in the Sanyo Eneloop rechargeable battery Super Power Pack:

(1) eneloop 4 position charger
(12) AA eneloop batteries
(4) AAA eneloop batteries
(2) C size adapters
(2) D size adapters
Storage case to contain everything
Instructions.

Price: $39.95 
(Seems a little steep for 16 batteries but if what I read is correct as is my rough math, 
16 batteries x 1800 charges a piece = 28800 batteries for $40??) 
                              
The eneloop batteries come precharged and ready to use right out of the package. I'm not a battery guru but the stats seem pretty good on these. 1.7 volts, 2000 mAH power, will maintain 75% charge after 3 years of non-use, and no memory effect.

I really like the D and C battery adapters. How they work is you slide a AA sized power cell into them and then place the whole thing right into what ever you are using.  This will work great for the Christmas train and animated toys which require the seemingly hard to find C batteries.

I will keep you updated on how they are.

Cheers ~ Kevin


⬇   Please +1 our posts  ⬇

Friday, October 25, 2013

TGIF Nuff Said


It has been one of "those" weeks and I have never been happier seeing a Friday as I am today.  Without getting into too much detail, work has picked up for me in the heating business after a 3 month lull which is a good thing however, not when it comes at you all at once! :-/

Emily has had a couple of family members fall ill this week.  Her uncle was hospitalized with what they thought was a stroke but later found out was a cancer mass on his neck. Her grandfather also paid a visit to the hospital this week with what we suspect was some kind of reaction to his medication.

Quick animal update: All of the chickens are nice and snug in their coop.  I finally finished closing it back up for the winter.  We are still brooding the 4 chicks that hatched last month.  So far it seems only 1 Roo/?  Beckman is doing good.  Curby is doing good.  George.... well he has some kind of skin "thing" going on and we think it is an infection from crawling through the chicken  wire to get into the coop to get to the feed. Apparently, pigs have very sensitive skin.  It is kind of sad to see that it sometimes hurts him so bad his back legs give out from the pain.  A call was placed to the vet, and we are now just observing him. I am down to 1 lonely quail.  The hawks managed to break through my defenses and pick off the other 2.  The lone survivor is living large now with the chickens, and is even roosting with them at night.

Well this is just a quick synopsis of whats going on here.  Hope to god it is much better where you are!

Cheers ~ Kevin

Friday, October 18, 2013

And we have a pig!

potbelly pig, george, pig, miniature, pet, Pot-bellied Pig
George our new Pot-bellied Pig!

At this point in the game I really shouldn't be surprised to see a pig standing in my kitchen, I mean no one else seems to be.  In fact I posted a status on my personal Facebook page last night after we brought George home that said "Something I never thought I would say: "Knock it off you guys!! Watch out for the pig!!" to which my friend replied, "I'm not surprised you eventually said that!"  But I have to admit, seeing a pig in my kitchen is going to take some getting used to.

So meet George, the newest addition to Our Little Coop.   Kevin and I briefly tossed around the idea of getting a pig last year but put the thought to bed after we discovered how expensive they were to buy. But as fate always has it, these things (animals) always end up making their way into our lives... somehow. 

This year our kids asked if they could have ponies come to their birthday party and our son had a special request: a pig.  I called Patch 22, the farm where we had gotten our birthday ponies in the past, and asked if this year we could do two ponies and possibly a pig.  I explained to them that since the last time they were out we had gotten a few chickens and there was really no need to bring a pen for the pig because we had the run for the chickens.  Dan called me back and left a message. "Well, I have to throw this out there. Every year at the end of the season we like to find homes for our pigs and since you have the chickens,  I would be willing to bring him to the kids party if you would be willing to take him."  Say wahhh? I ran outside to tell Kevin but I quickly put my excitement into check reminding myself why we didn't have a pig in the first place: price.  I called Dan back and told him we were interested in taking the pig but cautiously asked him how much he was selling him for.  He told me he wasn't looking to make money off of the pig but just wanted him to have a good home.  Ok..excited again! Sold!!  I told Dan that we wanted to come out and meet him before he came home.  I wasn't sure how big he would be and we also wanted to see how his behavior and personality was.  We brought a cage with "just in case," but we knew damn well we were bringing him home.  The kids at that point didn't know what was going on.  We wanted it to be a surprise but as soon as our daughter saw the cage she knew something was up. When I told her we were not bringing him home she cried. Ok fine fine... I just told her.  Yes, your crazy parents are getting you a pig.  

When we got to the farm, Dan took us over to the pen where George, his four brothers, mom and dad were kept.  We were both really surprised to see how small he was.  Obviously still young and going to get A LOT bigger,  we really weren't prepared to bring home such a tiny guy and I have to say I was relieved.   We didn't take too much time.  It was cold out and starting to rain.  We finally decided on George because he had the most spots and seemed to be a little smaller than the other three. Once we told Dan which one we wanted, we all experienced the thrill of hearing a pig scream for the first time.  The kids weren't expecting it at all and scattered, one hid behind me the other ran behind the truck.  I reassured them that he was fine and in fact not being murdered.  If you've never heard a pig scream,  it will stop your heart.  Dan loaded him up in the crate and we promised him that we would come back to visit. He told us that he had given a pig to another family last year who came back to visit and pulled up with the pig in the passenger seat.  We are hoping to one up that and are open to all suggestions :).   

On the ride home we tossed around names.  Of course Wilbur was an option but we figured every pig and their brother was named Wilbur.  I told Kevin we needed to name him after a country singer and said we should name him George. After throwing around a few other names I remembered that our kids watch a show called "Peppa Pig" and we asked our daughter what Peppas brothers name was. She said it was George and we were kind of sold at that point,  George it was.  

When we got home we let him run around the yard.  It was cold and raining but he seemed so happy to have some space to run around we decided to just let him take take it all in.  As it got darker... and finally dark we started to worry about how we were going to get him in for the night.  We had talked about keeping him in the garage and building him a little house to sleep in,   but after seeing how tame and small he was, we just couldn't. So the challenge now became getting him inside. Now most of us know how comical it is to watch grown adults chase chickens around, but you haven't seen anything until you've seen grown adults chase a pig.  We tried everything to avoid picking him up.....but after lassoing him with a dog leash, luring him with treats, chasing him in the direction of the house only to have him run in the opposite direction we had no choice.  I picked him up as fast as I could and ran to the house, pig screaming the entire way.  Finally made it inside only to see my brother and sister next door running out of their house like something had just been murdered.  I will NEVER pick a pig up again.  

So we get George in to the house, he spent the rest of the evening cautiously walking around on his tippy toes.  The hardwood floors were a little hard for him to walk on, but he made his way around. We set up a portable dog cage with blankets that he took to right away and when we were ready for bed, we lured him in with a treat and zipped him up.  I was fully expecting to be up with him during the night or at the very least find the cage and blankets shredded into a million pieces by morning.  I never thought that he would have slept through the entire night and Kevin would actually have to bribe him out of his crate to go outside.  Awesome! We are pretty sure that despite living outside his entire life, he is  house trained.  Granted we have only had him for 48 hours but I have to give this little pig credit, he hasn't had a single accident in the house or in his crate.


Everyone says pigs are extremely intelligent.  Within a day george has learned his name and is coming to the house when we call him. He also learned that the chicken coop is where the goldmine of food is and has already been kicked out twice.  He's still pretty stinky from living the farmlife and we are hoping that we can manage to get him into the bathtub at some point, but really don't want to traumatize him or our children with his bloody screams.  For now we have resorted to pouring warm glasses of water over his back as he runs by, which he doesn't seem to mind but not really fond of either.  I checked the local ordinances (after getting him...whoops!) and it is legal to have a potbelly pig where we live so we are hoping we can harness him up and walk him as much as we can and aside from people thinking we are freaks for walking a pig, we wont need to worry about being reported or him being taken away.  And that our friends is really about it! We look forward to many years with George and can't wait to share him with you all! Our crazy little journey continues! Thanks for being a part of it! 


Thursday, October 10, 2013

Pumpkin French Toast Casserole

pumpkin french toast recipe
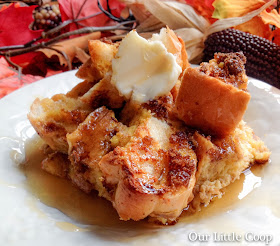
The BEST Pumpkin French Toast Recipe! 
Tis' the season! My sister gave me a jar of her homemade pumpkin butter this weekend, along with the recipe for this amazing pumpkin french toast casserole.  If you don't have pumpkin butter in the house or can't find it at the store, have no fear, you can substitute it with pumpkin puree!

Ingredients:
  • 1 loaf of French bread 
  • 8 large eggs 
  • 2 cups of milk 
  • 1 teaspoon of vanilla extract 
  • 1.5 teaspoons pumpkin pie spice 
  • 1/4 cup of pumpkin butter or 1/2 cup of pumpkin puree 
  • 1/4 brown sugar for topping 
Directions:
  1. Slice bread into 1/2 in cubes and arrange them in a generously buttered 9 by 13-inch casserole/baking dish.
  2. In a large bowl combine eggs, milk, vanilla, pumpkin pie spice, and pumpkin butter and whisk until combined.  
  3. Pour the egg mixture over the top of the bread, cover and refrigerate overnight.  
  4. In the morning pre-heat oven to 350 degrees.
  5. Sprinkle the top of the casserole with the brown sugar.
  6. Bake casserole for 50 minutes uncovered until fluffy and golden brown.  If the casserole starts to brown, cover the top with aluminum foil.   
  7. Let casserole sit for 20 minutes.
  8. Enjoy!
⬇   Please +1 our posts  ⬇

Sunday, October 6, 2013

Homemade Pumpkin Pie and Vanilla Frosting Playdough


A few months back we made an awesome batch of  rainbow Jell-O Playdough.  I was totally skeptical because I had read multiple playdough gone bad stories where the dough was molding if not kept in the refrigerator.  I am happy to report that we hit the homemade playdough recipe lottery recipe because I JUST threw away the last little bit of playdough that we made back in March and only because the colors had all blended so tightly together there were no colors left.  So today I was talking to my girlfriend about school and she was telling me that every year around this time she makes her kids pumpkin pie playdough.  What?! Brillllllliant!!  After confessing to each other that we had both tasted our homemade playdough only to be majorly disappointed by it, we shared a good laugh questioning why would have expected anything more.  Seriously, make this stuff and share in the temptation to lick your very own homemade playdough.  

Pumpkin Pie Playdough Recipe

Ingredients:

  • 1 cup of white flour
  • 1 cup of water 
  • 1/4 cup of salt 
  • 2 TBS of cooking oil 
  • 2 TBS of pumpkin pie spice 
  • Orange food coloring

NOTE: Many recipes called for 1-2 TBS of Cream of Tartar.  I made the play-dough with and without and noticed no difference. Do yourself a favor and save the money. 

Directions:
  1. Mix all of your ingredients in a pan and heat on low for about 5 minutes. Don't overcook or it will by dry and yucky.  
  2. Remove from heat, allow to cool, knead.  

NOTE: What I found to make the biggest difference in consistency was the cook time.  Overcooking the play-dough definitely made it dry and not as pliable.  

Vanilla Frosting Playdough Recipe:
  • 1 cup of white flour
  • 1 cup of water 
  • 1/4 cup of salt 
  • 2 TBS of cooking oil 
  • 2 TBS vanilla extract 
Directions:
  1. Mix all of your ingredients in a pan and heat on low for about 5 minutes. Don't overcook or it will by dry and yucky.  
  2. Remove from heat, allow to cool, knead.