Pages

Saturday, August 24, 2013

Our Rooster


  Back in March our friend dropped off some chicks as a "gift" in exchange for me giving him one of the older incubators I had lying around. He assured me they were all pullets. Yeah well.... not all. We live in town and have neighbors and "technically" should not have a rooster due to obvious reasons. Time kind of slipped away from us as it sometimes has a tendency to do, and that cute little chick grew into what he is today.

 His crow started out sweet and innocent until one morning at about 4:30 I was awoken by a full fledge "COCK - A - DOODLE - DOOO". Yeah...thats not gonna fly I thought  as Emily quickly reminded me we need to find him a home. A few phone calls where placed to a couple of friends that day and we had hit a roadblock. None of them had the room to take in another rooster as having too many can cause some serious issues like fighting and overly stressing out the hens. So now what?

Soup wasn't an option as I had grown to like this guy. He is very friendly and does a very good job of protecting his flock. So every night before I go to bed, I sneak out to the coop and grab him to put him in the garage and shut the door. He perches up on a stack of milk crates I have in one of the corners and seems to really like his "throne".  He still crows at the crack of dawn, however it is so muffled, you can hardly hear it. Fortunately his crow during the day is not bothering any of the neighbors either. As a matter of fact, most of them say they never even hear him and the ones that do are reminded of the days back when livestock would free roam through our neighborhood. Last night for the first time he waited until all of the hens headed up to roost in the coop and then he himself headed into the garage to sit upon his throne. Hopefully my days of having to tuck him in every night have come to an end. Ahh... the things we do for our pets. Cheers ~ Kevin
 

Monday, August 19, 2013

Cute Owl Labels For School Supplies


Just thought I would write up a quick post to share these adorable owl labels that I found online yesterday.  Our daughter's school requires that we label her supplies, however I bought her a few nice binders at Target that I really didn't want to mark up with a permanent marker in hopes that they would come home in one piece and I could reuse them.
I was able to find these really cute downloadable labels at 3rd Grade's a Hoot. The labels are available in pink and green.  I edited them by adding her name and then printed the labels on Avery sticker paper.  Pleased to say that in under ten minutes I was able to mark all of her supplies with a less permanent outcome and hopefully I will get to steal her binders back at the end of the year.  Click HERE to get yours!

Saturday, August 17, 2013

Pad Thai Recipe


home made pad thai recipe
The Best Pad Thai Recipe!


My husband and I both are huge fans of Pad Thai, but after many failed attempts to make it at home, I just couldn't stand the thought of tossing another botched meal in the garbage... and gave up hope. Until I found this Easy Pad Thai Recipe on Brownies For Dinner.  After reading over the ingredients and seeing how incredibly simple it was to make and pretty excited that there was no fish sauce involved *blugh*, I had to give it a try.  Third time's a charm! This really is one of the best Pad Thai recipes I have ever eaten and it's super simple and easy to throw together.  So simple that my husband asked me three times how I managed to make it so fast!

Ingredients:

  • 8 oz rice noodles (I actually used lo mein noodles because I had them in the house)
  • 2 TBS brown sugar
  • 2 TBS of fresh squeezed lime juice, and additional wedges for serving
  • 3 TBS soy sauce
  • 2 TBS vegetable oil
  • 3 scallions, diced.  White and green parts separated 
  • 1 garlic clove, minced
  • 2 eggs 
  • 1/2 cup fresh cilantro roughly chopped 
  • 1/4 cup chopped dry roasted, salted peanuts
Directions:
  1. Cook your noodles according to the directions on the package.  
  2. In a small bowl whisk the brown sugar, lime juice and soy sauce. 
  3. Heat the vegetable oil in a medium skillet and sauté the scallions, and garlic until fragrant.  Add the eggs and scramble lightly until the eggs are almost cooked but still runny.  
  4. Add the noodles and the lime, brown sugar and soy sauce to the pan with the eggs and toss lightly.
  5. Serve the noodles in a bowl and garnish with cilantro and peanuts, lime wedges on the side.
  6. Enjoy! 


⬇   Please +1 our posts  ⬇

A BALLin' Teachers Gift For The First Day of School!

mason jar, craft ideas, paint, diy

As mentioned before, our little one is flying the coop next week and starting her first day of kindergarten.  I thought it would be nice to send her on the first day with a little something for her teacher.   It never hurts to reach out and say (scream) "PLEASE take care of my baby!!" with a mason jar full of pencils.  This was a super easy and inexpensive project. I found this amazing project at liluna.com.

What you will need: 

  • A 16 oz mason jar 
  • Chalkboard spray paint
  • Spray paint color of your choice 
  • Twine or ribbon 
  • Tag printout 
  • Pencils

Directions:

Place your mason jar upside down on a tarp, plastic bag, or something of the like that you're ok covering in spray paint.

Start by spraying the entire jar with the chalkboard spray paint.  You may need to coats.  Allow to dry. Usually doesn't take too long. 

After the chalkboard spray paint has dried, spray the mason jar with your colored spray paint.  I used a pastel pink, but the original poster used a yellow and it was awesome.  

This may take a few coats as well.  

After your jar has completely dried, lightly scratch off the paint covering the lettering on the jar.  You can use a tweezers, penny, your nail. You may want to do a little scratching elsewhere on the jar to further create that weathered look.

Print your tag by clicking HERE or on the tag itself.  You will need to scale it down.  I printed my tag at 40% and it was perfect.  I printed the tag on card stock to ensure durability.


Hole punch the corner of your tag and attach it to the jar with your twine or ribbon.  

Fill your jar with pencils.  Done.  Its cute, it's easy, its something that your child's teacher will actually use and hopefully it will help your child get the school year off on the right foot! 


mason jar, craft ideas, paint, diy, teacher gift


mason jar, craft ideas, paint, diy, teacher gift

Friday, August 16, 2013

Banana-Zucchini-Chocolate Chip Bread

banana bread zucchini chocolate chip bread
Delicious Banana Zucchini Chocolate Chip Bread!

I found this recipe at "Healthy Eating for Ordinary People."  My mom is the queen of banana breads and she's a hard one to beat, but I think this recipe just might have.  It's delicious and our pickiest eater loves it! 

Ingredients:
  • -3 very ripe bananas
  • -2 eggs
  • -1/4 cup honey
  • -1/4 cup brown sugar
  • -1 teaspoon vanilla extract
  • -1 3/4 cup all-purpose flour
  • -1 teaspoon baking soda
  • -1 teaspoon baking powder
  • -1 teaspoon ground cinnamon
  • -1 1/2 cup of zucchini 2 small, shredded 
  • -3/4 cup chocolate chips

Directions:
  1. Preheat your over to 350 degrees and grease a standard size loaf pan.
  2. Mash your bananas in a large bowl, add eggs, honey, sugar, and vanilla and mix well.  
  3. Add the flour, baking soda, baking powder, ground cinnamon, shredded zucchini and chocolate chips.   Mix well. 
  4. Pour your batter into the greased loaf pan and bake for 50 minutes.  
  5. Check to see if your banana bread is finished by sticking a toothpick in the middle.  The toothpick should pull out clean 
  6. Allow the banana bread to cool for about twenty minutes before serving. 
  7. Enjoy!!
⬇   Please +1 our posts  ⬇

Sunday, August 11, 2013

Our First Blue Egg!


This past March we purchased four  Ameraucana chicks from our local feed store and were gifted three more by our friend farmer Travis. We have been waiting very patiently to see what color eggs they were going to lay and yesterday when I noticed one of the Ameraucana girls was in the nest box I figured she was checking out her digs and getting comfortable with the egg laying process.  I was not expecting her to do anything in there, so last night when I opened the nest box I was shocked to see a little blue egg nestled in with all of our brown egg layers!  After a year of seeing only brown it actually startled me to find it! I have to admit I was a little bored with the eggs we were getting and I'm really looking forward to see what color eggs the other Ameraucana girls lay!! 

Saturday, August 3, 2013

If You Lose Your Way Tonight....


Everybody will be dancing and we're feeling it right
Everybody will be dancing and be doin' it right
Everybody will be dancing and be feeling alright
Everybody will be dancing and till we're doin' it right

If you do it right
Let it go all night
Shadows on you break 
Out into the light

If you lose your way tonight that's how you know the magic's right

Friday, August 2, 2013

How to Organize Your Photos For Project Life Using Lightroom


So about those 100,000 photos....

I decided that my goal would be to focus on the life that was happening NOW and to not dwell on the life (a.k.a. photos) that had accumulated from the past.  Moving forward, I wanted to make sure that I never ended up in this unorganized mess of a situation again and like fate would have it, one of the girls in The Project Life Facebook (support) Group wrote a quick post outlining the system she used in Lightroom to organize photos for Project Life.  Bingo!  Since I only started this project three weeks ago, I backed up the photos that were already in my Lightroom catalog, got them out of there and started fresh.  So fresh and so clean!

I'm going to screenshot the steps I took to organize my photos and hopefully make this a really easy system for everyone interested to use.

The purpose of this system is to first group your photos by year. Next, because Project Life pages are often constructed on a week to week basis, the photos will be broken down further and organized by week.  Since I'm starting fresh, you can see I only have 229 photos in my catalog to organize, however this system will work with any amount of photos and by following these simple steps can be achieved rather easily.


 First I am going to show you how to create a collection set.  The collection set in this system represents the year your pictures were taken.

STEP 1: 

Open Lightroom > Library > New Collection Set


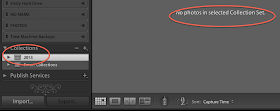
In the "Create Collection Set" box, type in the appropriate year. Since I'm current, I named my collection set "2013." Make sure "Top level" is selected and click "Create".


As you can see, I have now created a collection set for the year 2013. 


Now I am going to show you how to create a collection.  The collection  in this system represents the week your pictures were taken.  

STEP 2: 

Click Library > New Collection


In the "Create Collection" box, type in the appropriate week.  As you can see I am starting with week 28.  Click "Inside a Collection Set" and choose the appropriate year from the drop down menu. As time goes on there will be more than one collection set to chose from here.  Remember a collection set in this system represents the year.  Click Create. 


You now have a collection (the week, WEEK 28) inside of the collection set (the year, 2013).


STEP 3:  

Now we need to figure out what photos were taken during that week, in my case "Week 28".  From the Catalog menu on the far left, click on All Photographs > Metadata.  This will bring up ALL of the information that you will need to sort your pictures.  


From the metadata tab I'm going to to click on 2013 > July which will drop down all of the photos taken in July sorted by date. I start my weeks on Mondays and end on Sundays, so for me "Week 28" was July 8th - 14th.  While holding down the "command" key on my keyboard I'm going to select the  dates 9,10,11,12,13, and 14 (I didn't take pictures on the 8th which is why it is excluded).  All of the photos taken on these days during week 28 are now all grouped together! 


STEP 4:  

The final part of this process is going to be to move the pictures into the "Week 28" collection.  The easiest way to do this is to click the first picture in the set and while holding the shift key down, click the last picture in the set.  This will select all of the pictures.  FInally, drag all of the selected pictures into the appropriate week.  Make sure you are dragging from the actual center of the picture.  The pictures will not drag if you drag from a corner. 


And that's it!  Each week as you move forward or backwards, just create a new collection for the week or a new collection set for a new year as needed! I really hope this was helpful and not at all confusing. Feel free to comment or e-mail with any questions! 

Special thanks to Elisabeth Lind from the Project Life 2013 Facebook (support) Group who suggested this system and helped walk me through the process! Elisabeth is a professional photographer and has many years of experience using Lightroom.  Her website is elisabethjoyphotography.com

How to Rename a Catalog in Lightroom 4


I wanted to rename a Lightroom Catalog that already had photos in it to "2013." While there is no way to do this within the Lightroom program, thankfully there is a super easy work around! 

STEP 1: Locate your Lightroom 4 catalog files.  

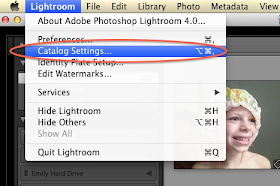
  • For Mac, go to Lightroom > Catalog Settings > General. The top item is the location of the catalog. You can hit the “Show” button to take you there in finder.
  • For Windows, go to Edit > Catalog Settings > General. Click “Show” to open in Explorer


STEP 2:  Shut down Lightroom

STEP 3: Rename the file that ends with ".lrcat" and the file that ends with ".lrdata" by changing them to the same name. Just make sure that with the .lrdata file you add a space and then "previews" before the extension file. For example: 


My files went from: 

Lightroom 4 Previews.lrdata and Lighroom 4 Catalog.lrcat
to
2013 Previews.lrdata and 2013.lrcat

Make sure that you keep the space


STEP 4: Relaunch Lightroom and open your renamed catalog.  


Ta-da!!